Explorer
Home Screen
Description
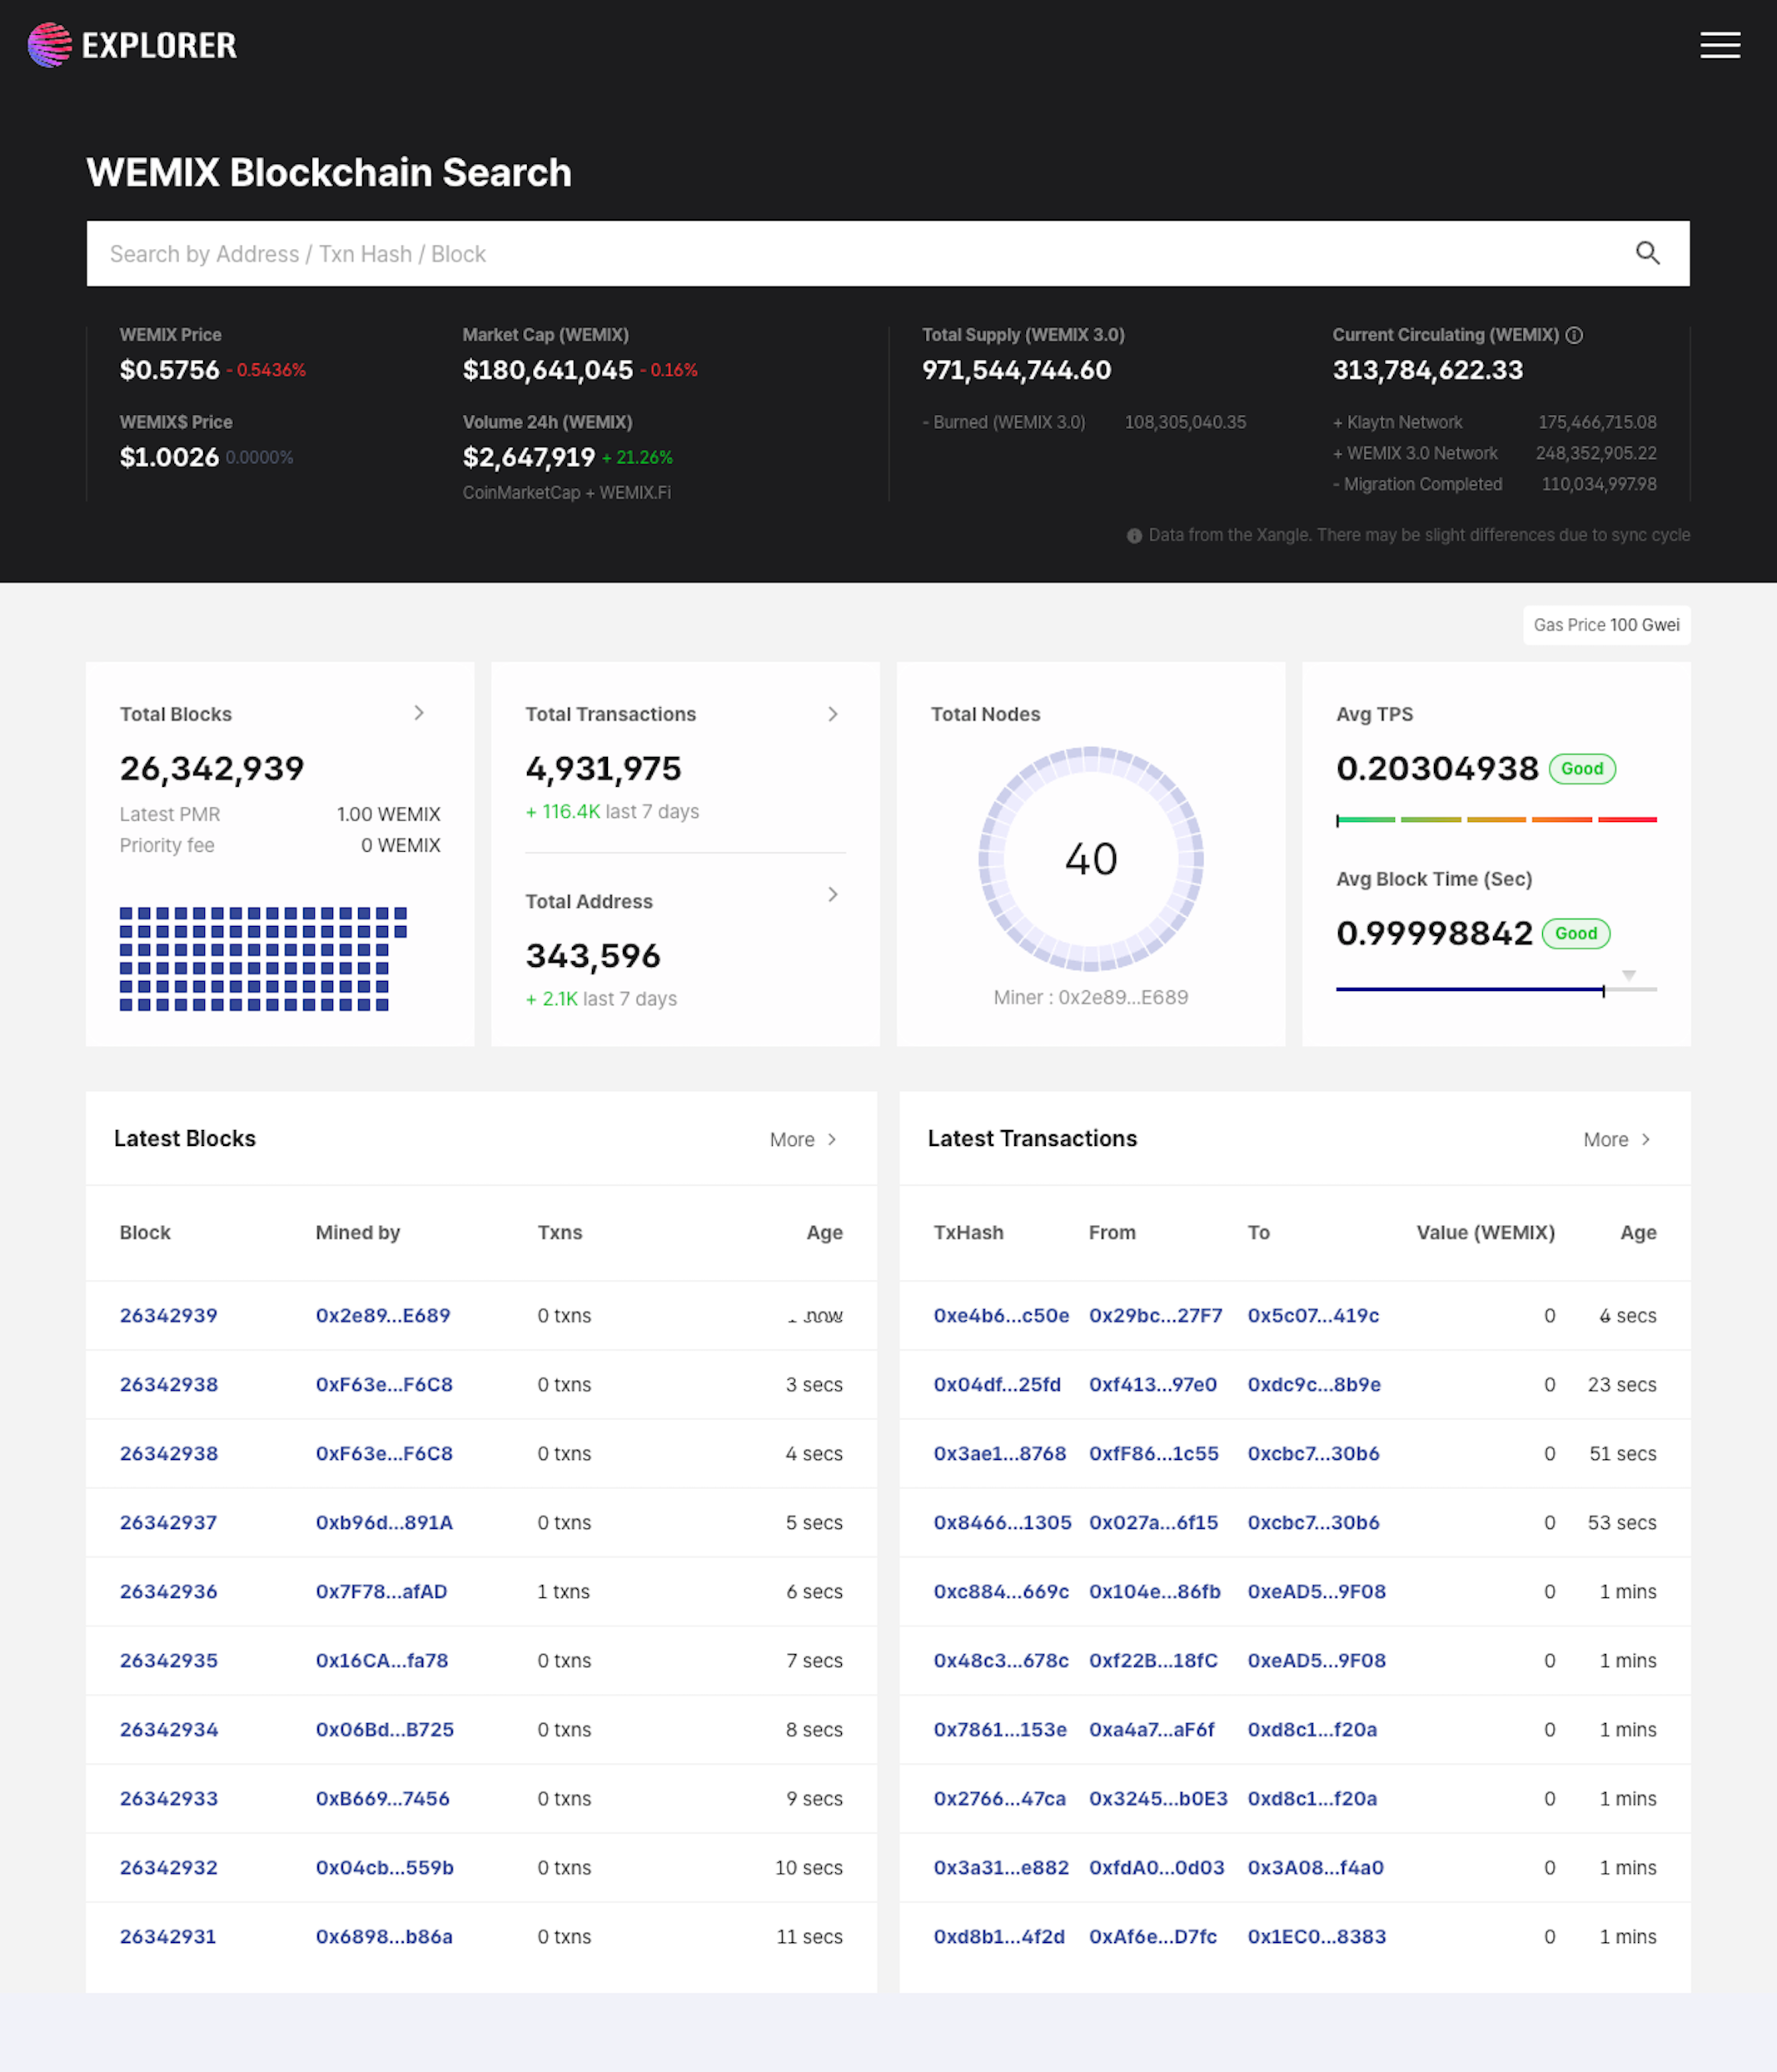
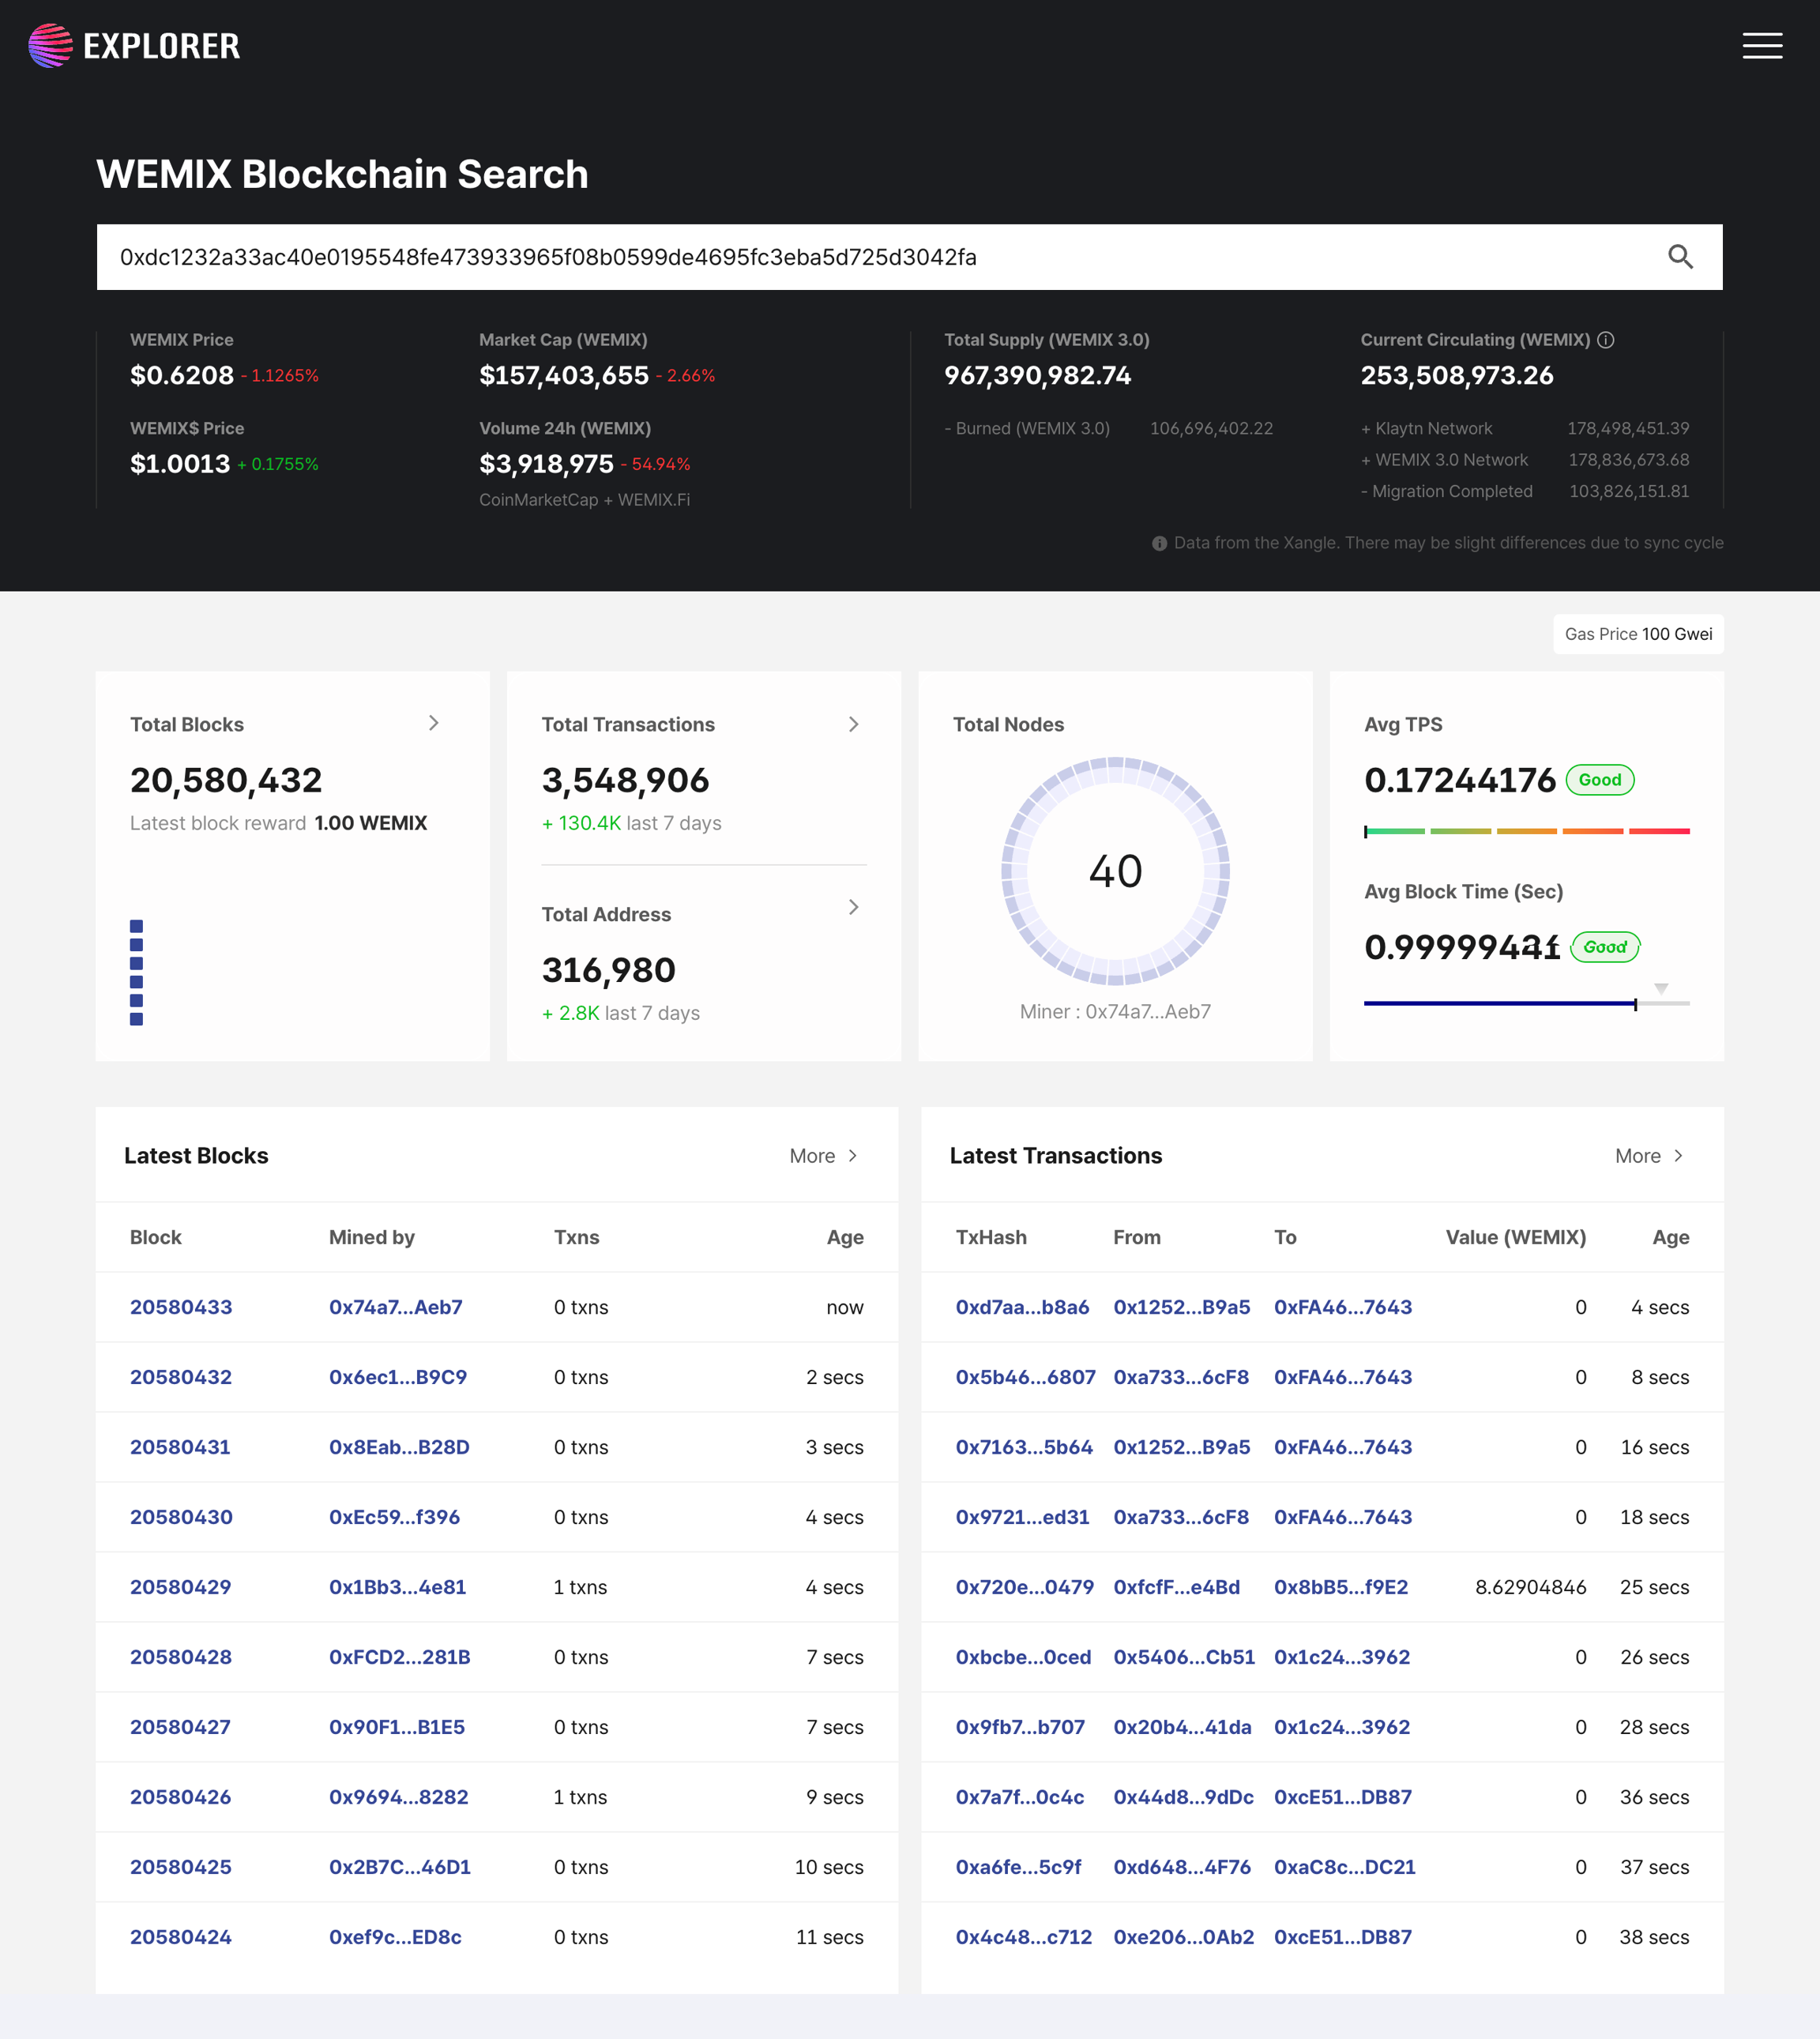
This is the main screen of WEMIX Explorer. You can check block, transaction, node operation, WEMIX price information, etc.
How to access
STEP 1: Open WEMIX Explorer.
STEP 2: The WEMIX Explorer Dashboard is displayed on the home page.
How to use
The main screen contains information about the height of the block, the total number of transactions, the number of wallet creations, the node operation status, transaction details, average TPS, average block creation time, and WEMIX price.
WEMIX Price: Current WEMIX Price
WEMIX$ Price: Current WEMIX$ Price
Market Cap(WEMIX) : Total Market value of a WEMIX’s circulating supply
Volume 24h(WEMIX) : WEMIX 24hour volume(CoinMarketCap+WEMIXFi)
Total Supply(WEMIX3.0): WEMIX Total Supply
Current Circulating(WEMIX): WEMIX Current Circulating
Total Blocks: Block height
Total Transactions: Total number of transactions
Total Address: Total number of wallet address
Total Nodes: The state of 40 nodes generating blocks
Gas Price: Current gas price
Avg TPS: Average TPS
Avg Block Time: Average block creation time
Latest Blocks: Recent blocks
Latest Transactions: Recent transactions
Lookup for block
Description
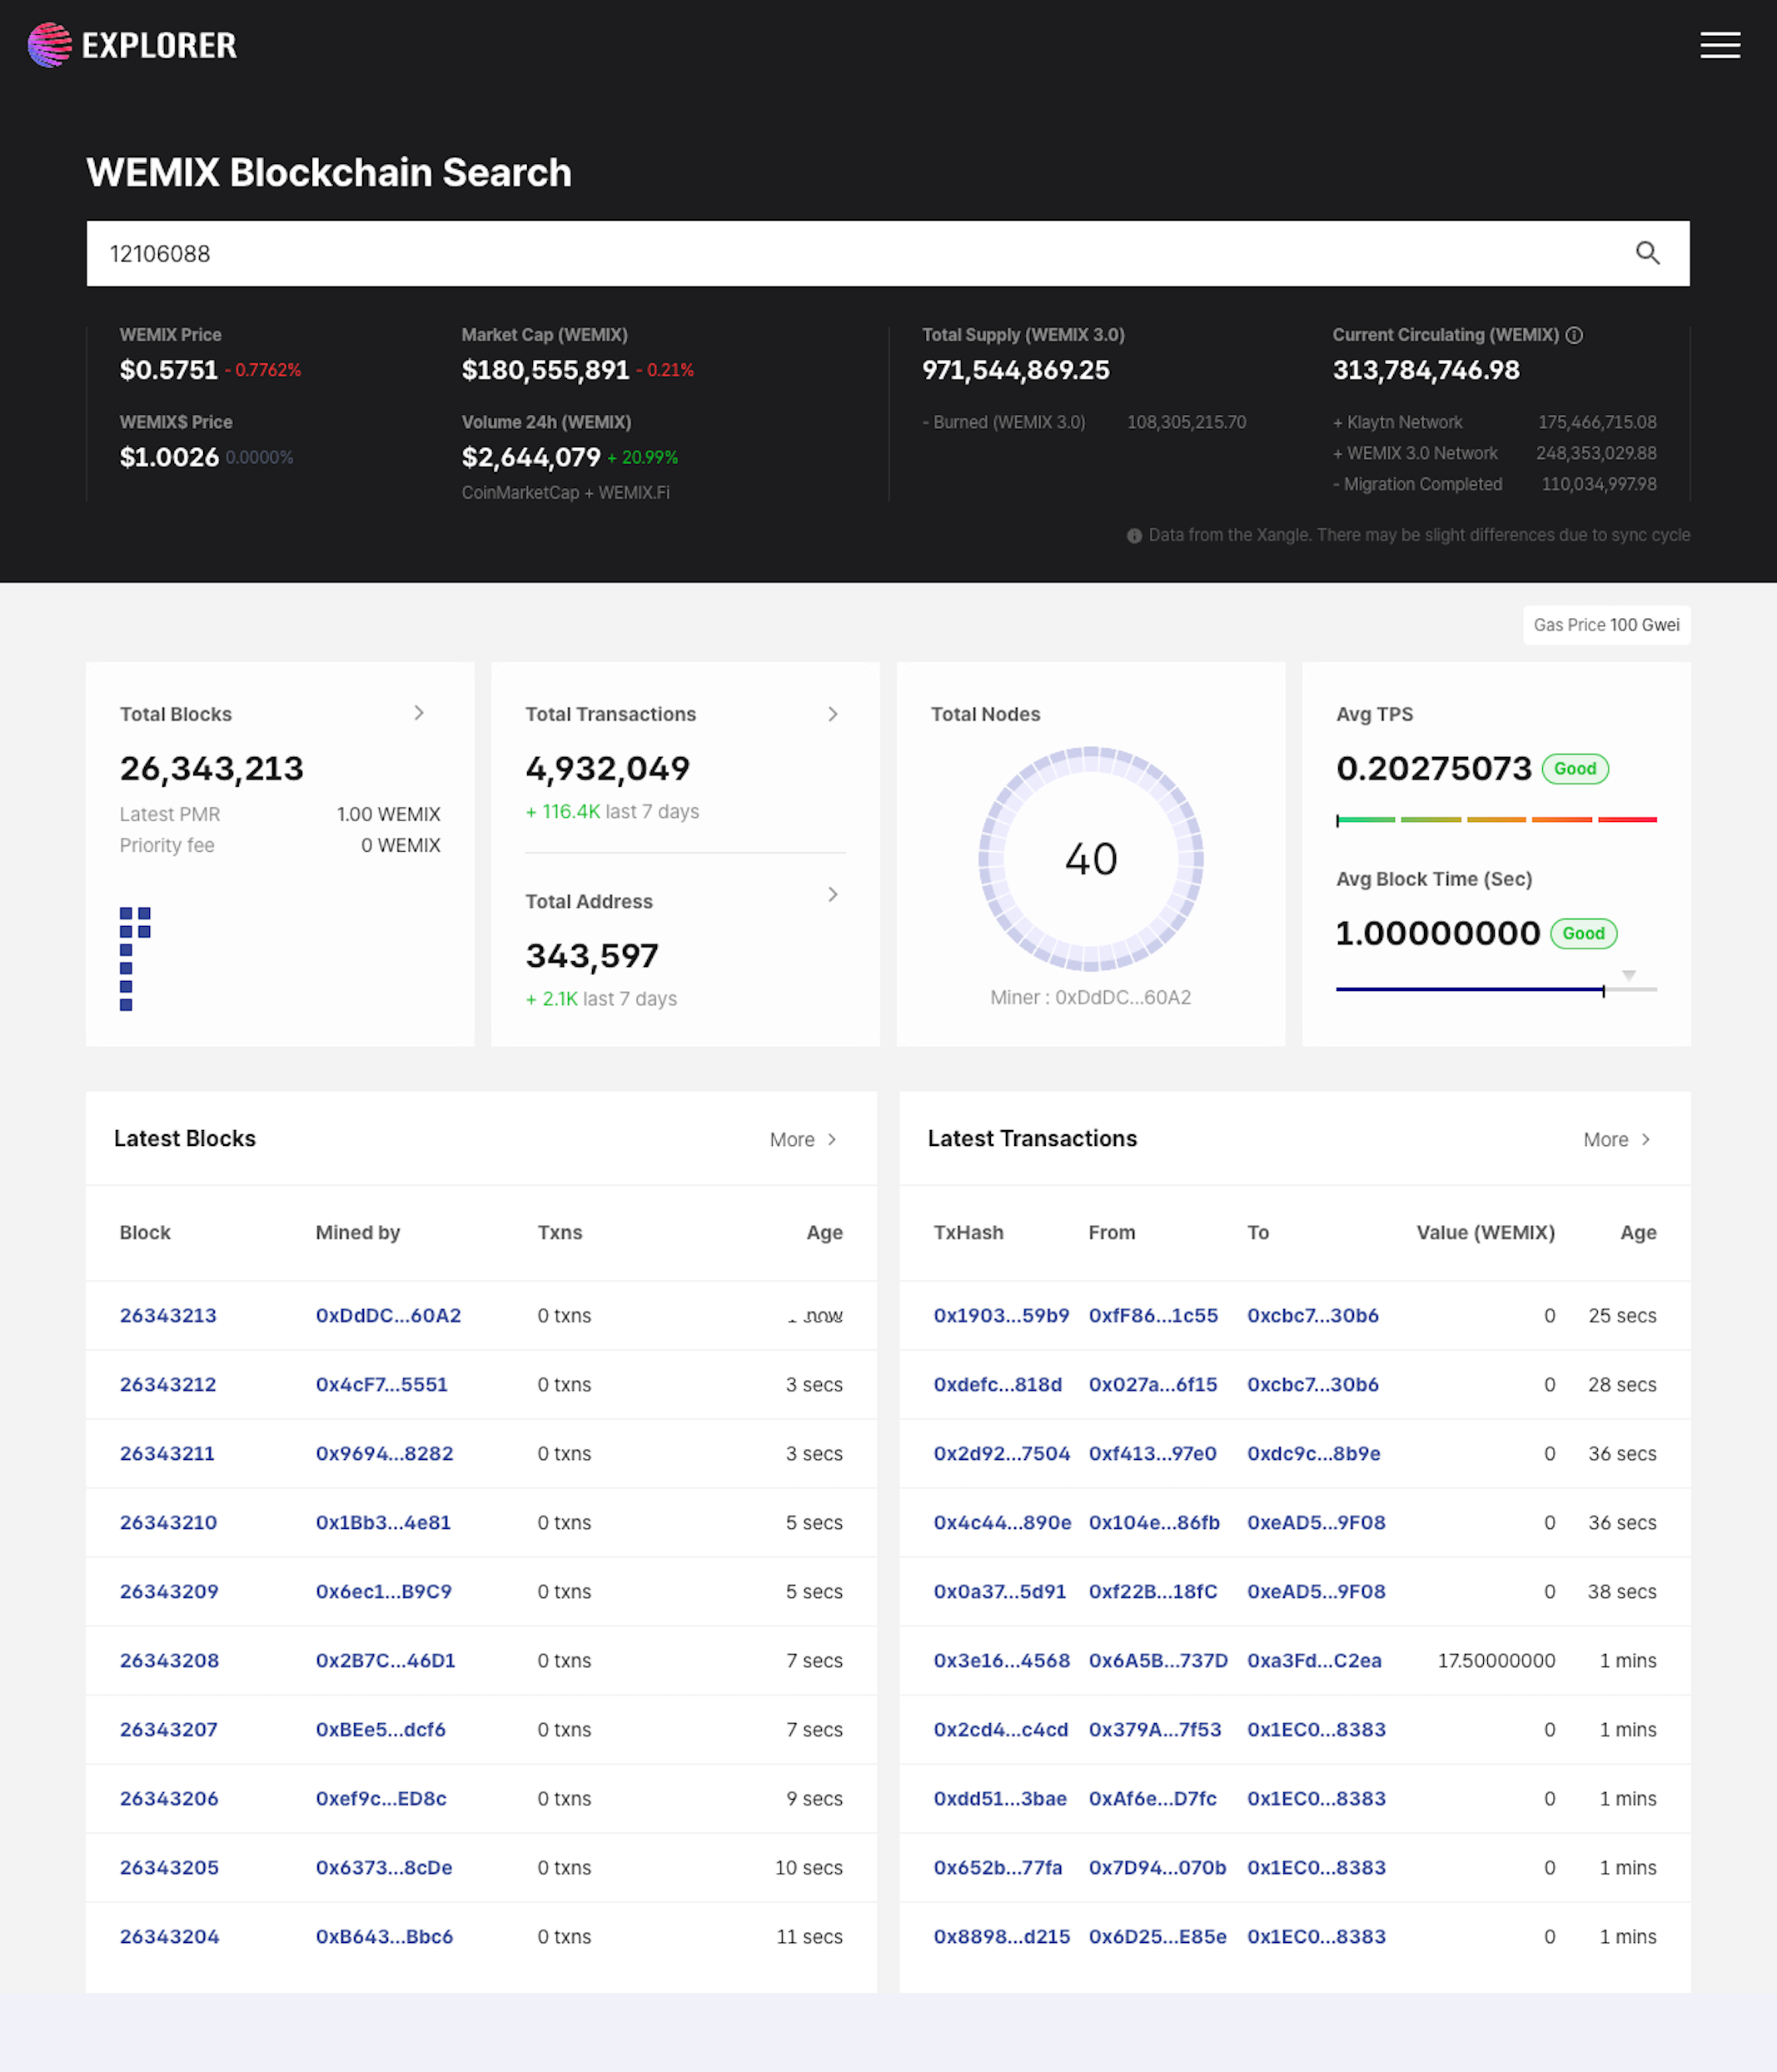
This feature allows user to search for block by block's height.
How to access
STEP 1: Open WEMIX Explorer.
STEP 2: Search block information using the search engine at the top left corner.
How to use
STEP 1: Copy height of block.
STEP 2: Paste height of block to the search box.
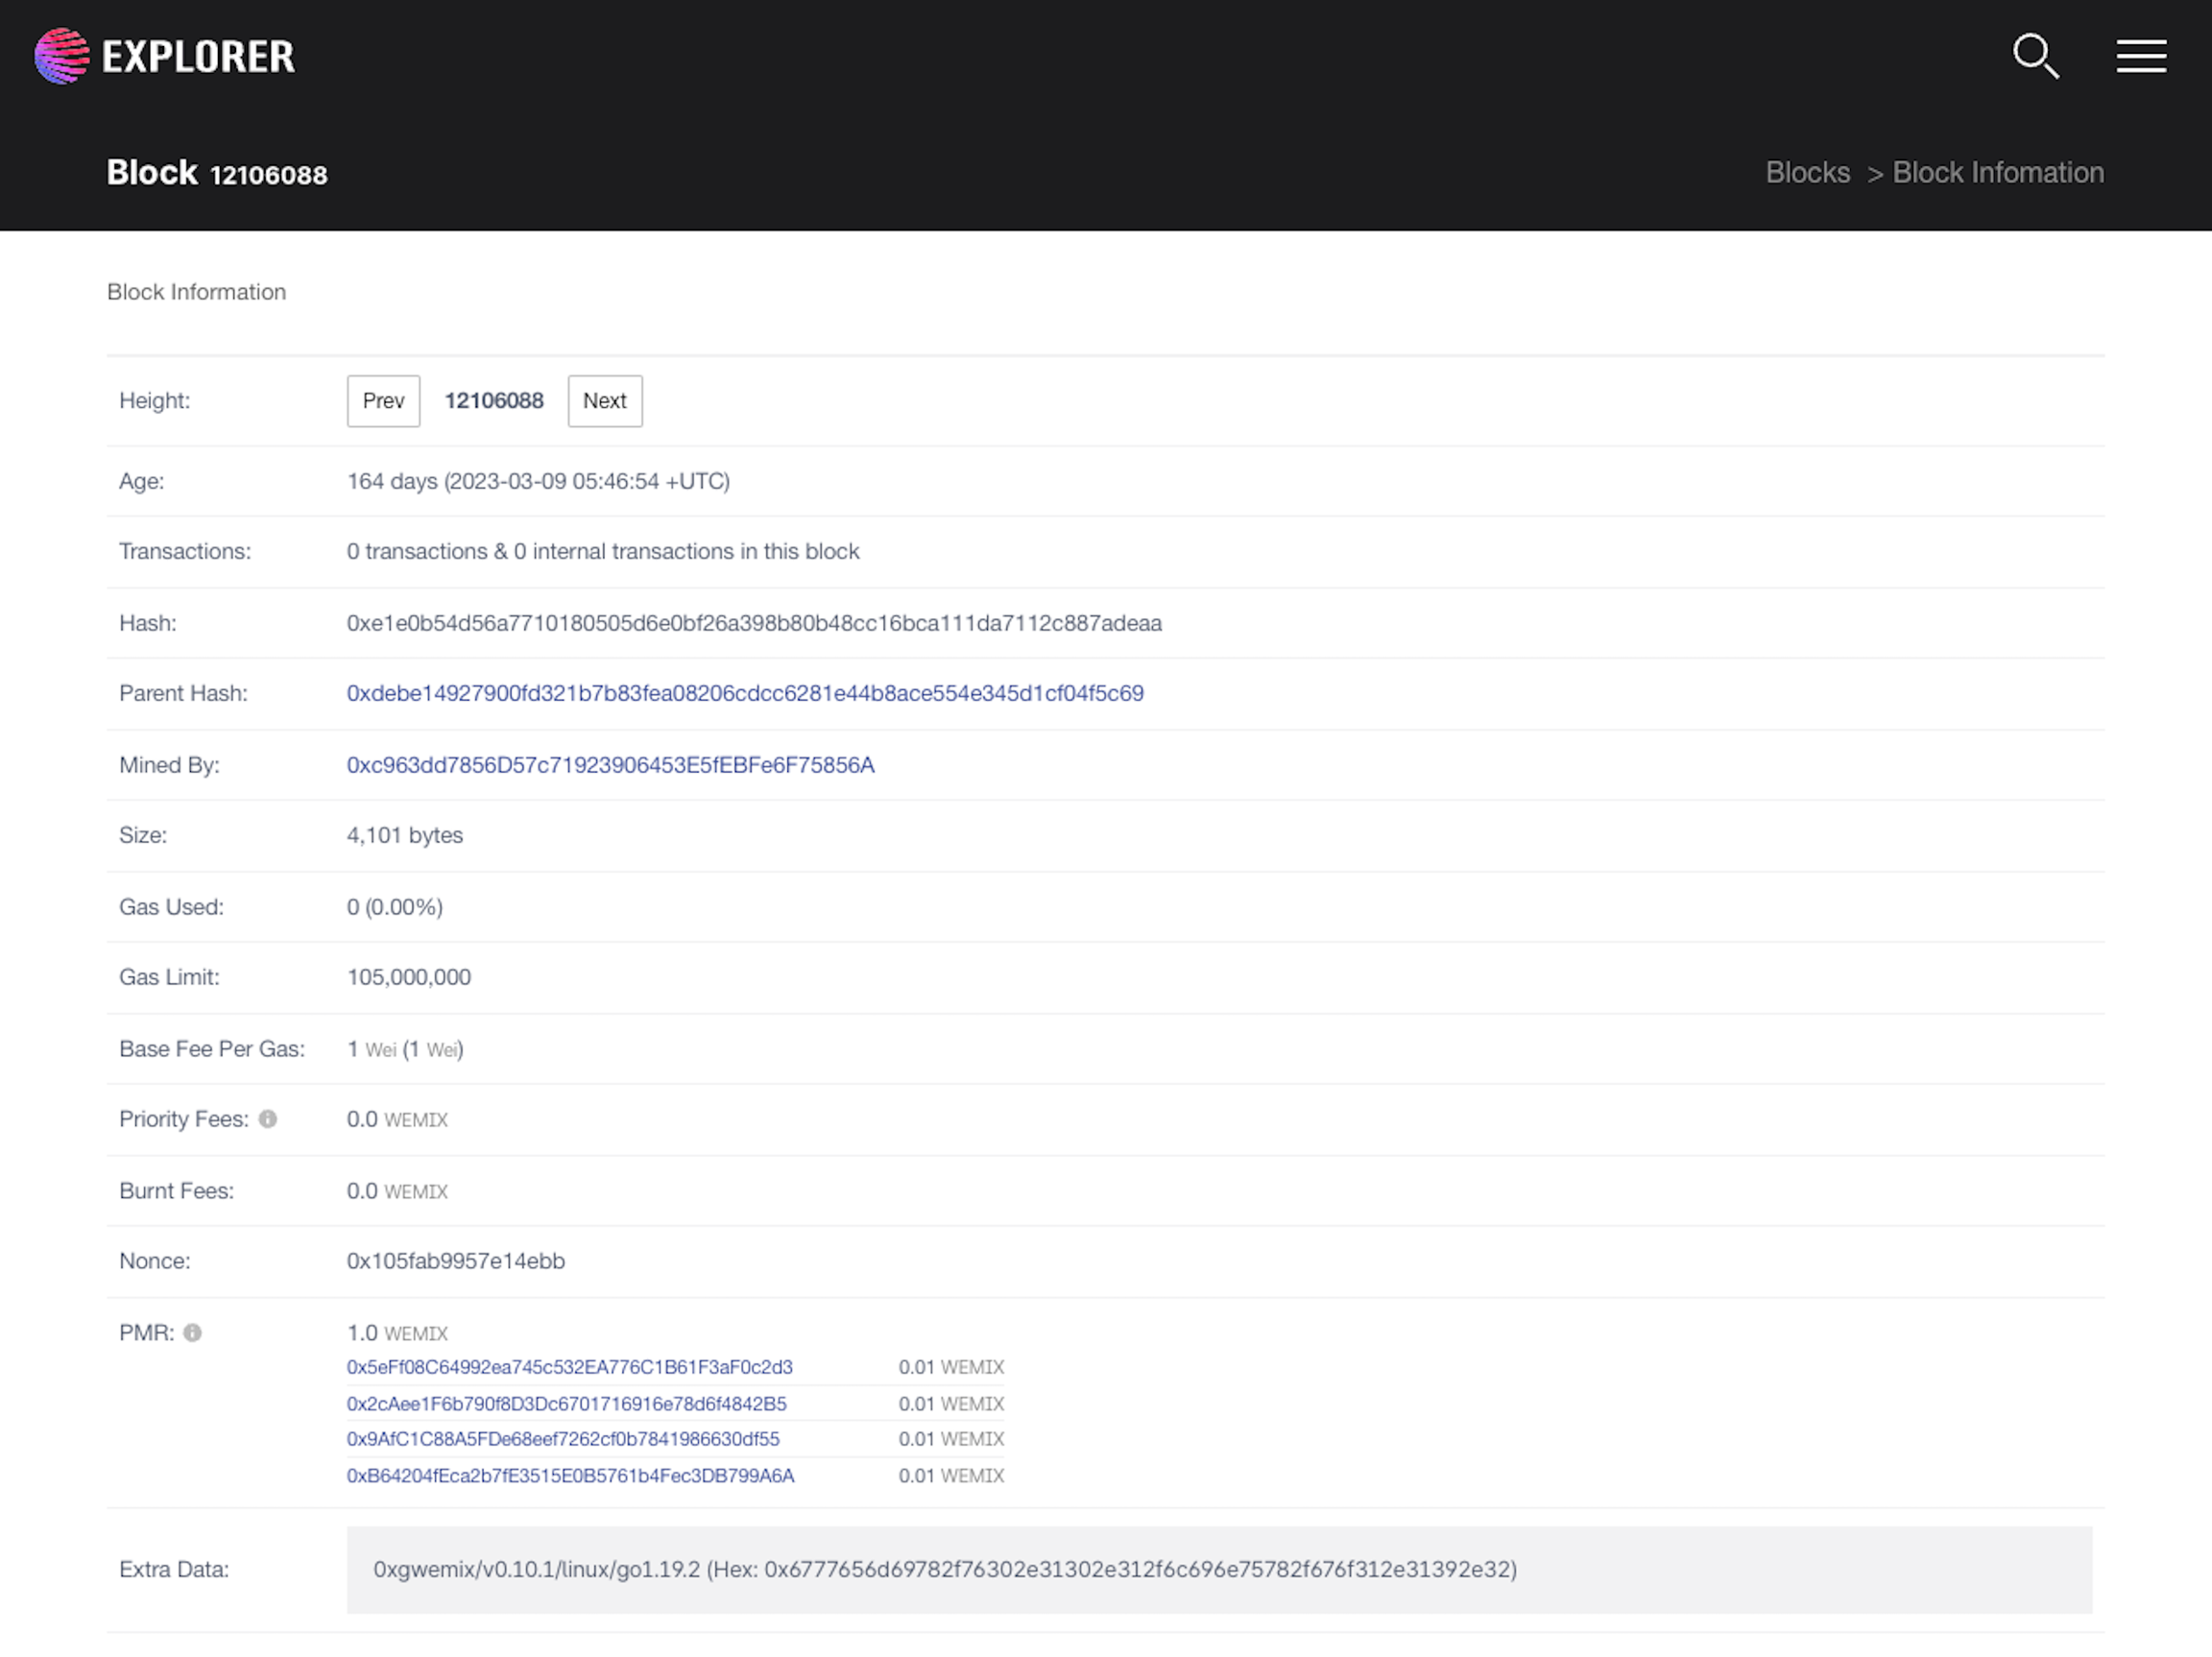
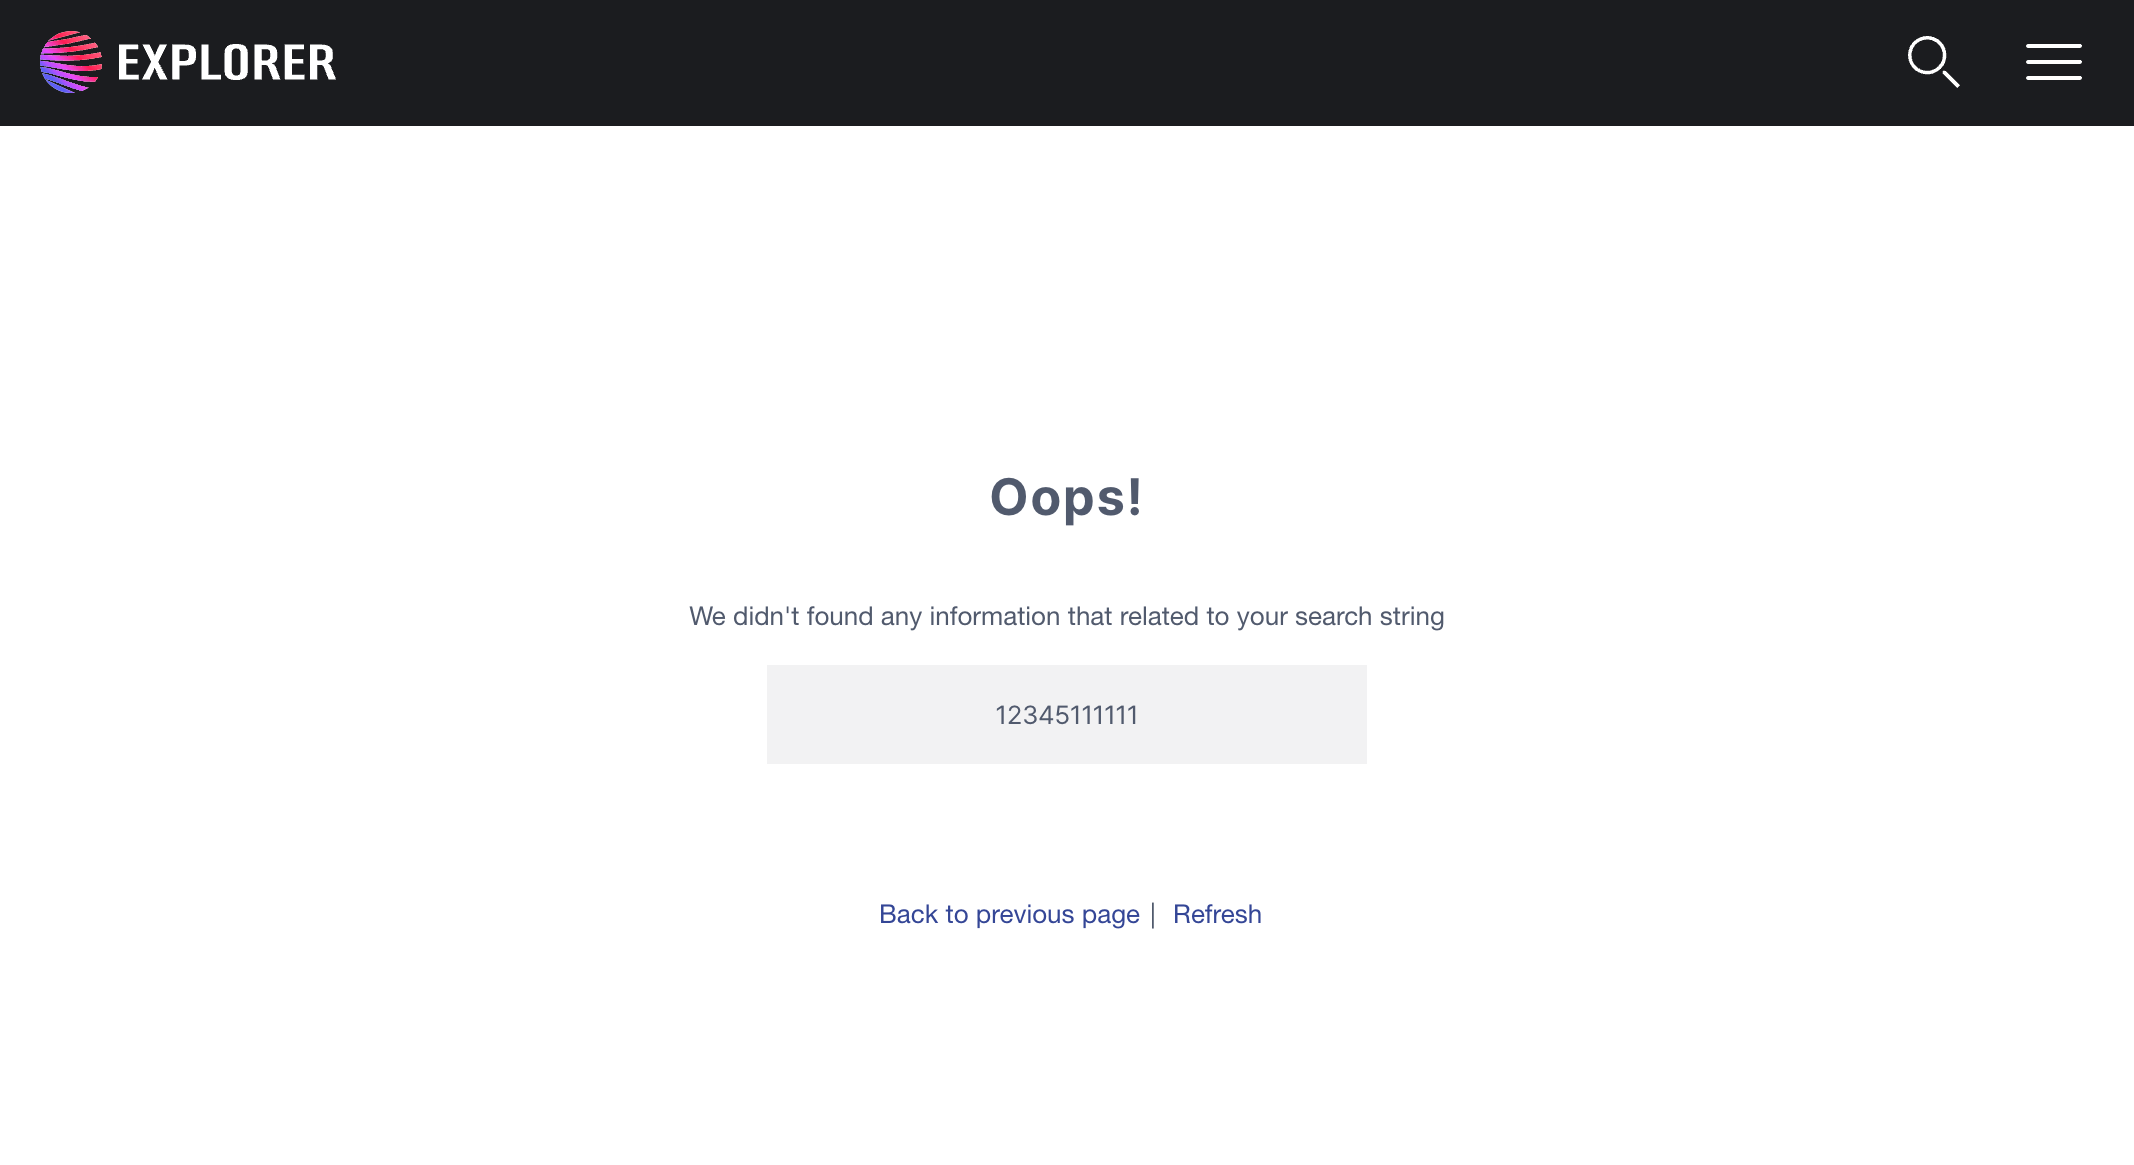
STEP 3: Web UI will redirect to the search result page.
View blocks
Description
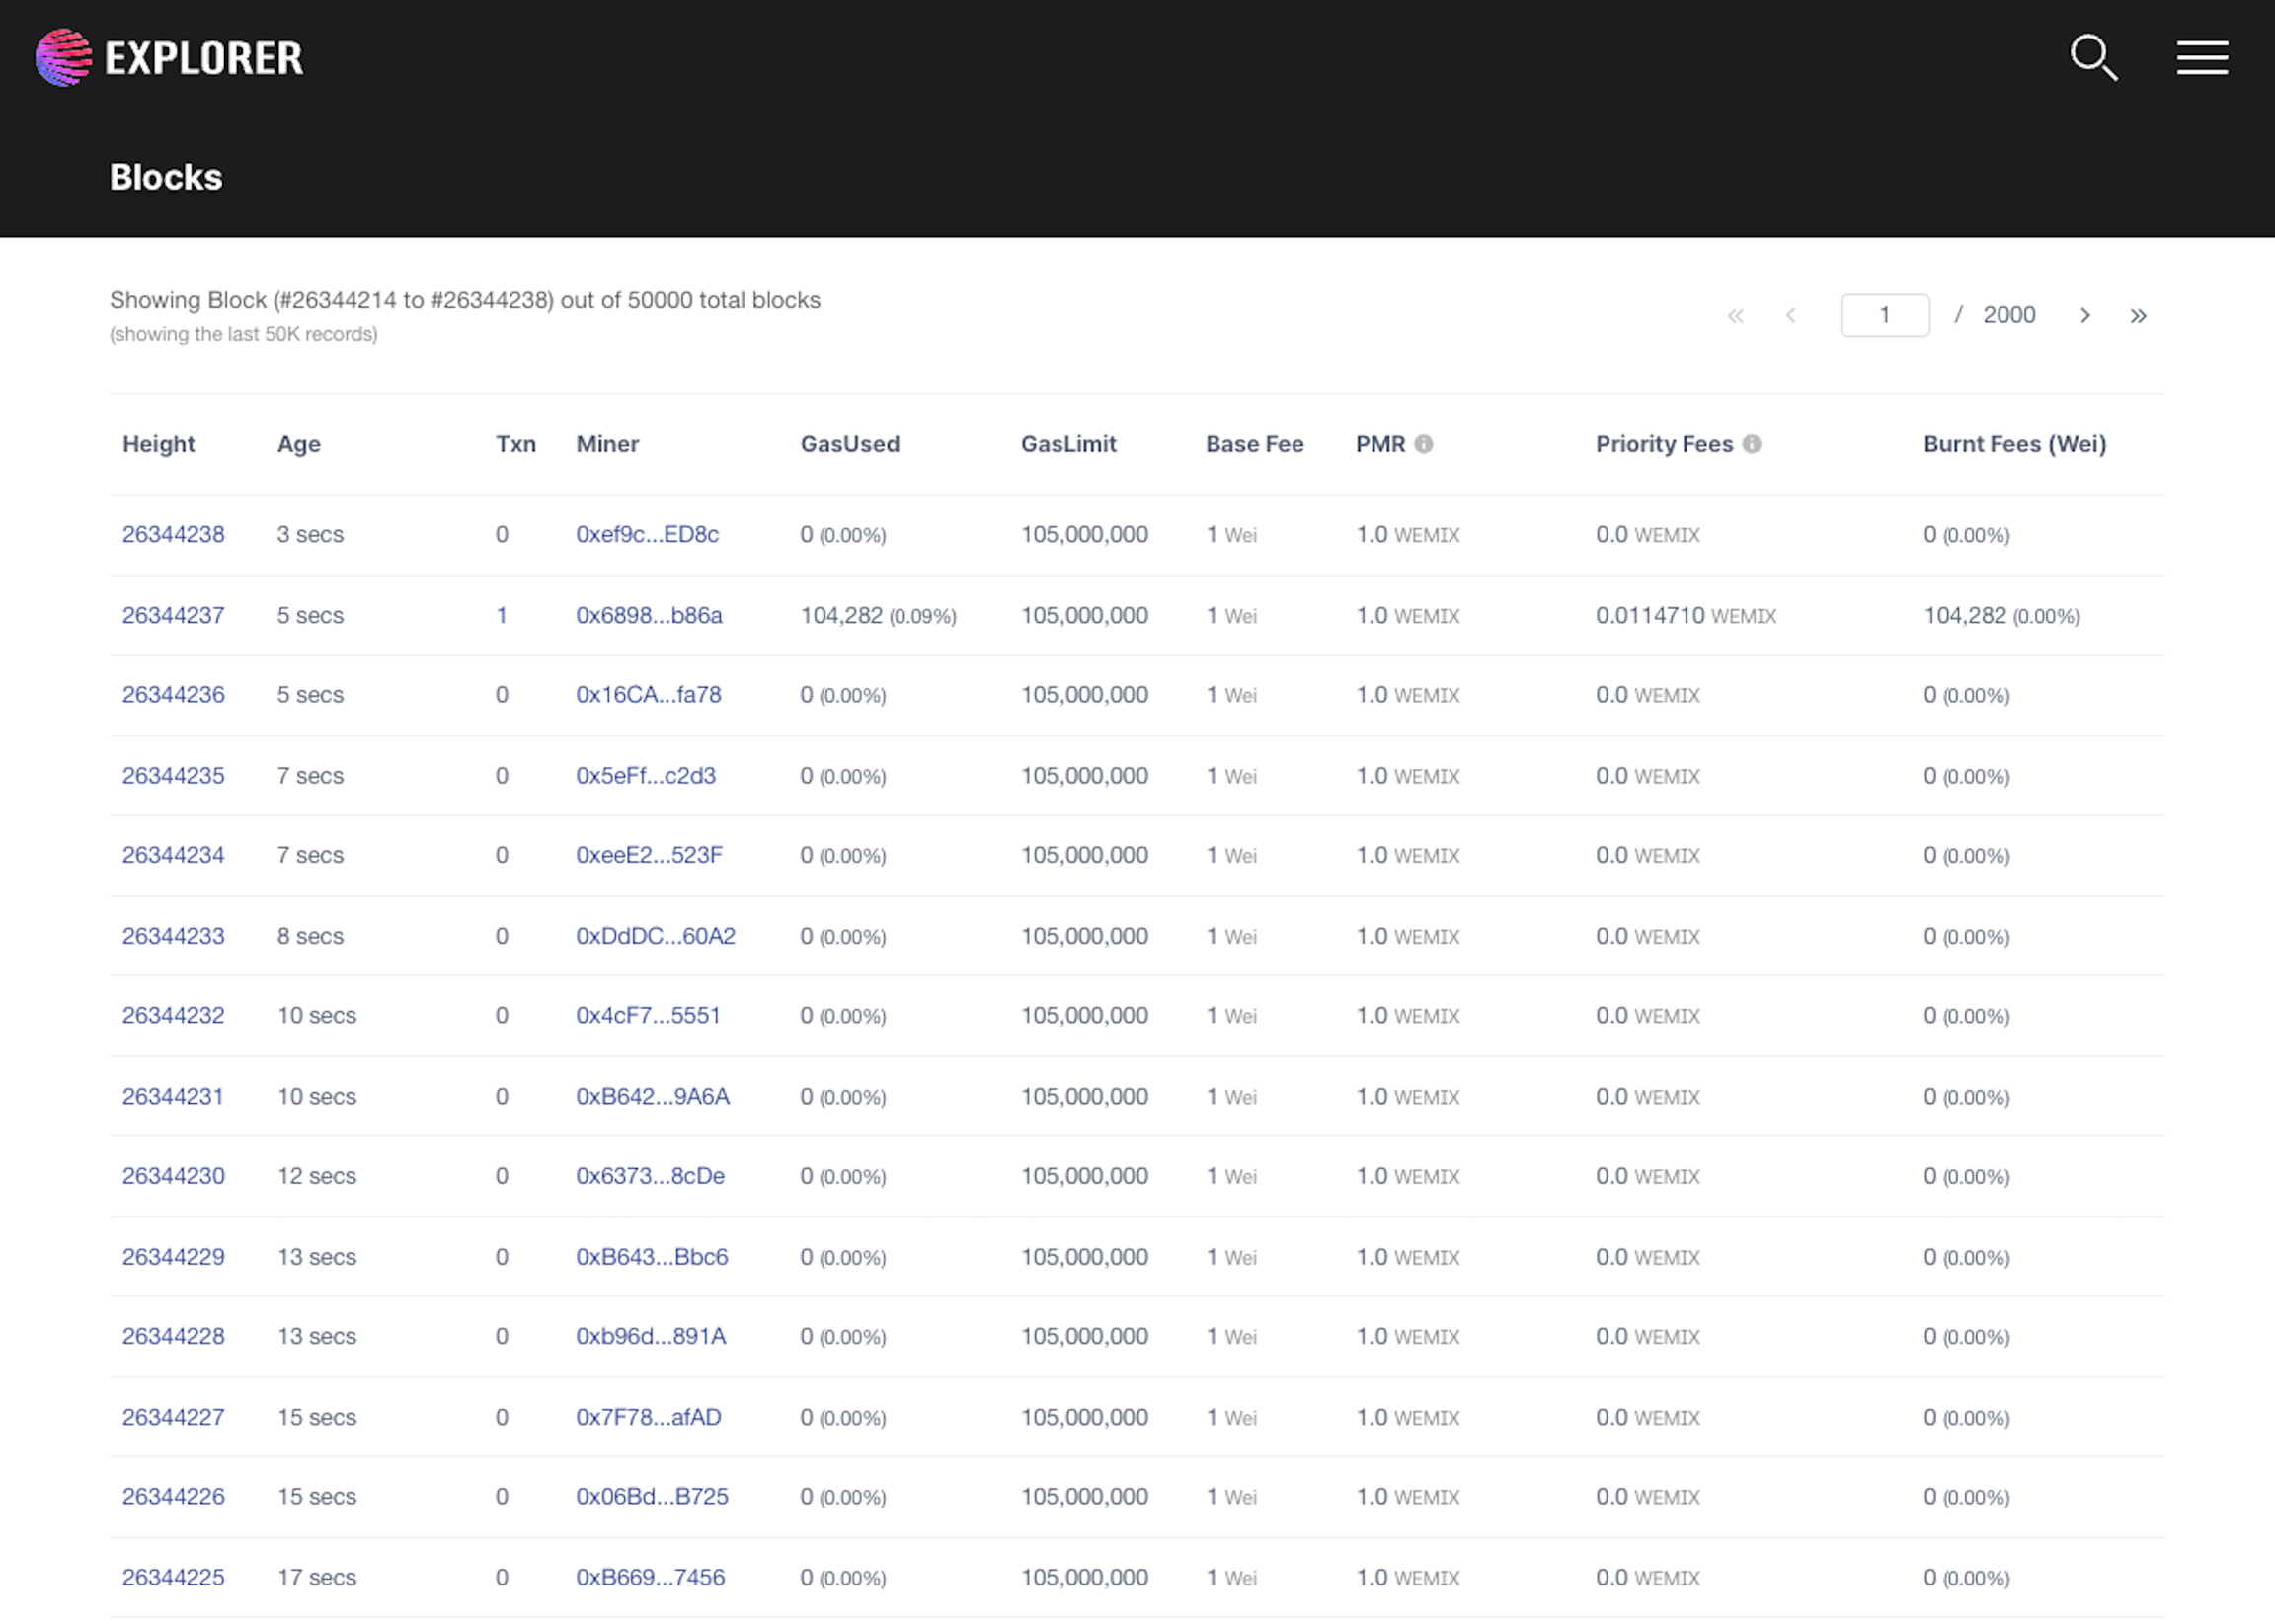
This feature allows users to view all blocks with matching URL.
How to access
STEP 1: Open WEMIX Explorer.
STEP 2: Click on Blocks in the Web UI navigation.
STEP 3: Web UI will redirect to Blocks.
How to use
This web UI shows a table of blocks on WEMIX sorted by time. At the top of the table, a title shows the selected block's height and the total blocks matching the URL filter. The table shows 25 records by default. Each record is a WEMIX block. This table has nine columns:
Height: The position of this block in WEMIX Blockchain.
Age: The time when the block was introduced.
Txn: The number of transactions in this block.
Miner: The address of miner that completed mining process and introduce this block.
GasUsed: Total amount of Gas that used for mining this block.
GasLimit: Total amount of Gas that provided for mining this block.
Base Fee: Block's base fee.
PMR: PMR(Permanent Minting Reward) is WEMIX, newly minted as a reward for every block.
Priority Fees: Priority fees are charges that determine the priority of transaction processing.
Burnt Fees: Total amount of fees burned in the block.
Block details
Description
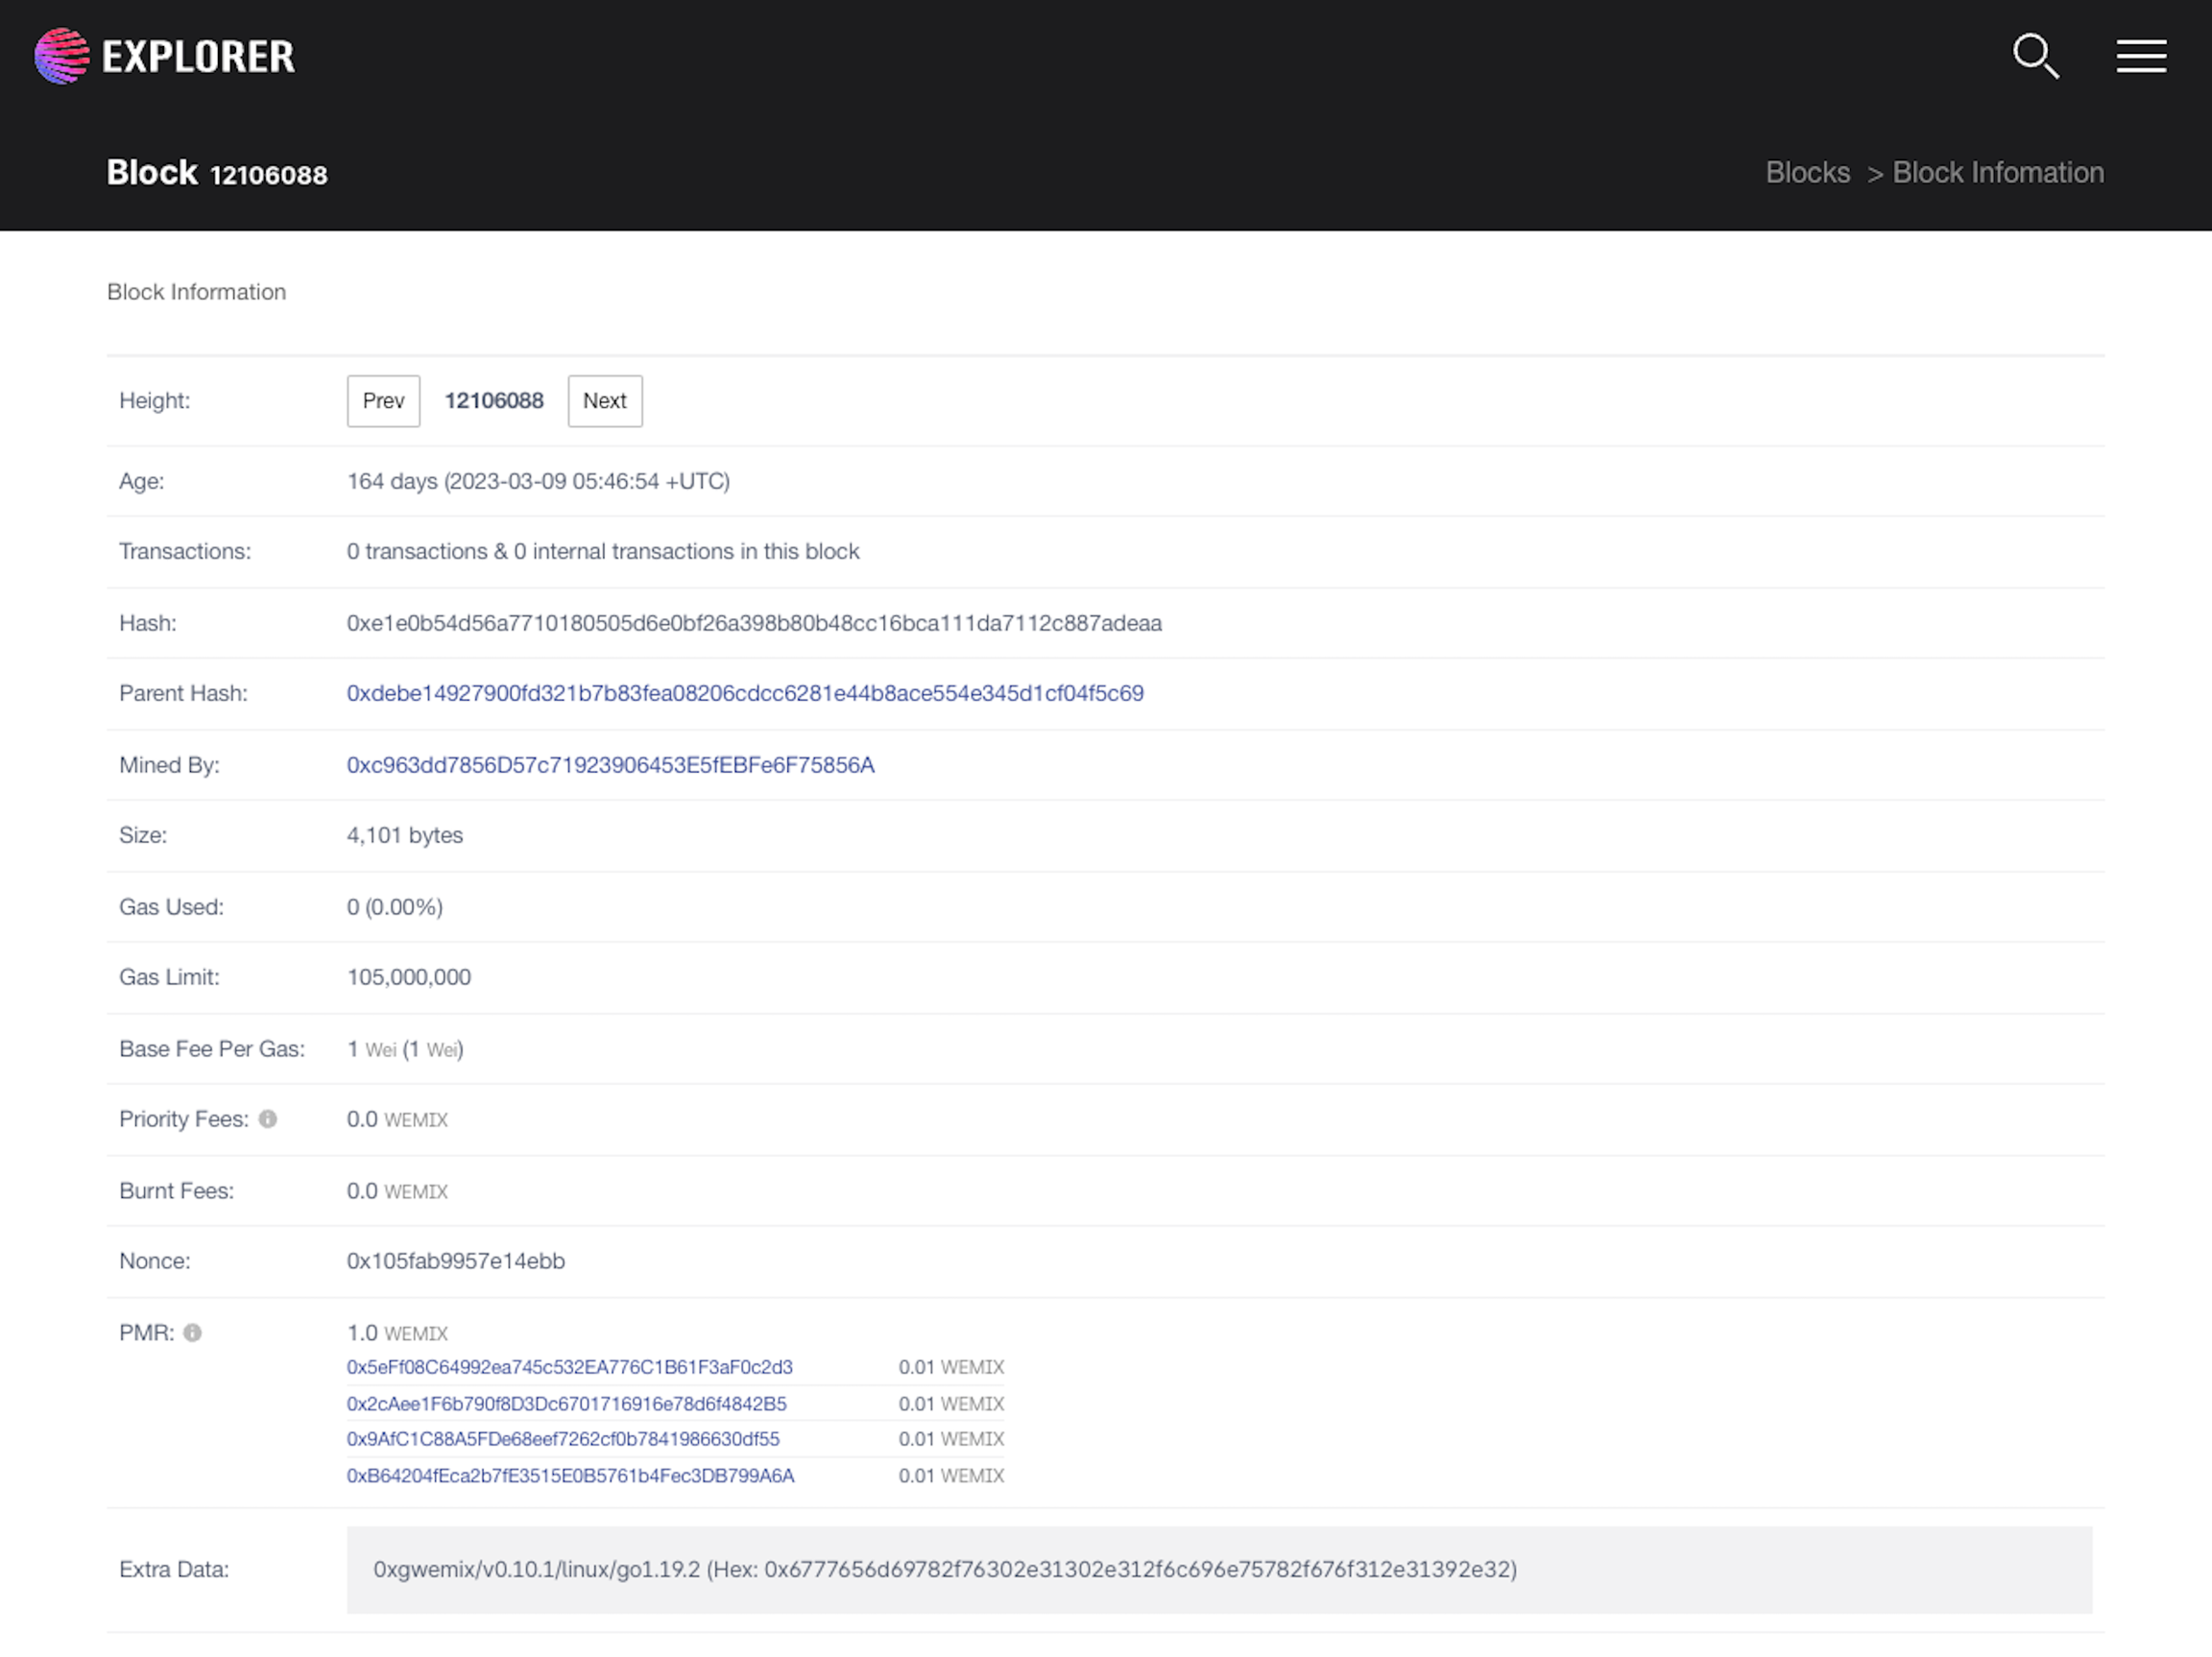
This feature allows users to view the details of the block.
How to access
STEP 1: Open WEMIX Explorer.
STEP 2: Click on Blocks in the Web UI navigation.
STEP 3: Web UI will redirect to Blocks.
STEP 4: Click on {block's height}.
STEP 5: Web UI will redirect to the Block details.
How to use
This Web UI shows information of blocks with matching URL id param. Each block contains 14 fields:
Height: The position of this block in WEMIX Blockchain.
Age: The time when this block was introduced.
Transactions: The number of transactions in this block.
Hash: The hash of this block.
Parent Hash: The hash of the previous block.
Mined By: The address of miner that completed mining process and introduce this block.
Size: The size of this block in data storage.
Gas Used: Total amount of Gas that used for mining this block.
Gas Limit: Total amount of Gas that provided for mining this block.
Base Fee Per Gas: Block's base fee.
Priority Fees: Priority fees are charges that determine the priority of transaction processing.
Burnt Fees: Total amount of fees burned in the block.
Nonce: This blocks's nonce.
PMR: PMR(Permanent Minting Reward) is WEMIX, newly minted as a reward for every block.
Block Reward: Amount of WEMIX reward for miner who introduces this block.
Extra Data: This blocks's extra data.
Lookup for transaction
Description
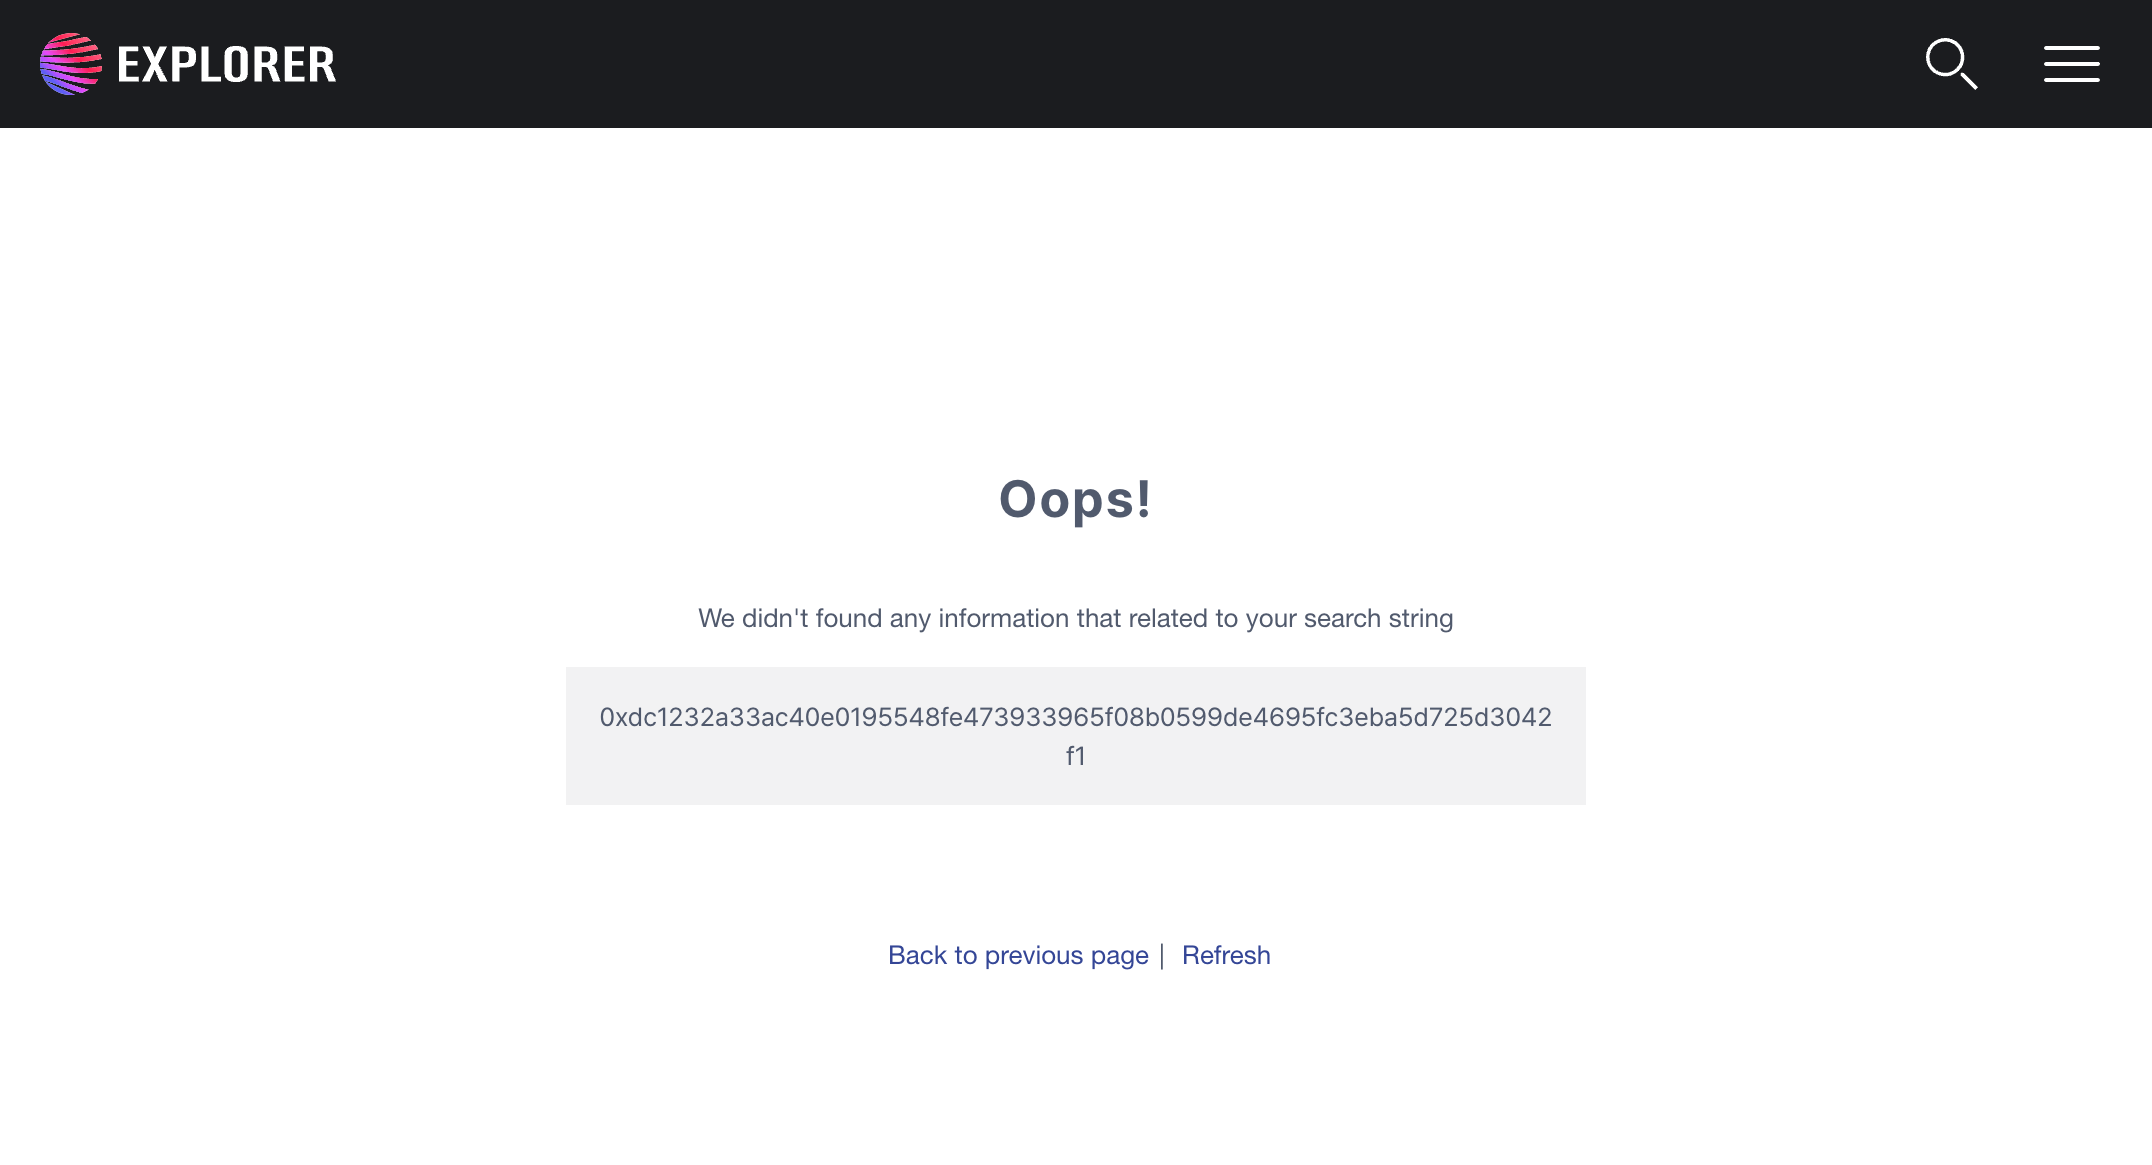
This feature allows users to search transactions by transaction hash.
How to access
STEP 1: Open WEMIX Explorer.
STEP 2: Search transaction information using the search engine at the top.
How to use
STEP 1: Copy your transaction.
STEP 2: Paste transaction to the search box.
STEP 3: Web UI will redirect to the search result page.
View transactions
Description
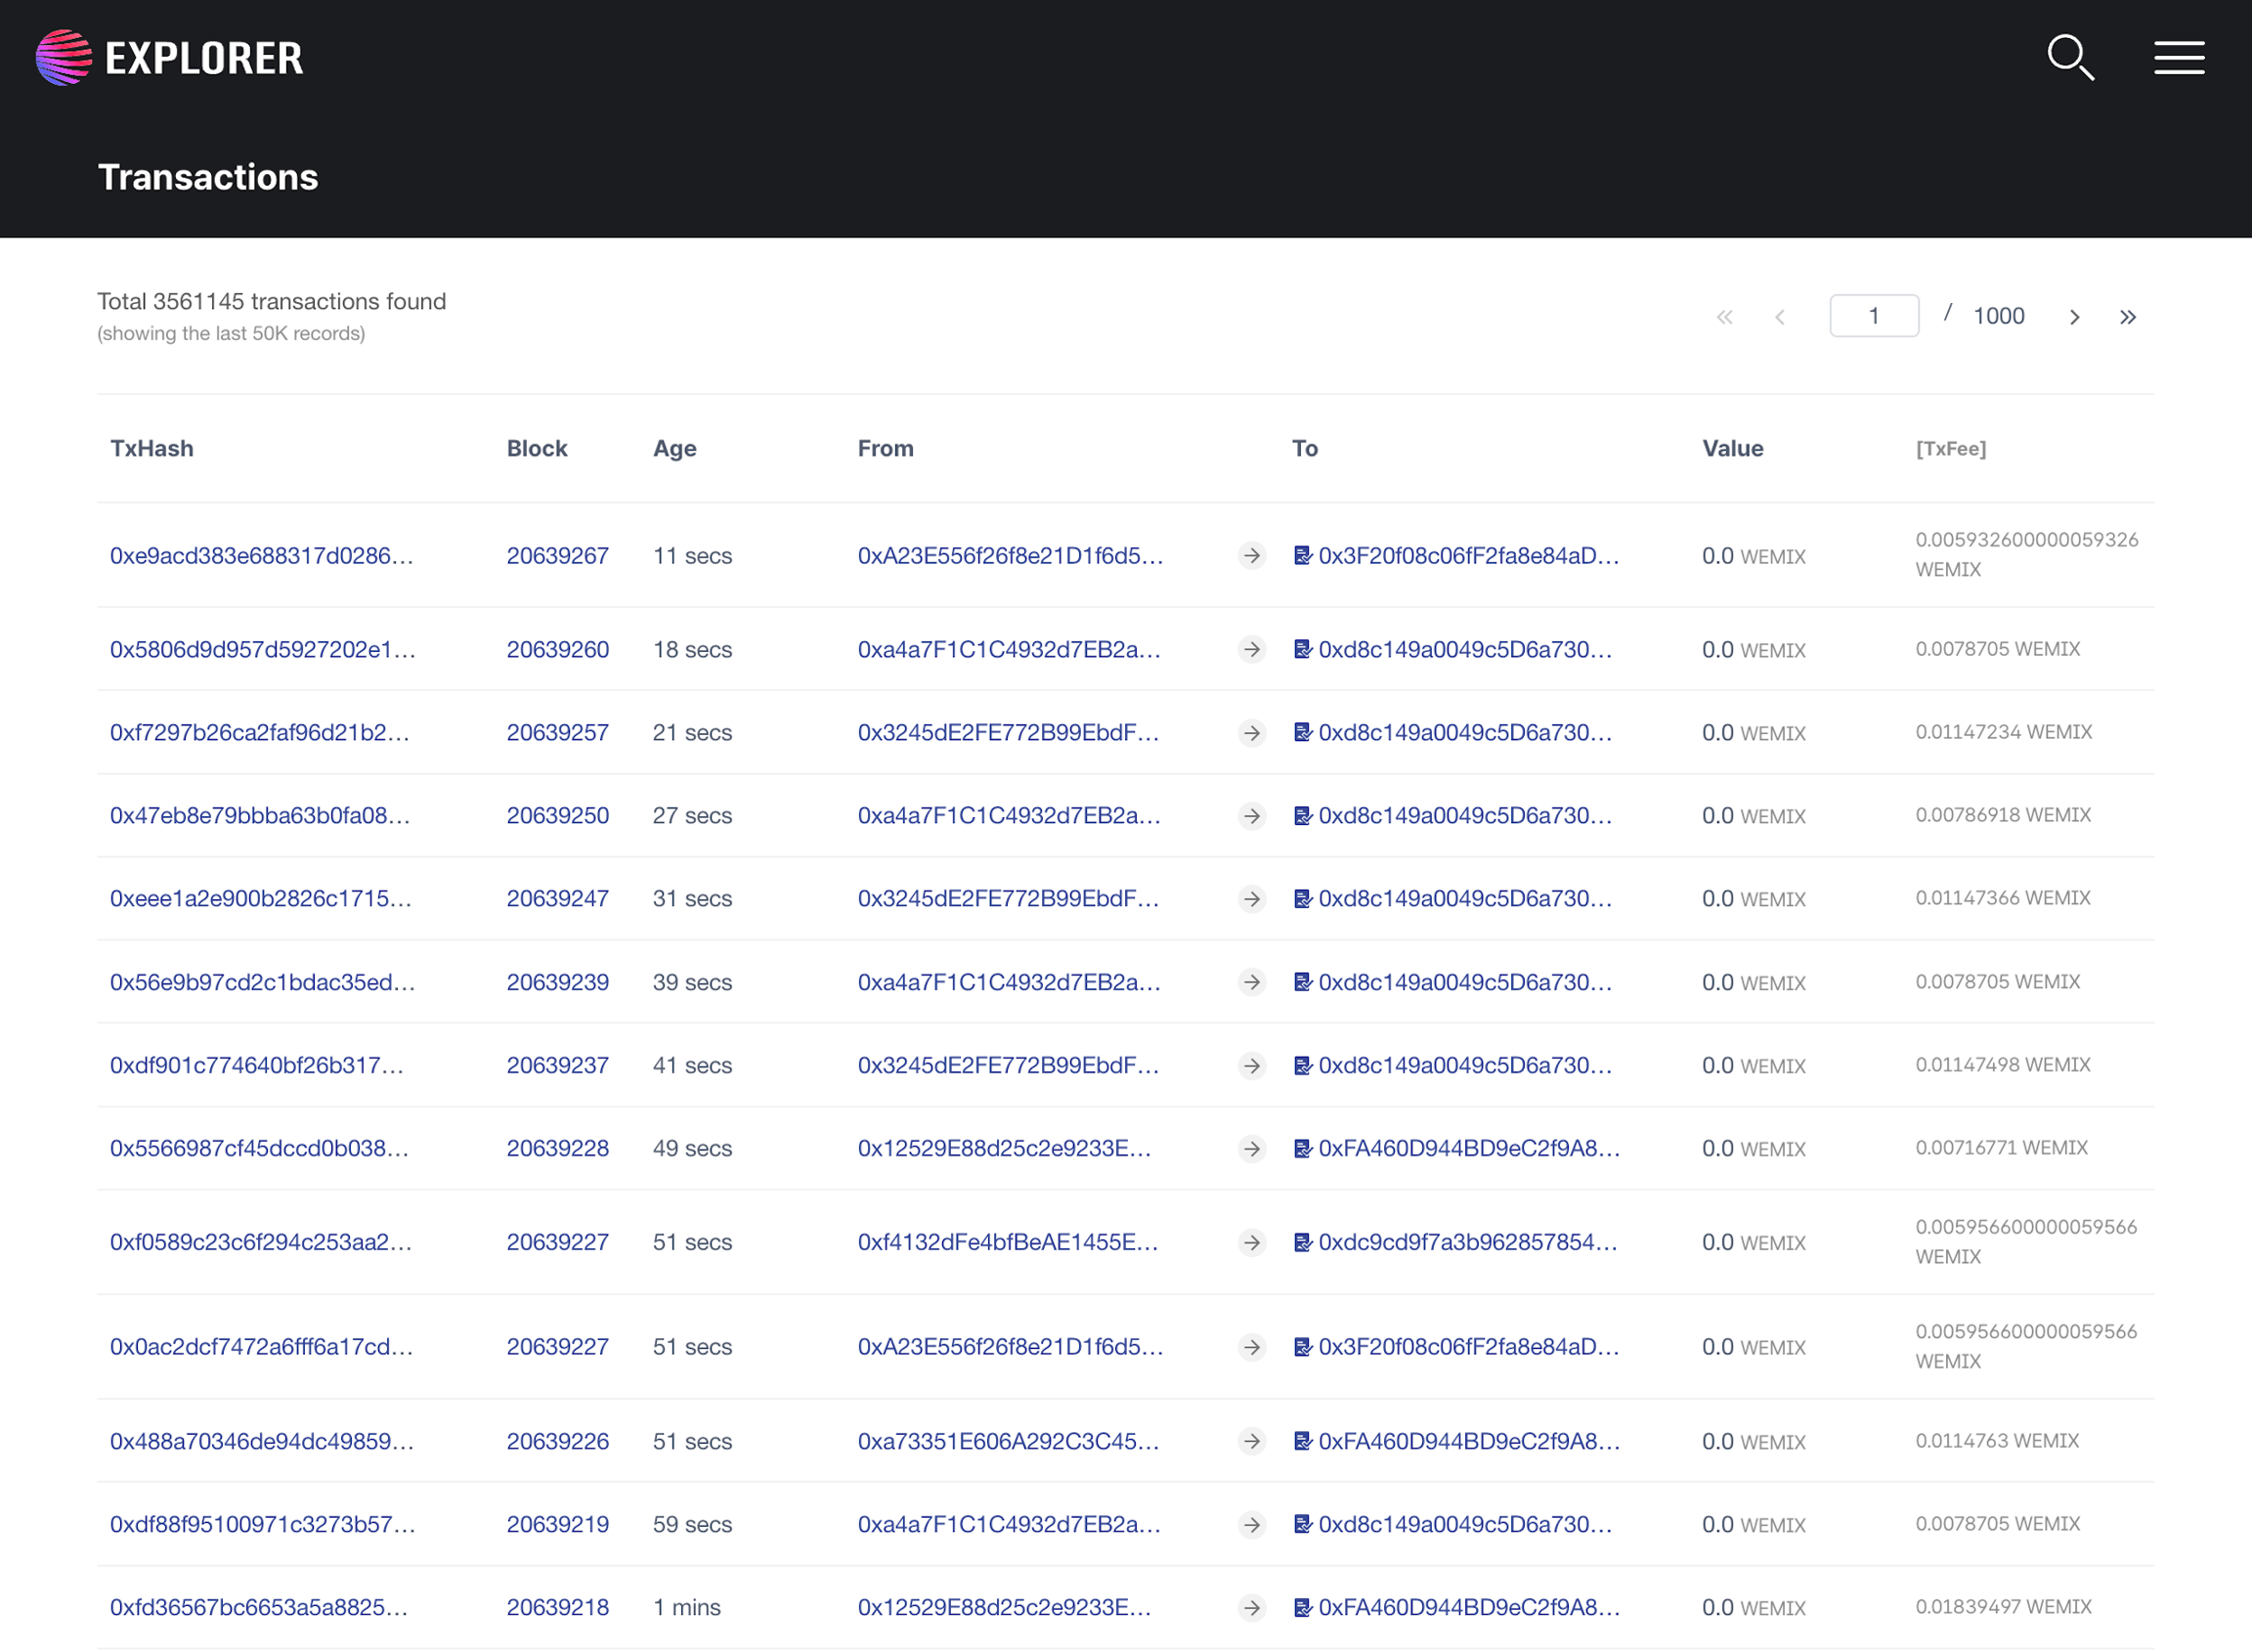
This feature allows users to view all transactions with matching URL.
How to access
STEP 1: Open WEMIX Explorer.
STEP 2: Click on Transactions and "View Txns" in the Web UI navigation.
STEP 3: Web UI will redirect to TRANSACTION page.
How to use
This Web UI shows a table of transactions on WEMIX transactions sorted by time. At the top of the table, a title shows the total transactions matching the URL filter. The table shows 50 records by default. Each record is a WEMIX transaction. This table has seven columns:
TxHash: This is transaction's hash.
Block: The height of block which this transaction belongs to.
Age: The time when this transaction was appeared on the WEMIX Network.
From: The address that performed this transaction.
To: The address that received this transaction's value.
Value: The value transfer in this transaction.
TxFee: Remittance fee
Transaction details
Description
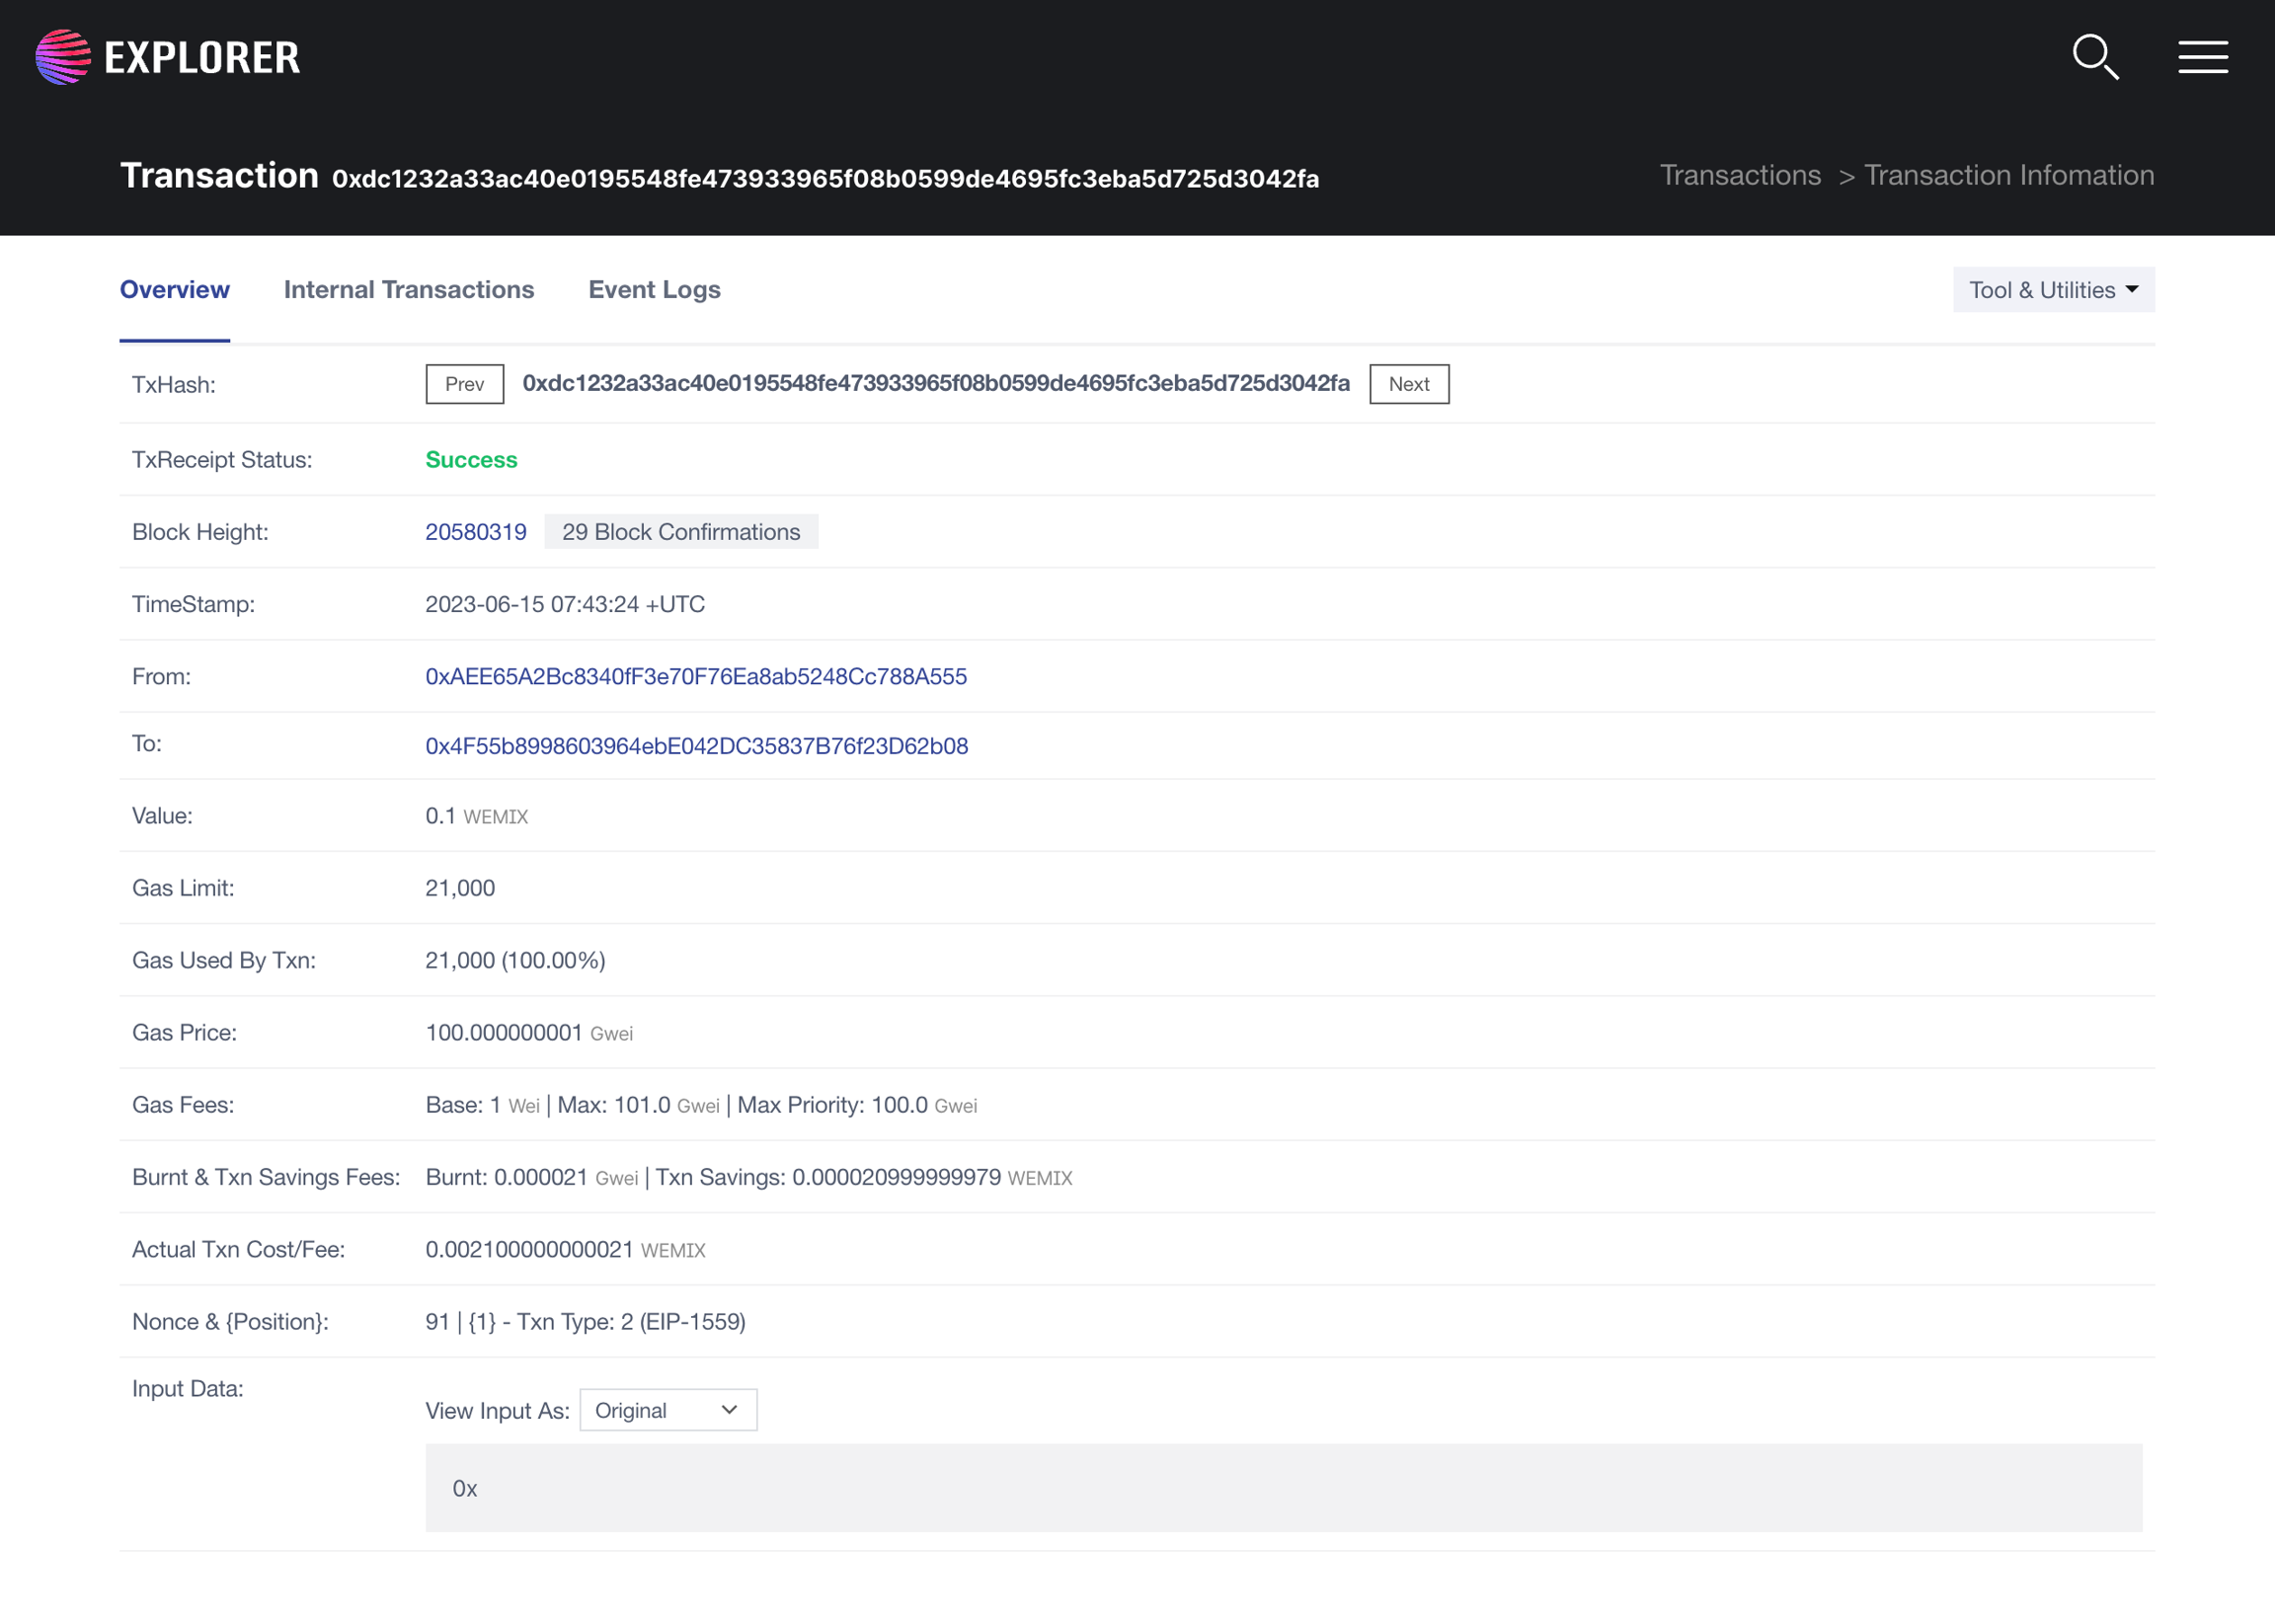
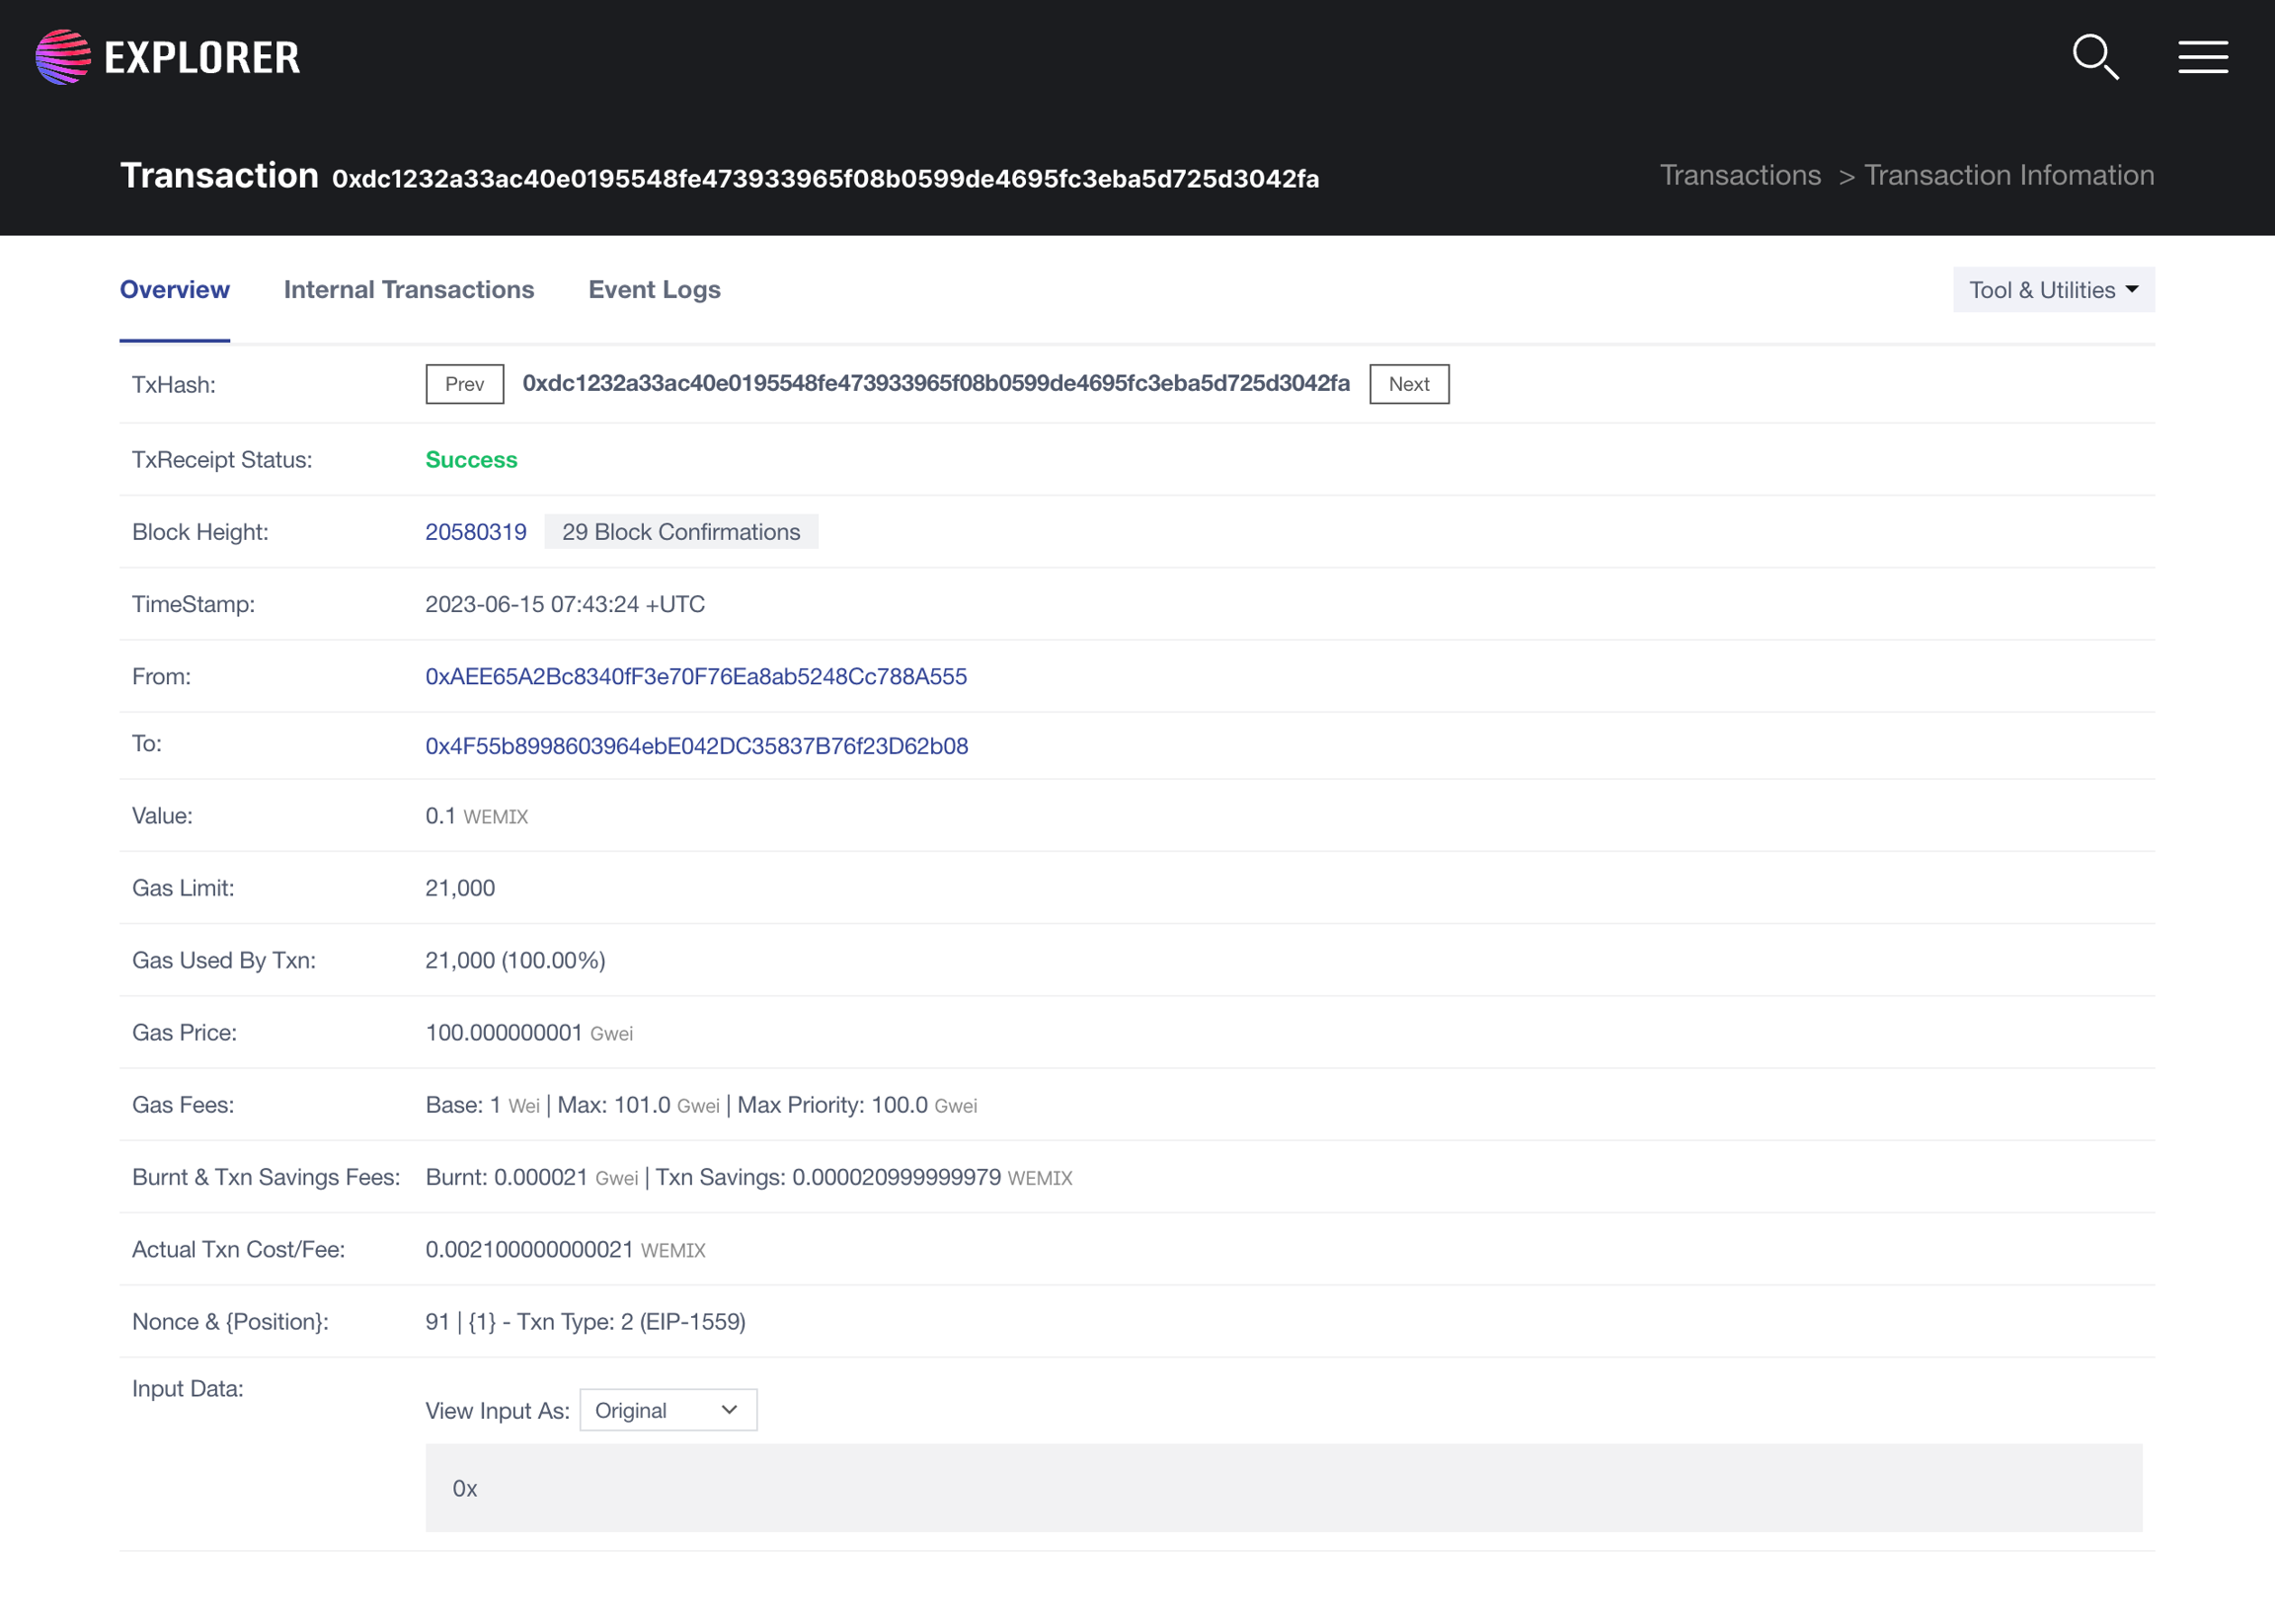
This feature allows users to view the details of the transaction.
How to access
STEP 1: Open WEMIX Explorer.
STEP 2: Click on Transactions and "View Txns" in the Web UI navigation.
STEP 3: Web UI will redirect to TRANSACTIONS.
STEP 4: Click on {TxHash}.
STEP 5: Web UI will redirect to the Transaction details.
How to use
This web UI shows information of transactions with matching URL id param. Each transaction contains 15 fields:
TxHash: The hash of the transaction's data.
TxReceipt Status: The status of the transaction.
Block Height: The height of block which this transaction belongs to.
TimeStamp: The first time when this transaction was appeared on the WEMIX Network.
From: The address that performed this transaction.
To: The address that received this transaction's value.
Value: The value transfer in this transaction.
Gas Limit: Total amount of Gas that provided for confirming this transaction.
Gas Used By Txn: Total amount of Gas that used for confirming this transaction.
Gas Price: The Gas price used for confirming this transaction.
Gas Fees: Base fee | Fee paid | Rewards for Miners.
Burnt & Txn Savings Fees: Amount of WEMIX burned | Quantity of WEMIX excluding fees.
Actual Tx Cost/Fee: Remittance fee
Nonce & Position: This transaction's nonce and the position of this transaction in block.
Input Data: This transaction's input data.
View Token list
Description
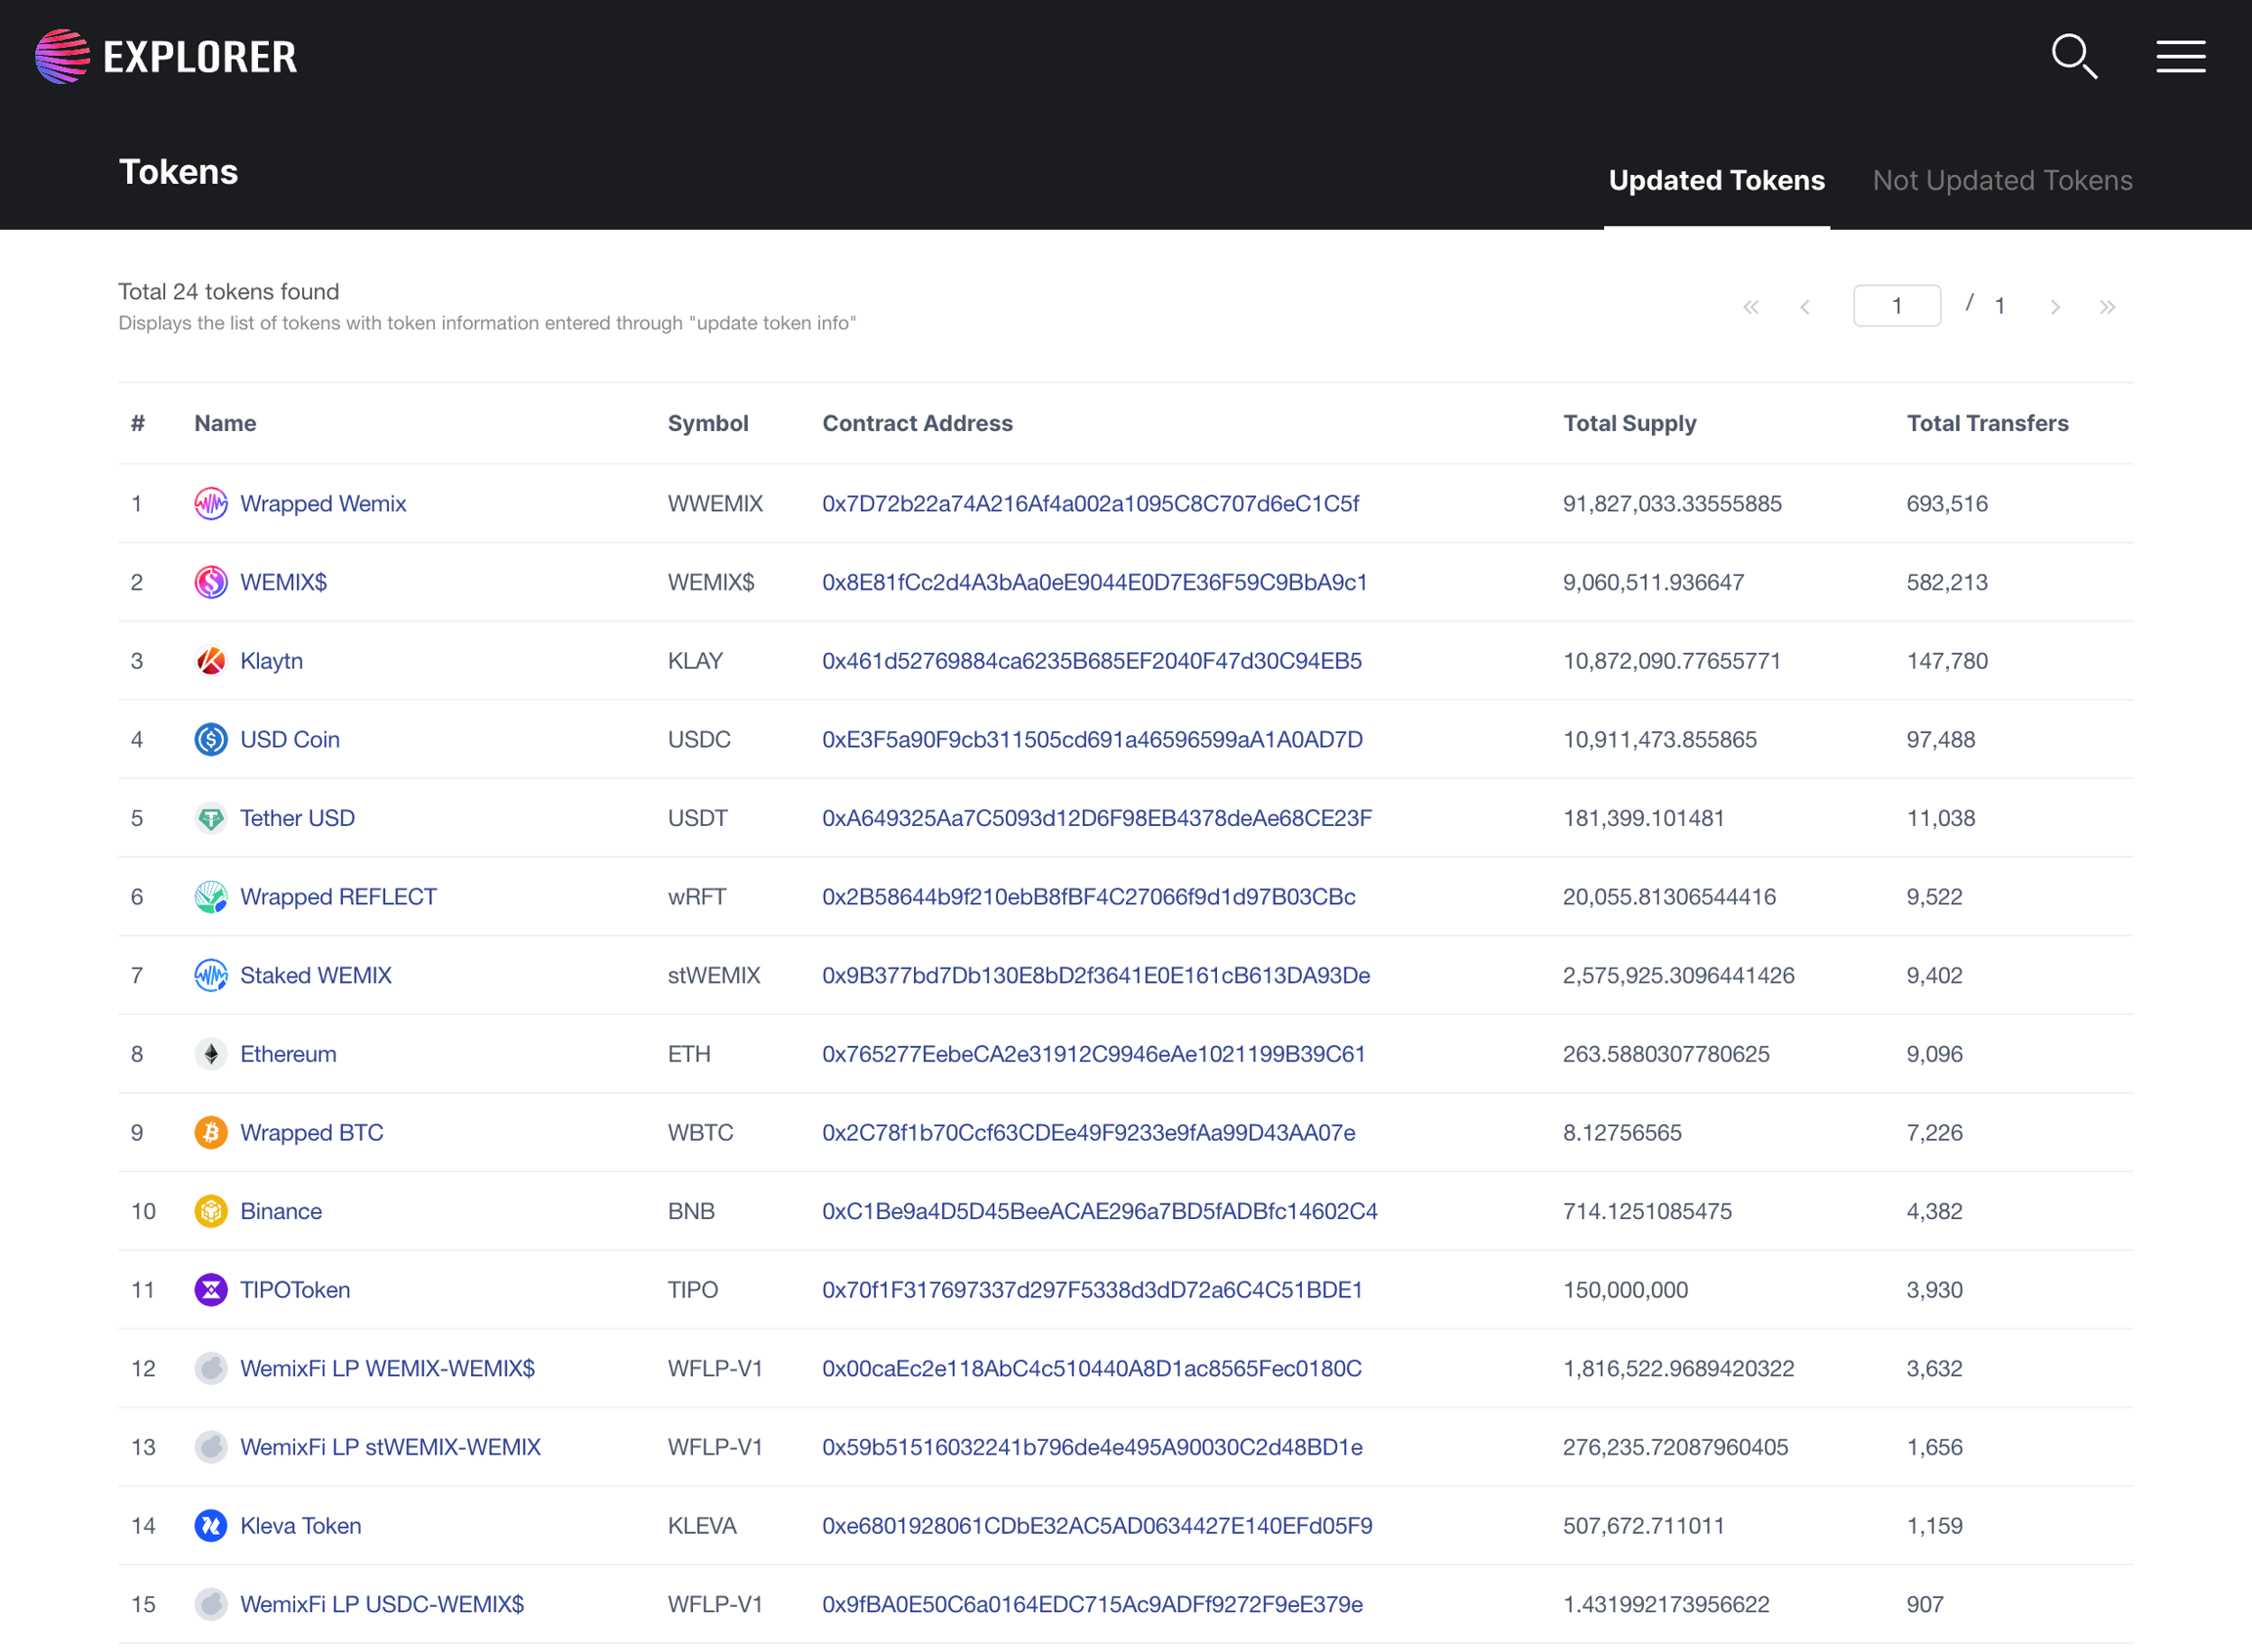
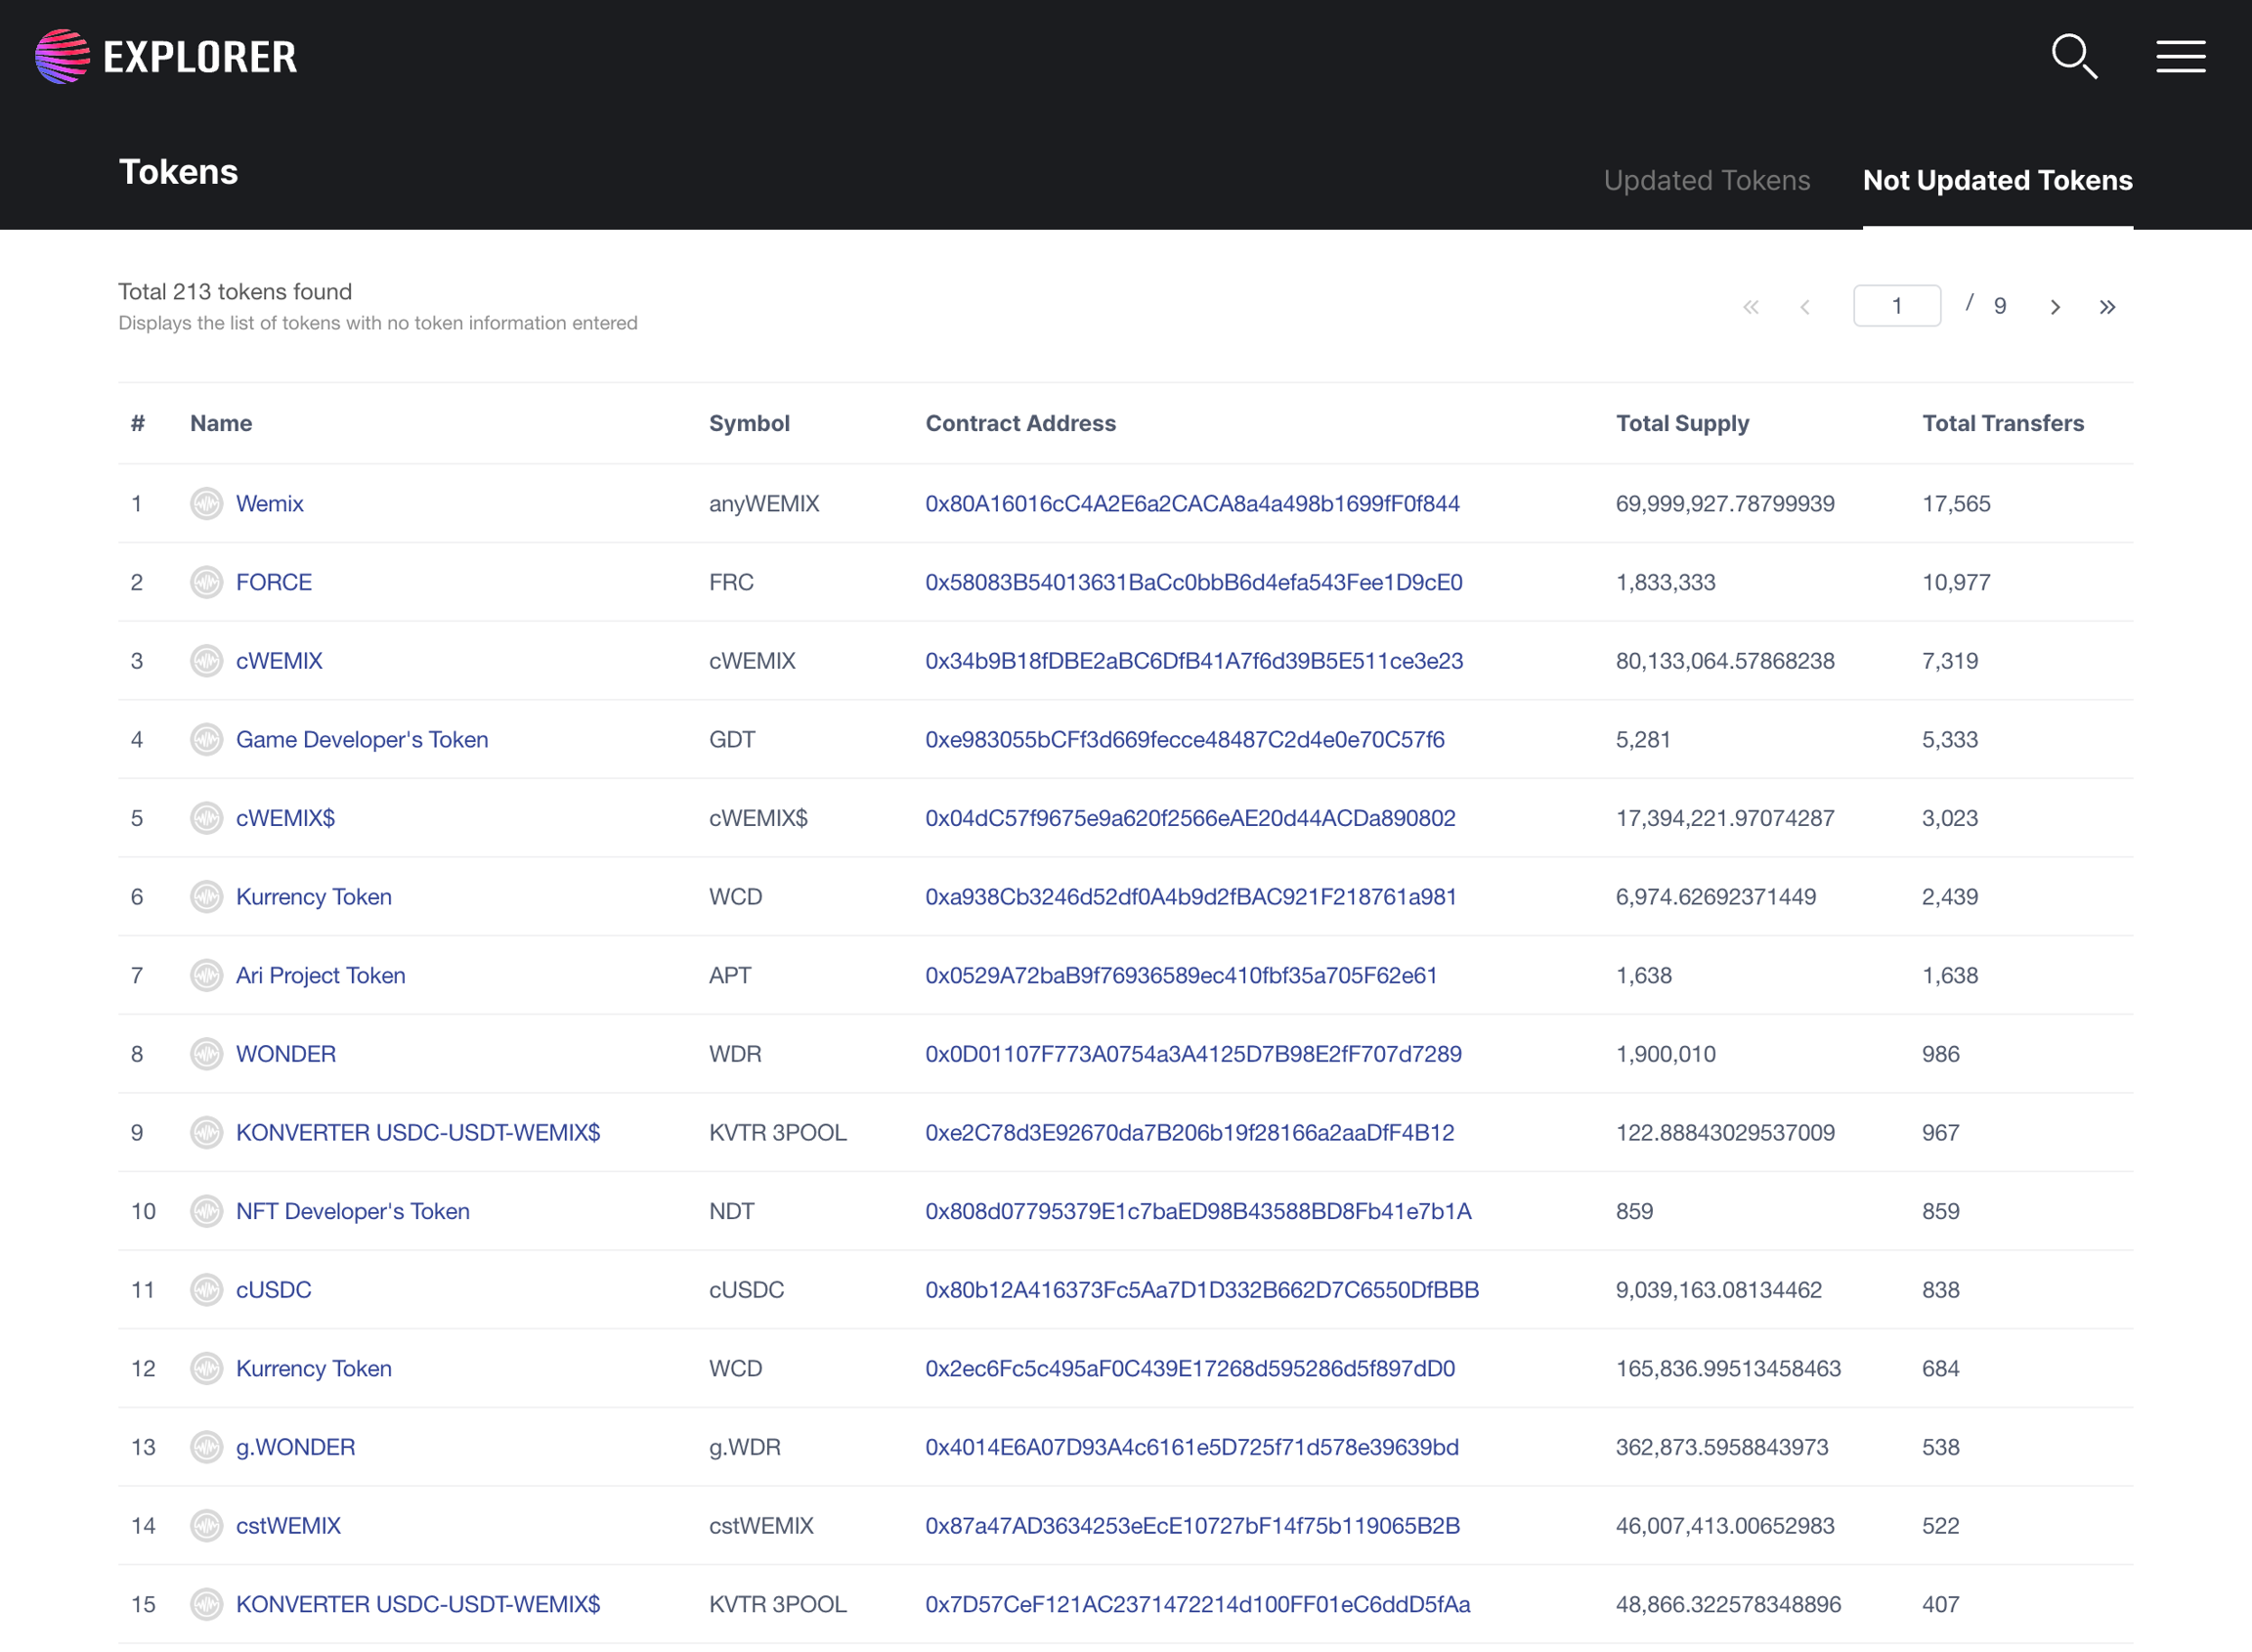
The Updated Tokens tab displays a list of tokens with token information entered through "Updated Token Information". Other tokens can be viewed on the Not Updated Tokens tab.
How to access
STEP 1: Connect to WEMIX Explorer.
STEP 2: Click Tokens tab and select "Token list" from the Web UI navigation.
STEP 3: Select Updated Tokens tab or Not Updated Tokens tab.
STEP 4: The Web UI will be redirected to the selected page.
How to use
The Web UI displays information of tokens issued on the WEMIX Blockchain. Each token has 6 data fields.
#: Token sorting order
Name: Name of token
Symbol: Symbol of token
Contract Address: Registered token contract address
Total Supply: Total supply of the token
Total Transfers: The total amount of the tokens transferred
View Token transfers
Description
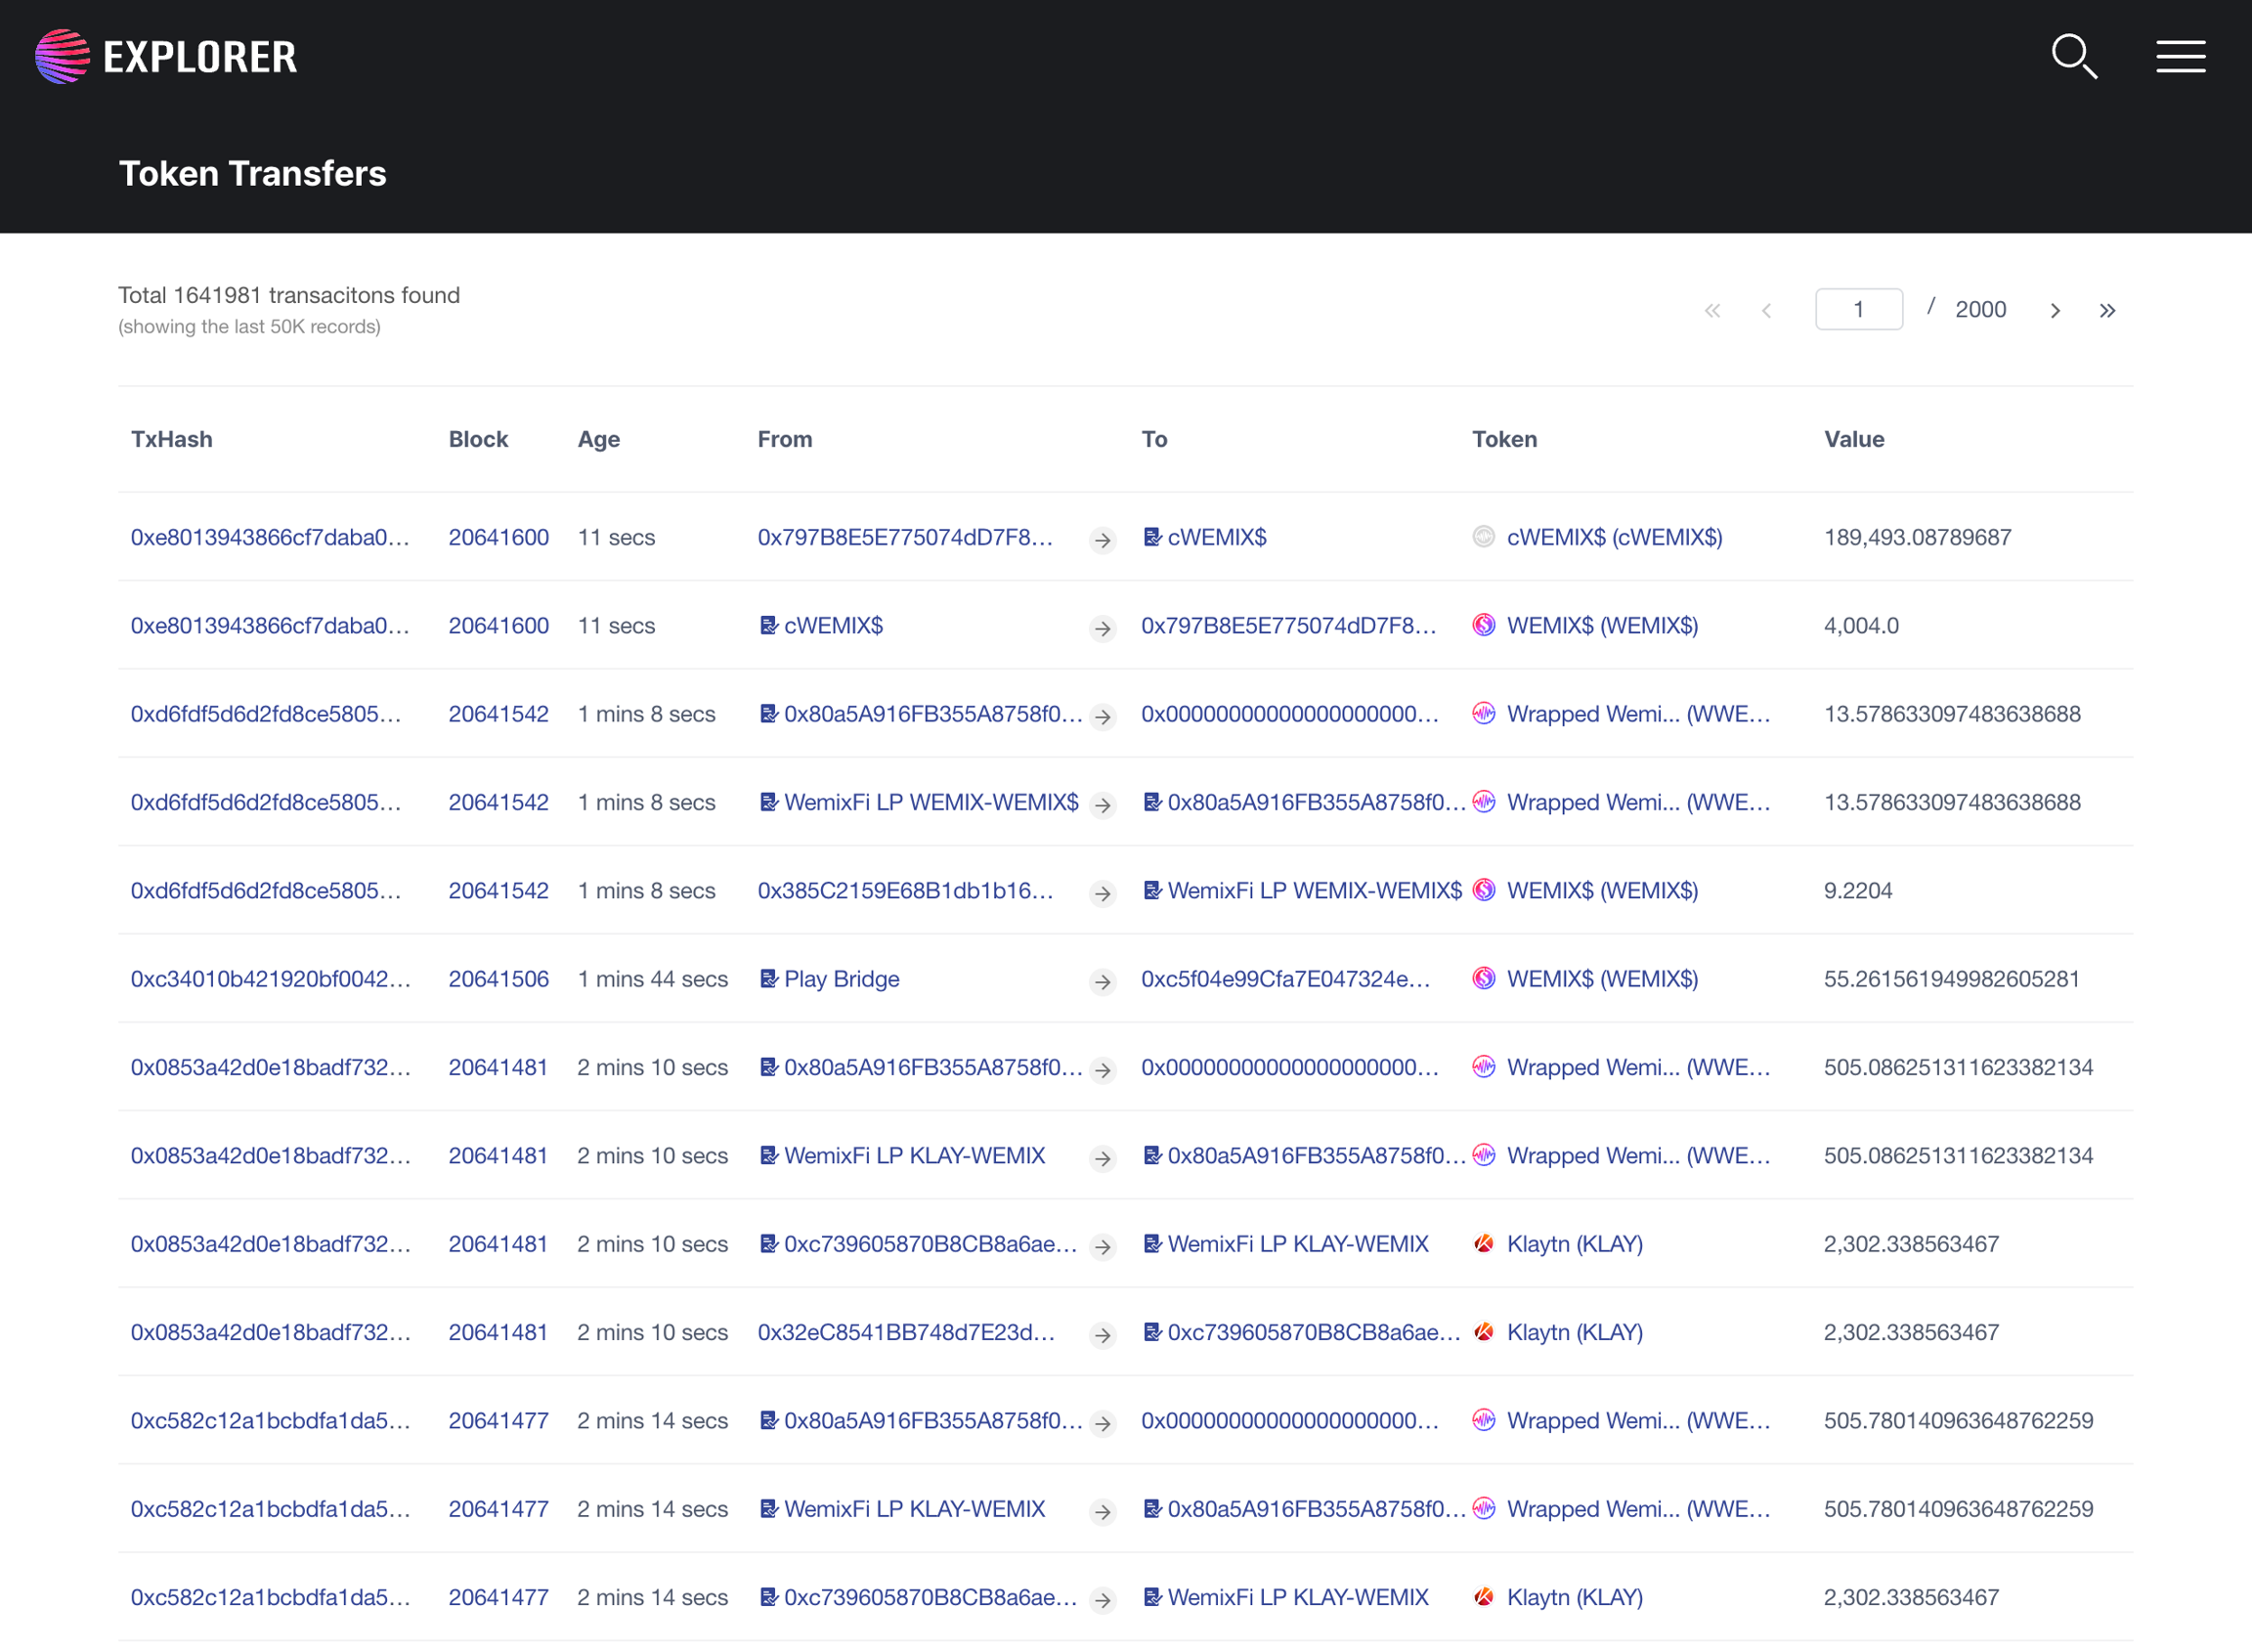
This feature allows users to view the transactions of tokens.
How to access
STEP 1: Open WEMIX Explorer
STEP 2: Click on Tokens and "Token Transfer" in the Web UI navigation.
STEP 3: Web UI will redirect to TOKENS.
How to use
This Web UI displays all transaction information for tokens issued by the WEMIX blockchain. Each transaction has seven fields.
TxHash: Transaction hash
Block: The height of the block to which the transaction belongs
Age: The time the transaction was displayed on the WEMIX network
From: Address where the transaction was made
To: Address where the value of the transaction was received
Token: The type of token generated in the transaction
Value: The value transfer in this transaction.
View NFT list
Description
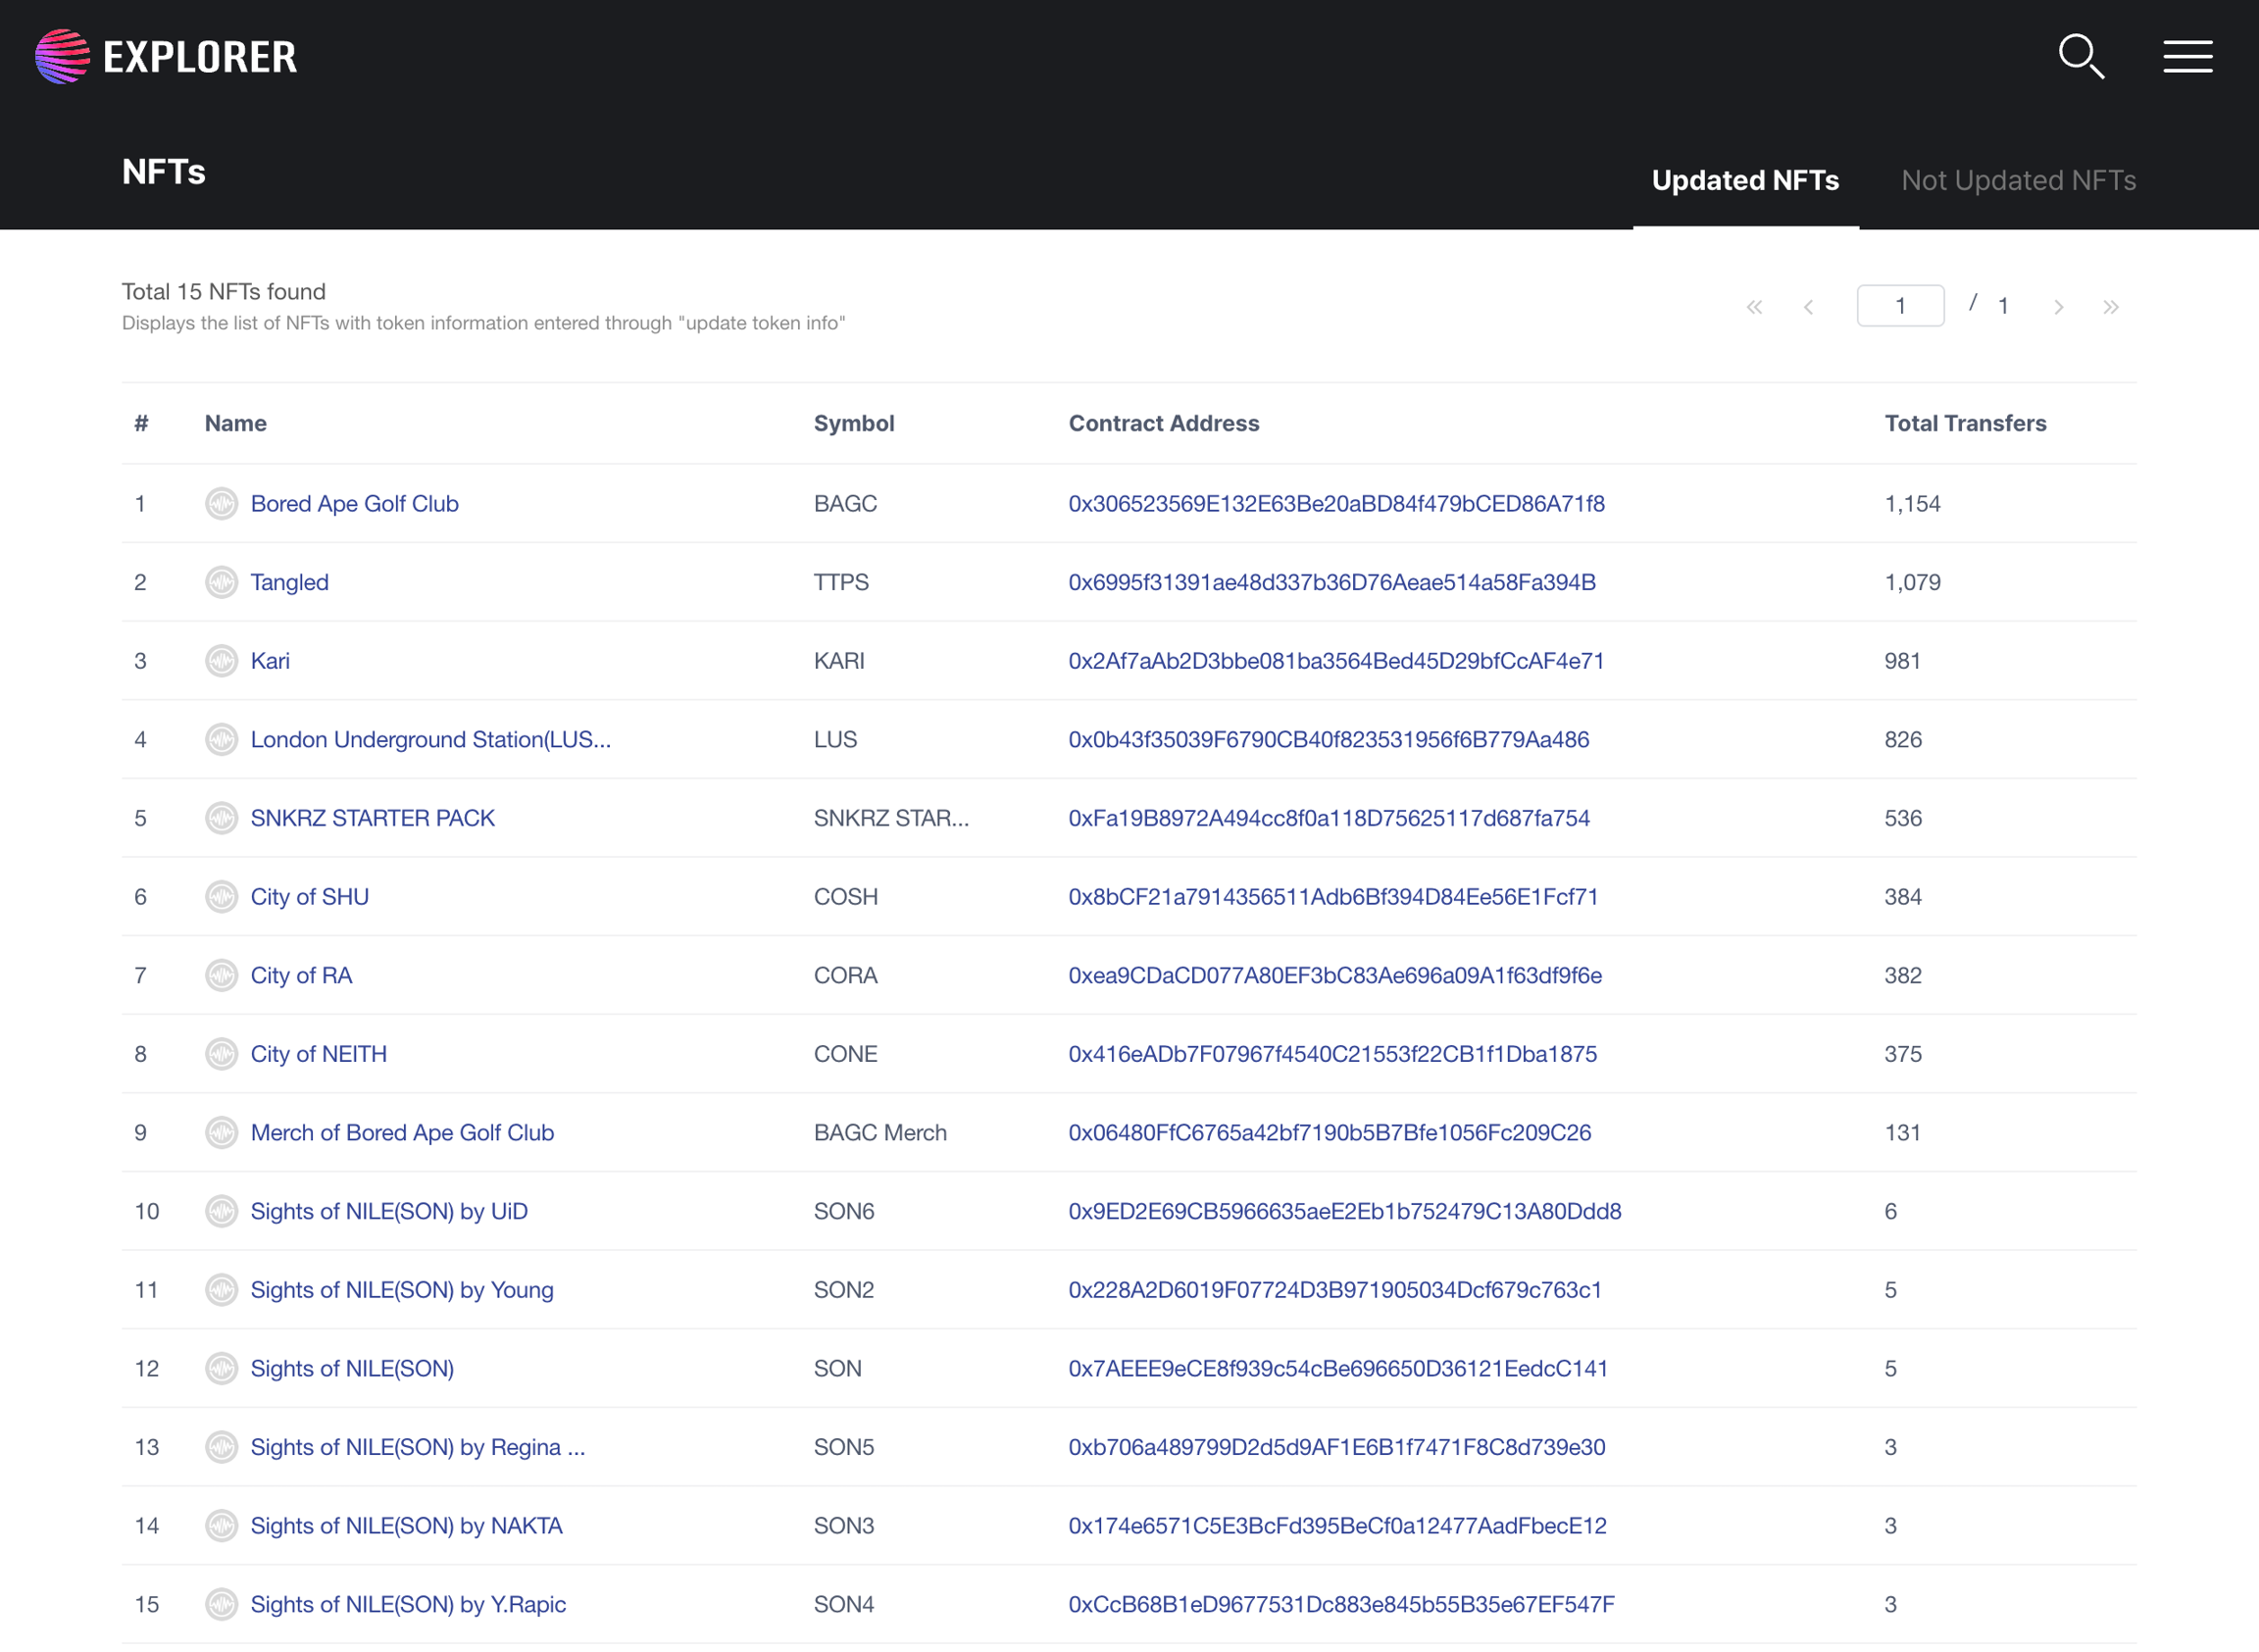
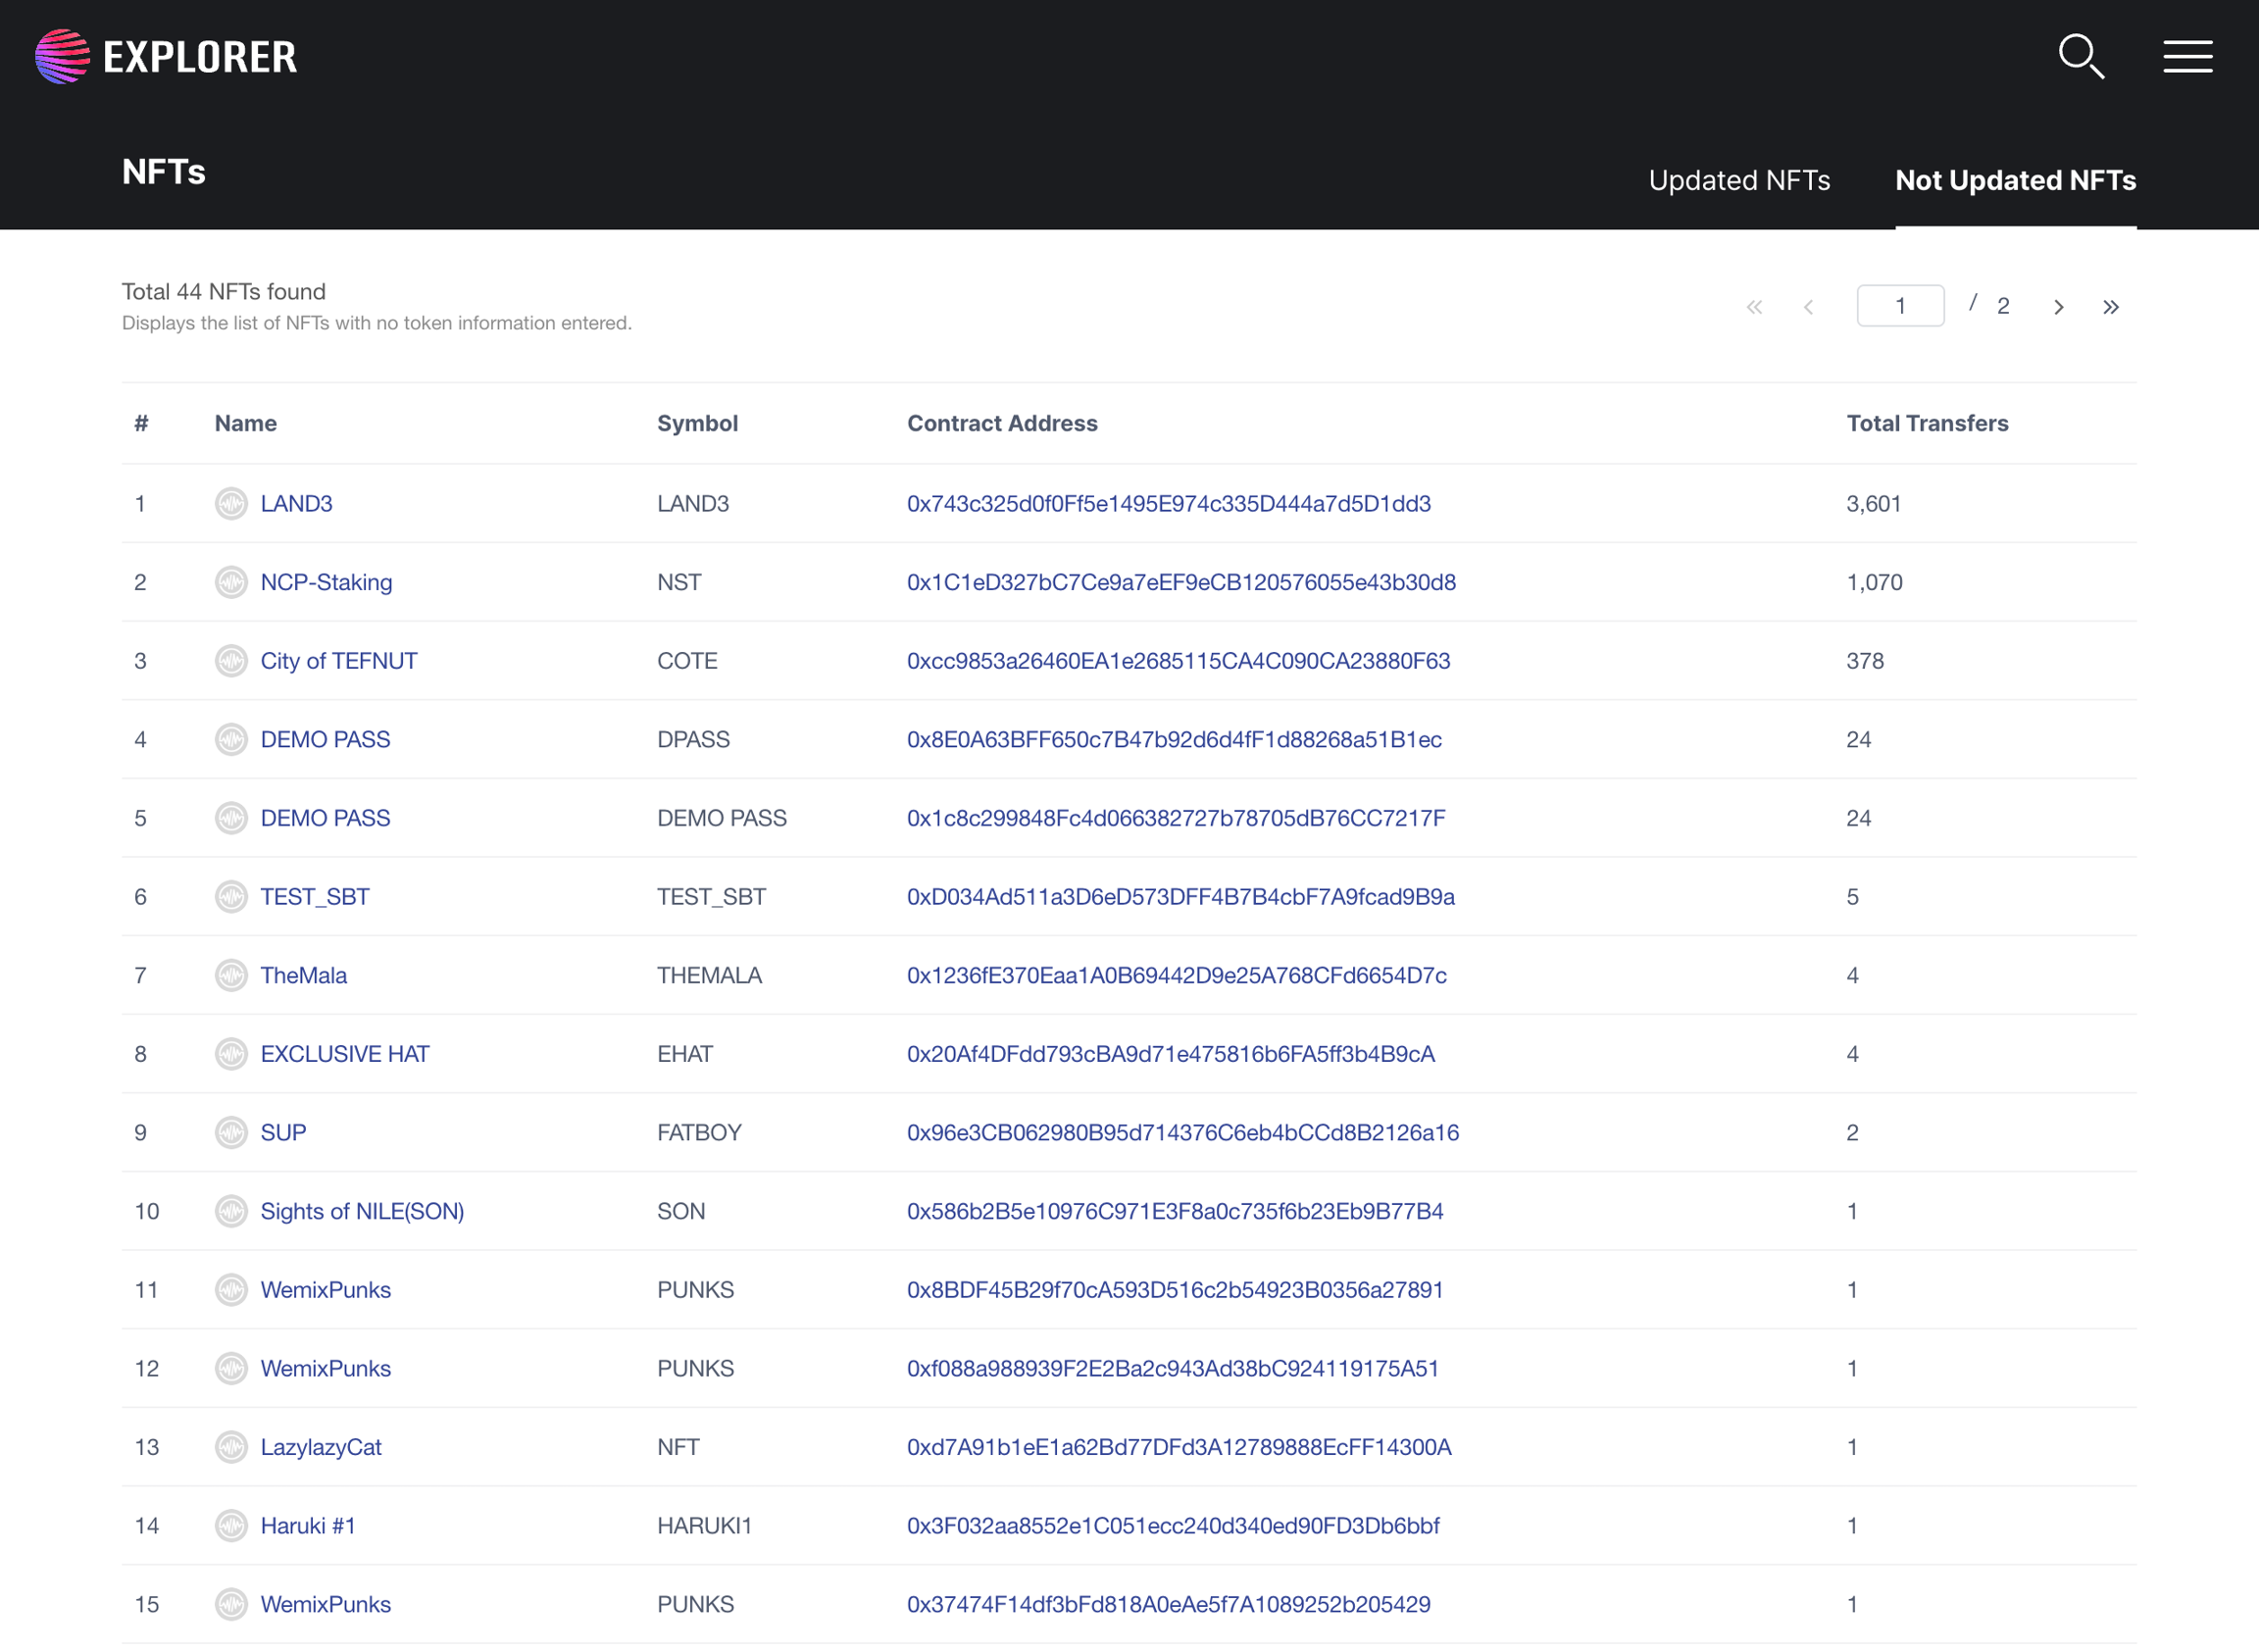
The Updated NFTs tab displays a list of NFTs with token information entered through "Updated Token Information". Other NFTs can be viewed on the Not Updated NFTs tab.
How to access
STEP 1: Connect to the WEMIX Explorer.
STEP 2: Click the NFTs tab and select "NFT List" in the Web UI navigation.
STEP 3: Select Updated NFTs tab or Not Updated NFTs tab.
STEP 4: The Web UI will be redirected to the selected page.
How to use
This Web UI displays all the NFT information published by the WEMIX blockchain. Each NFT has 6 fields.
#: NFT sort order
Name: NFT name
Symbol: NFT symbol
Contract Address: Registered NFT contract address
Total Transfers: Total transfer amount of the corresponding NFT
View NFT transfers
Description
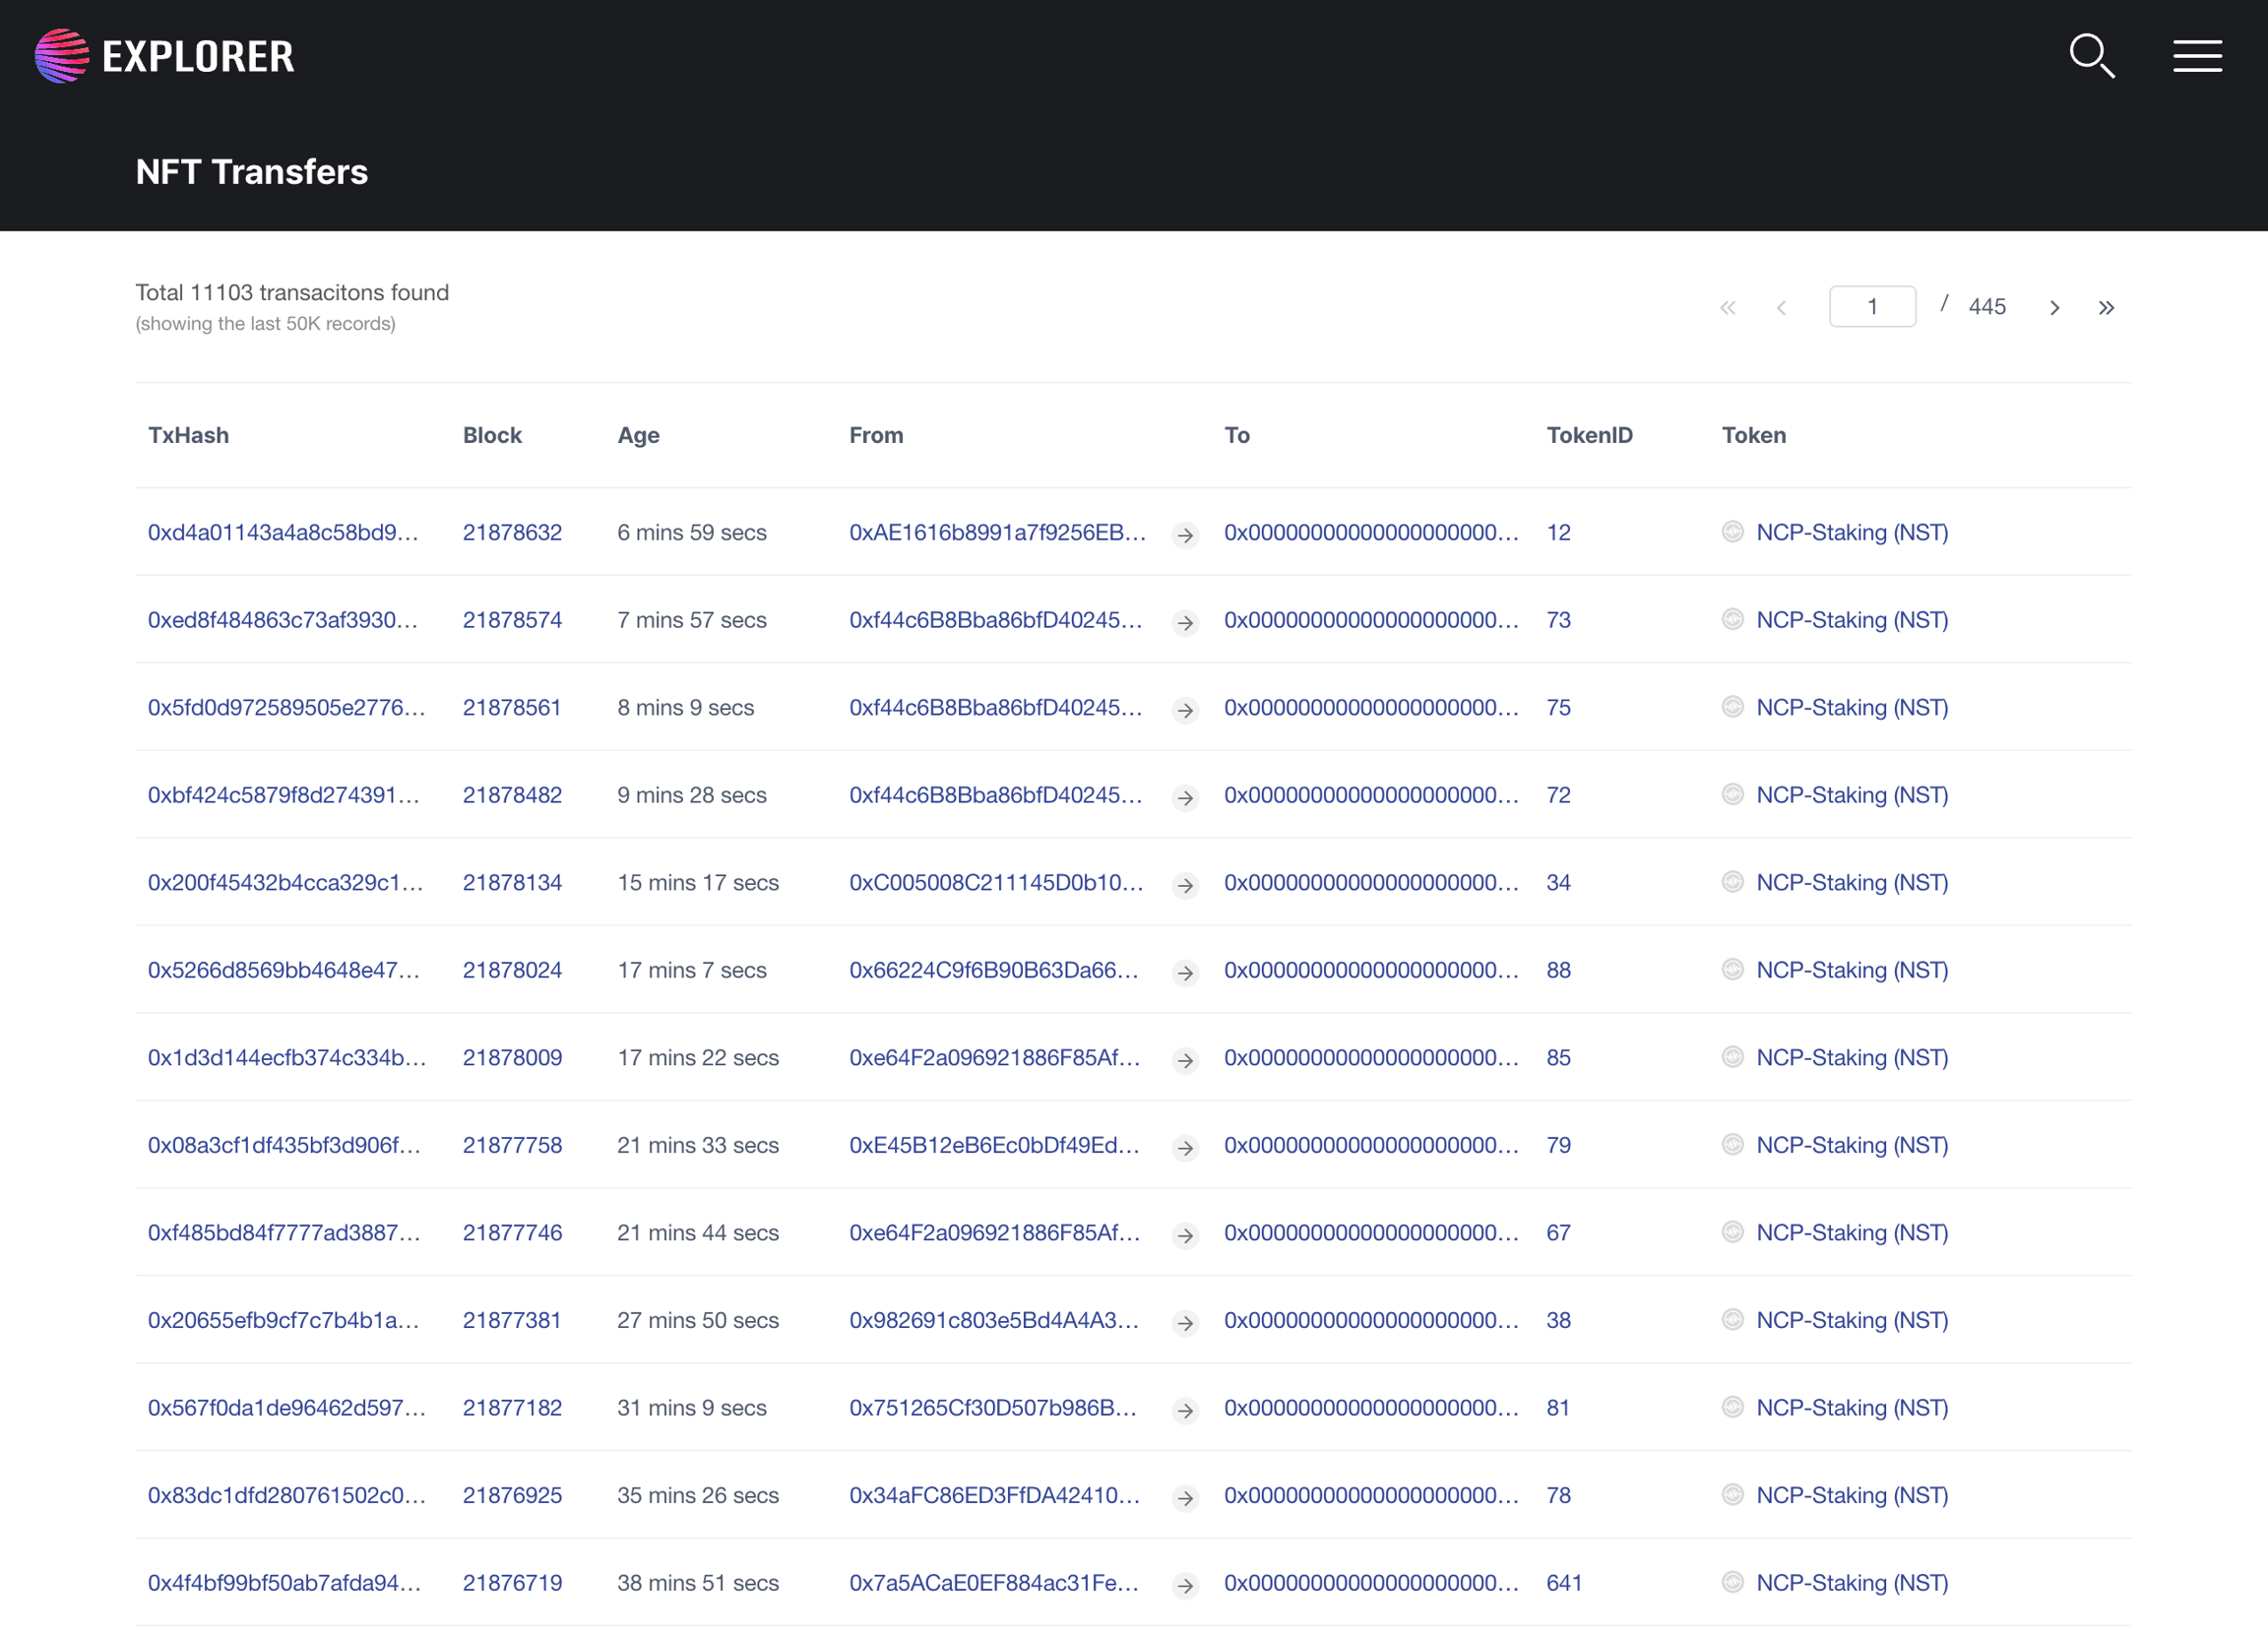
This feature allows users to view all transactions in the NFT transfer.
How to access
STEP 1: Connect to the WEMIX Explorer.
STEP 2: Click the NFTs tab and select "NFT Transfer" in the Web UI navigation.
STEP 3: Web UI redirects to NFT transaction page
How to use
This Web UI displays all transaction information for NFTs issued by the WEMIX blockchain. Each transaction has seven fields.
TxHash: Transaction hash
Block: The height of the block to which the transaction belongs
Age: The time the transaction was displayed on the WEMIX network
From: Address where the transaction was made
To: Address where the value of the transaction was received
TokenID: NFT token ID
Token: The type of NFT that occurred in the transaction
Lookup for address
Description
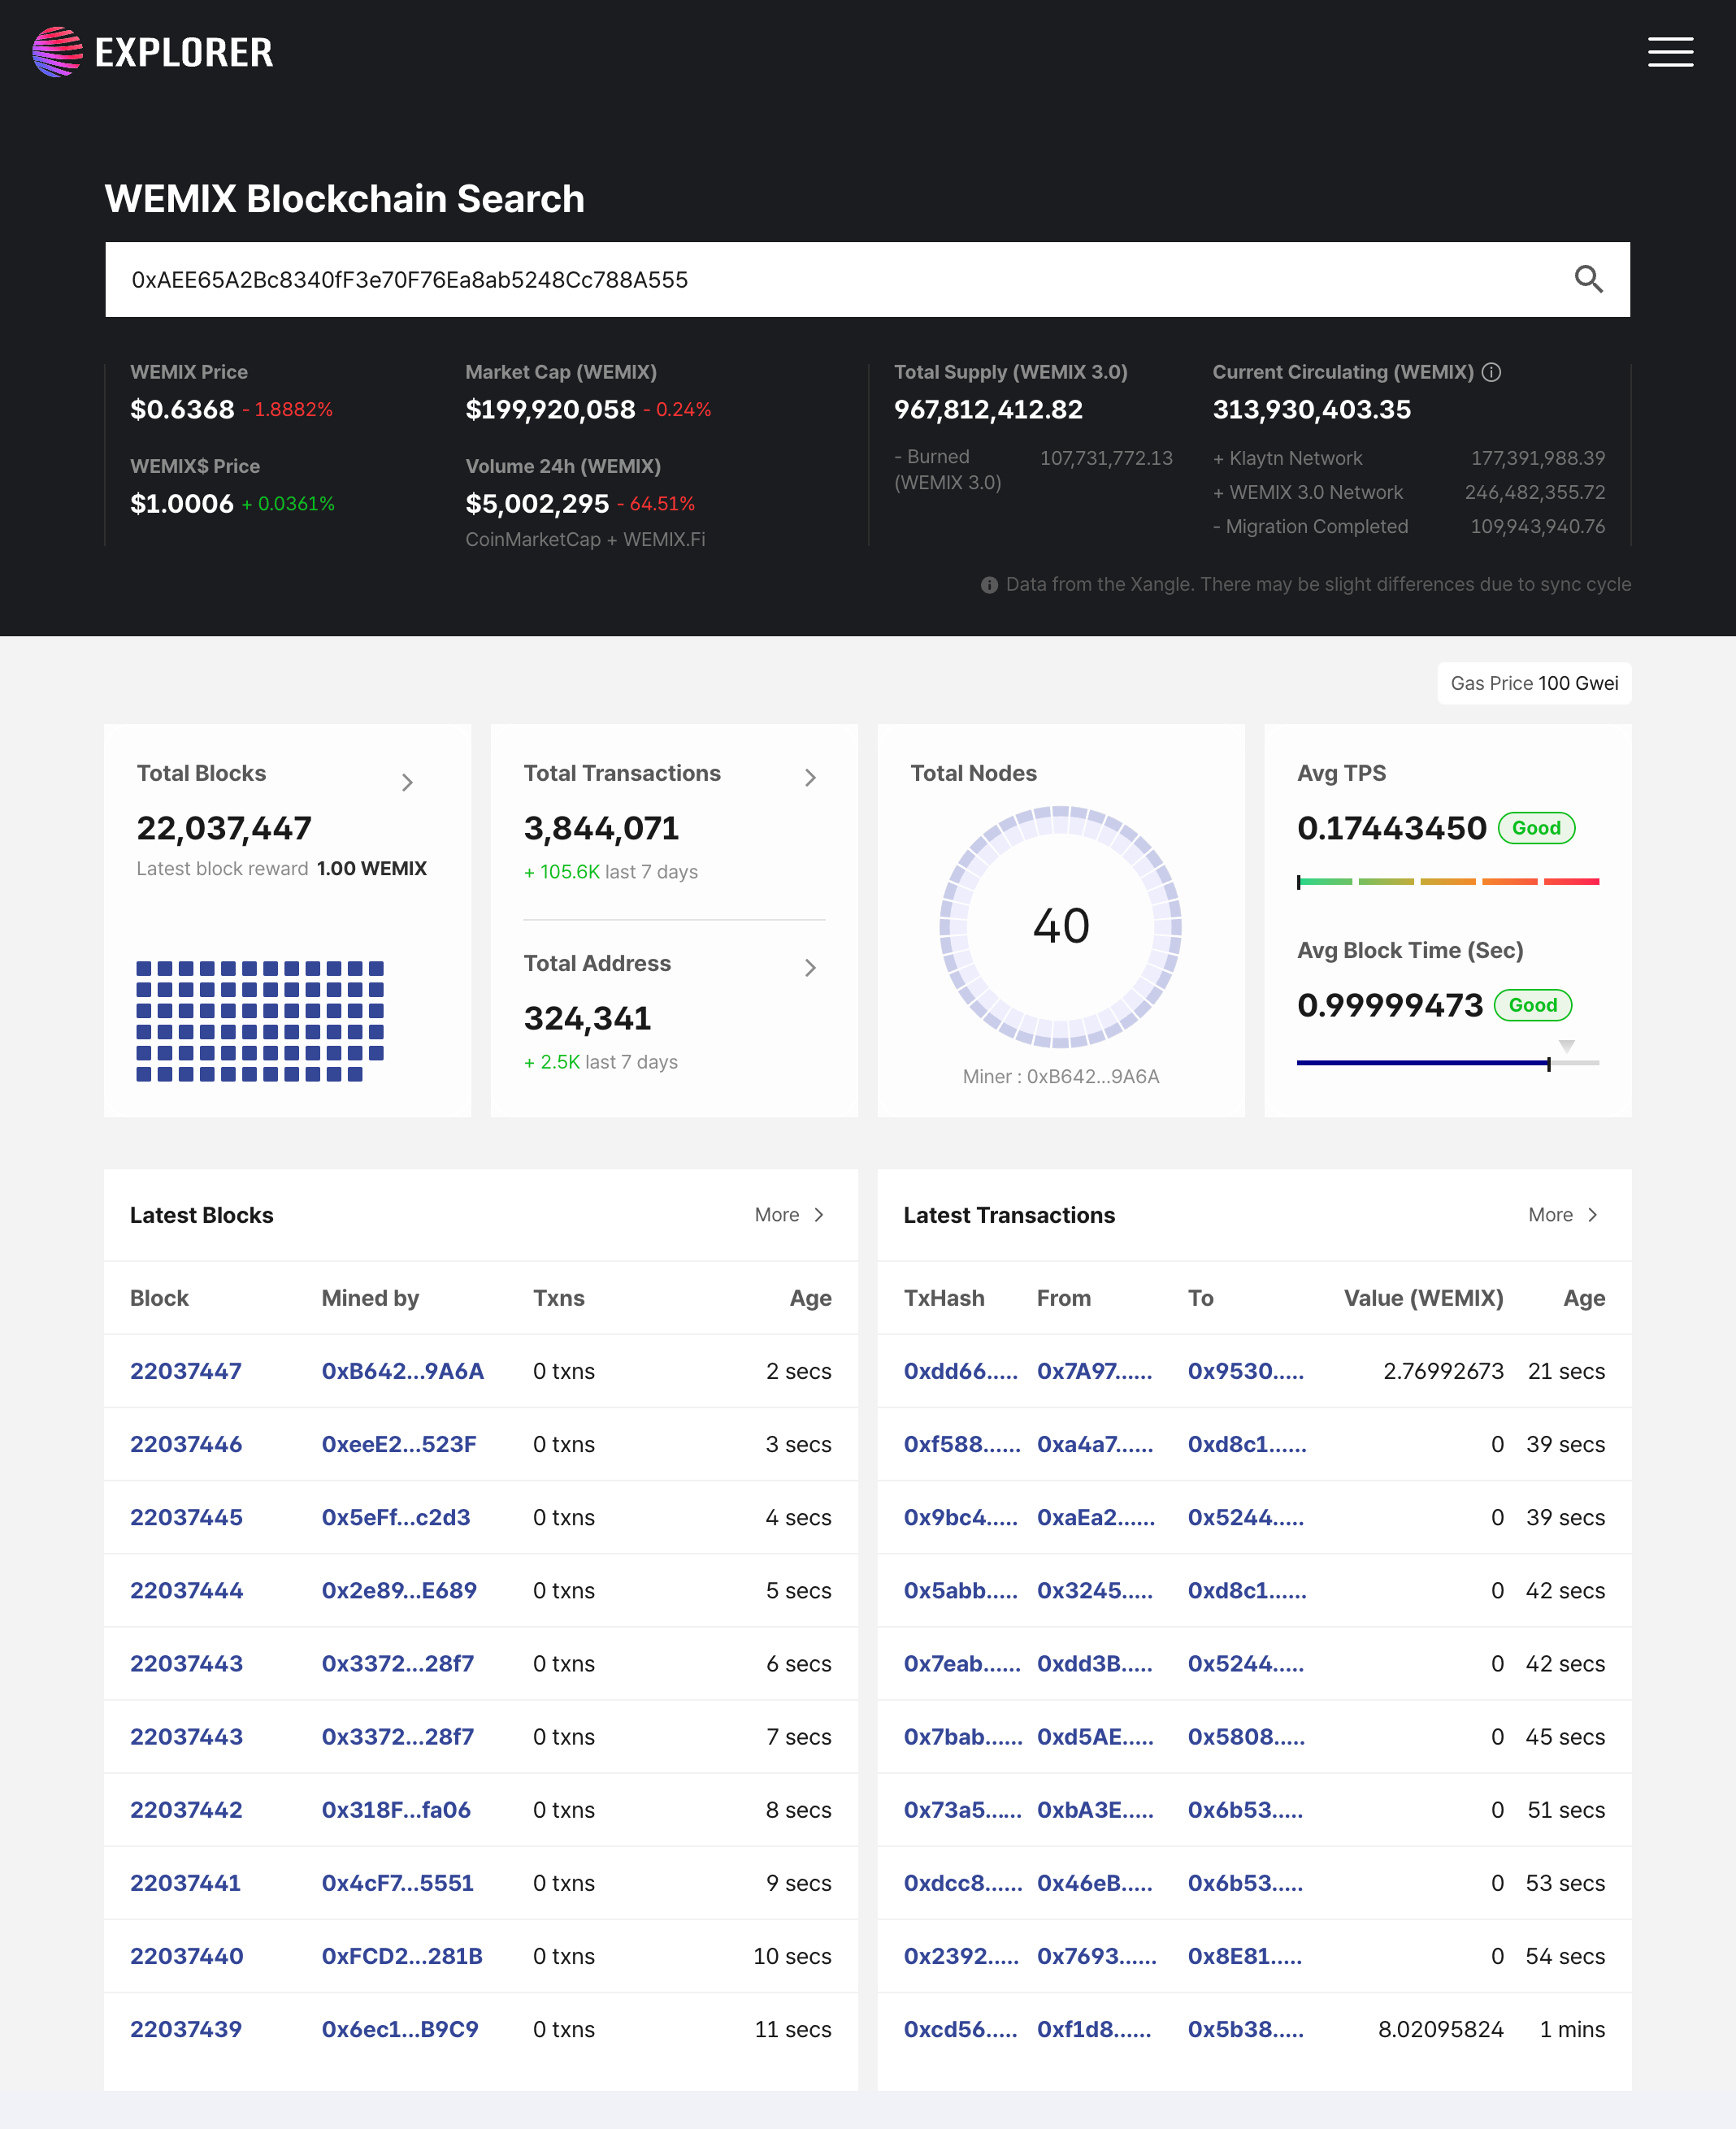
The feature allows user can search for address.
How to access
STEP 1: Open WEMIX Explorer.
STEP 2: The search box for address searching in top of Web UI.
How to use
STEP 1: Copy your address.
STEP 2: Enter your address to the search box.
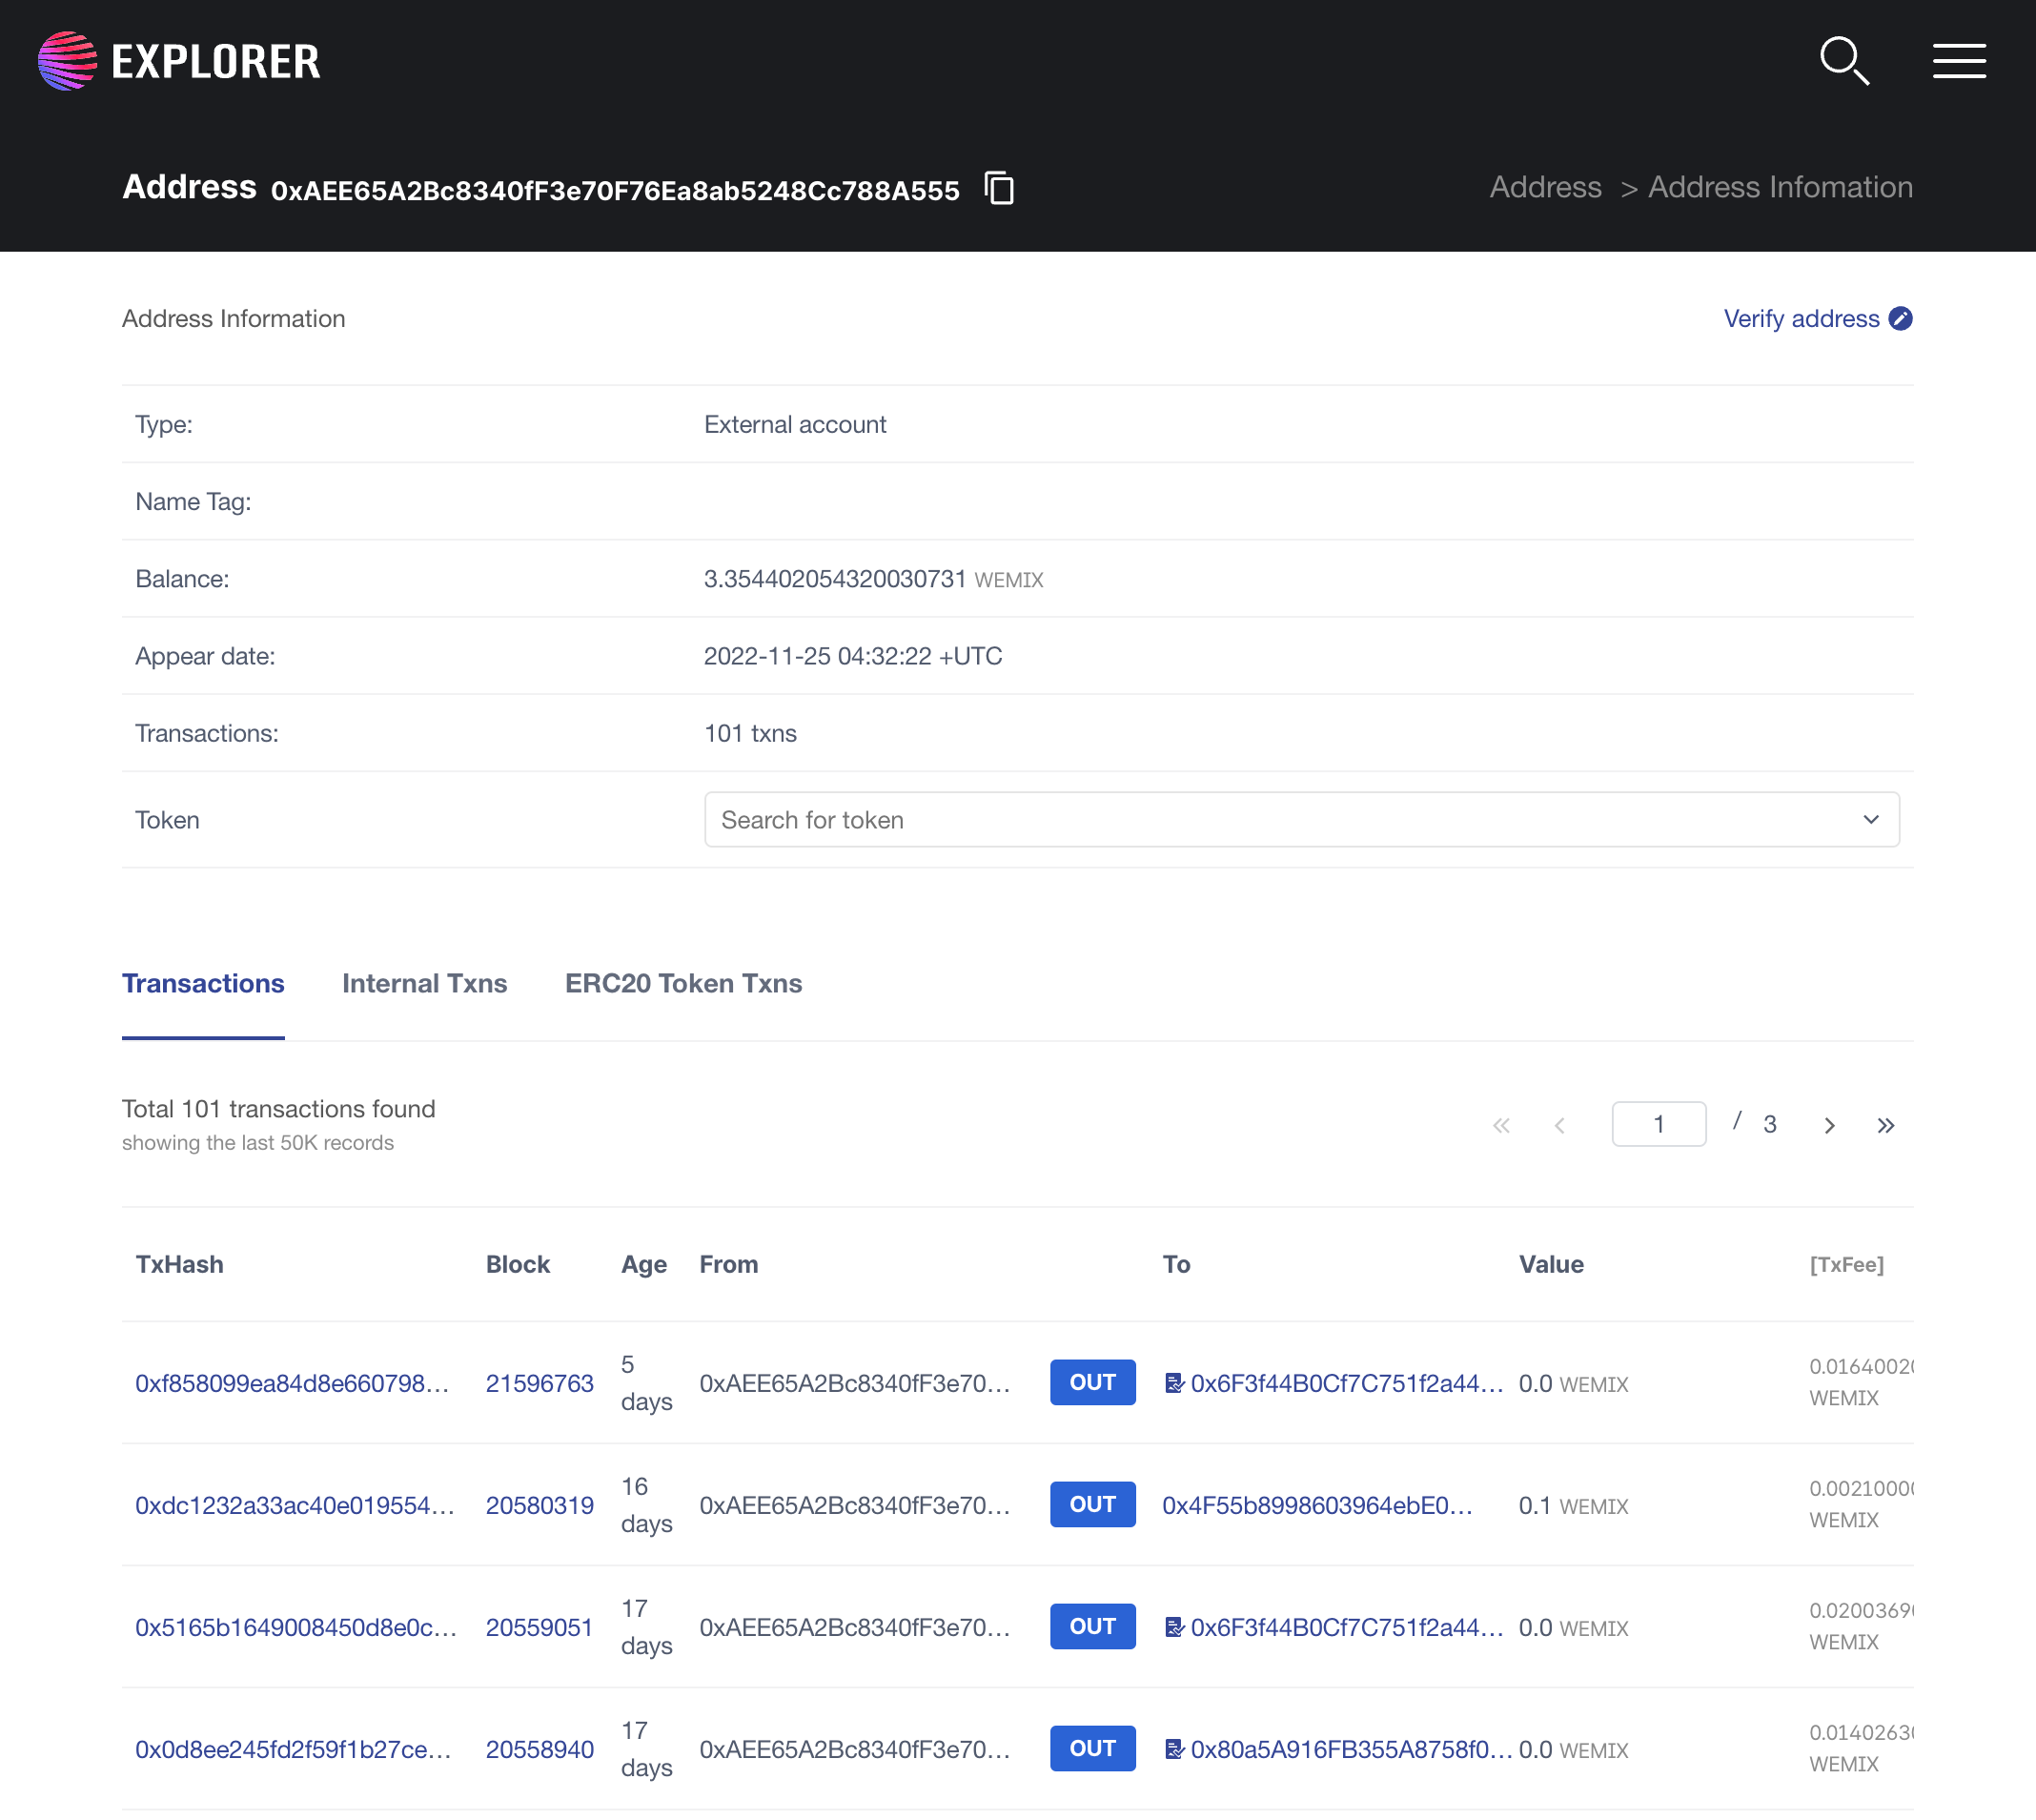
STEP 3: Web UI will redirect to the search result page.
View addresses
Description
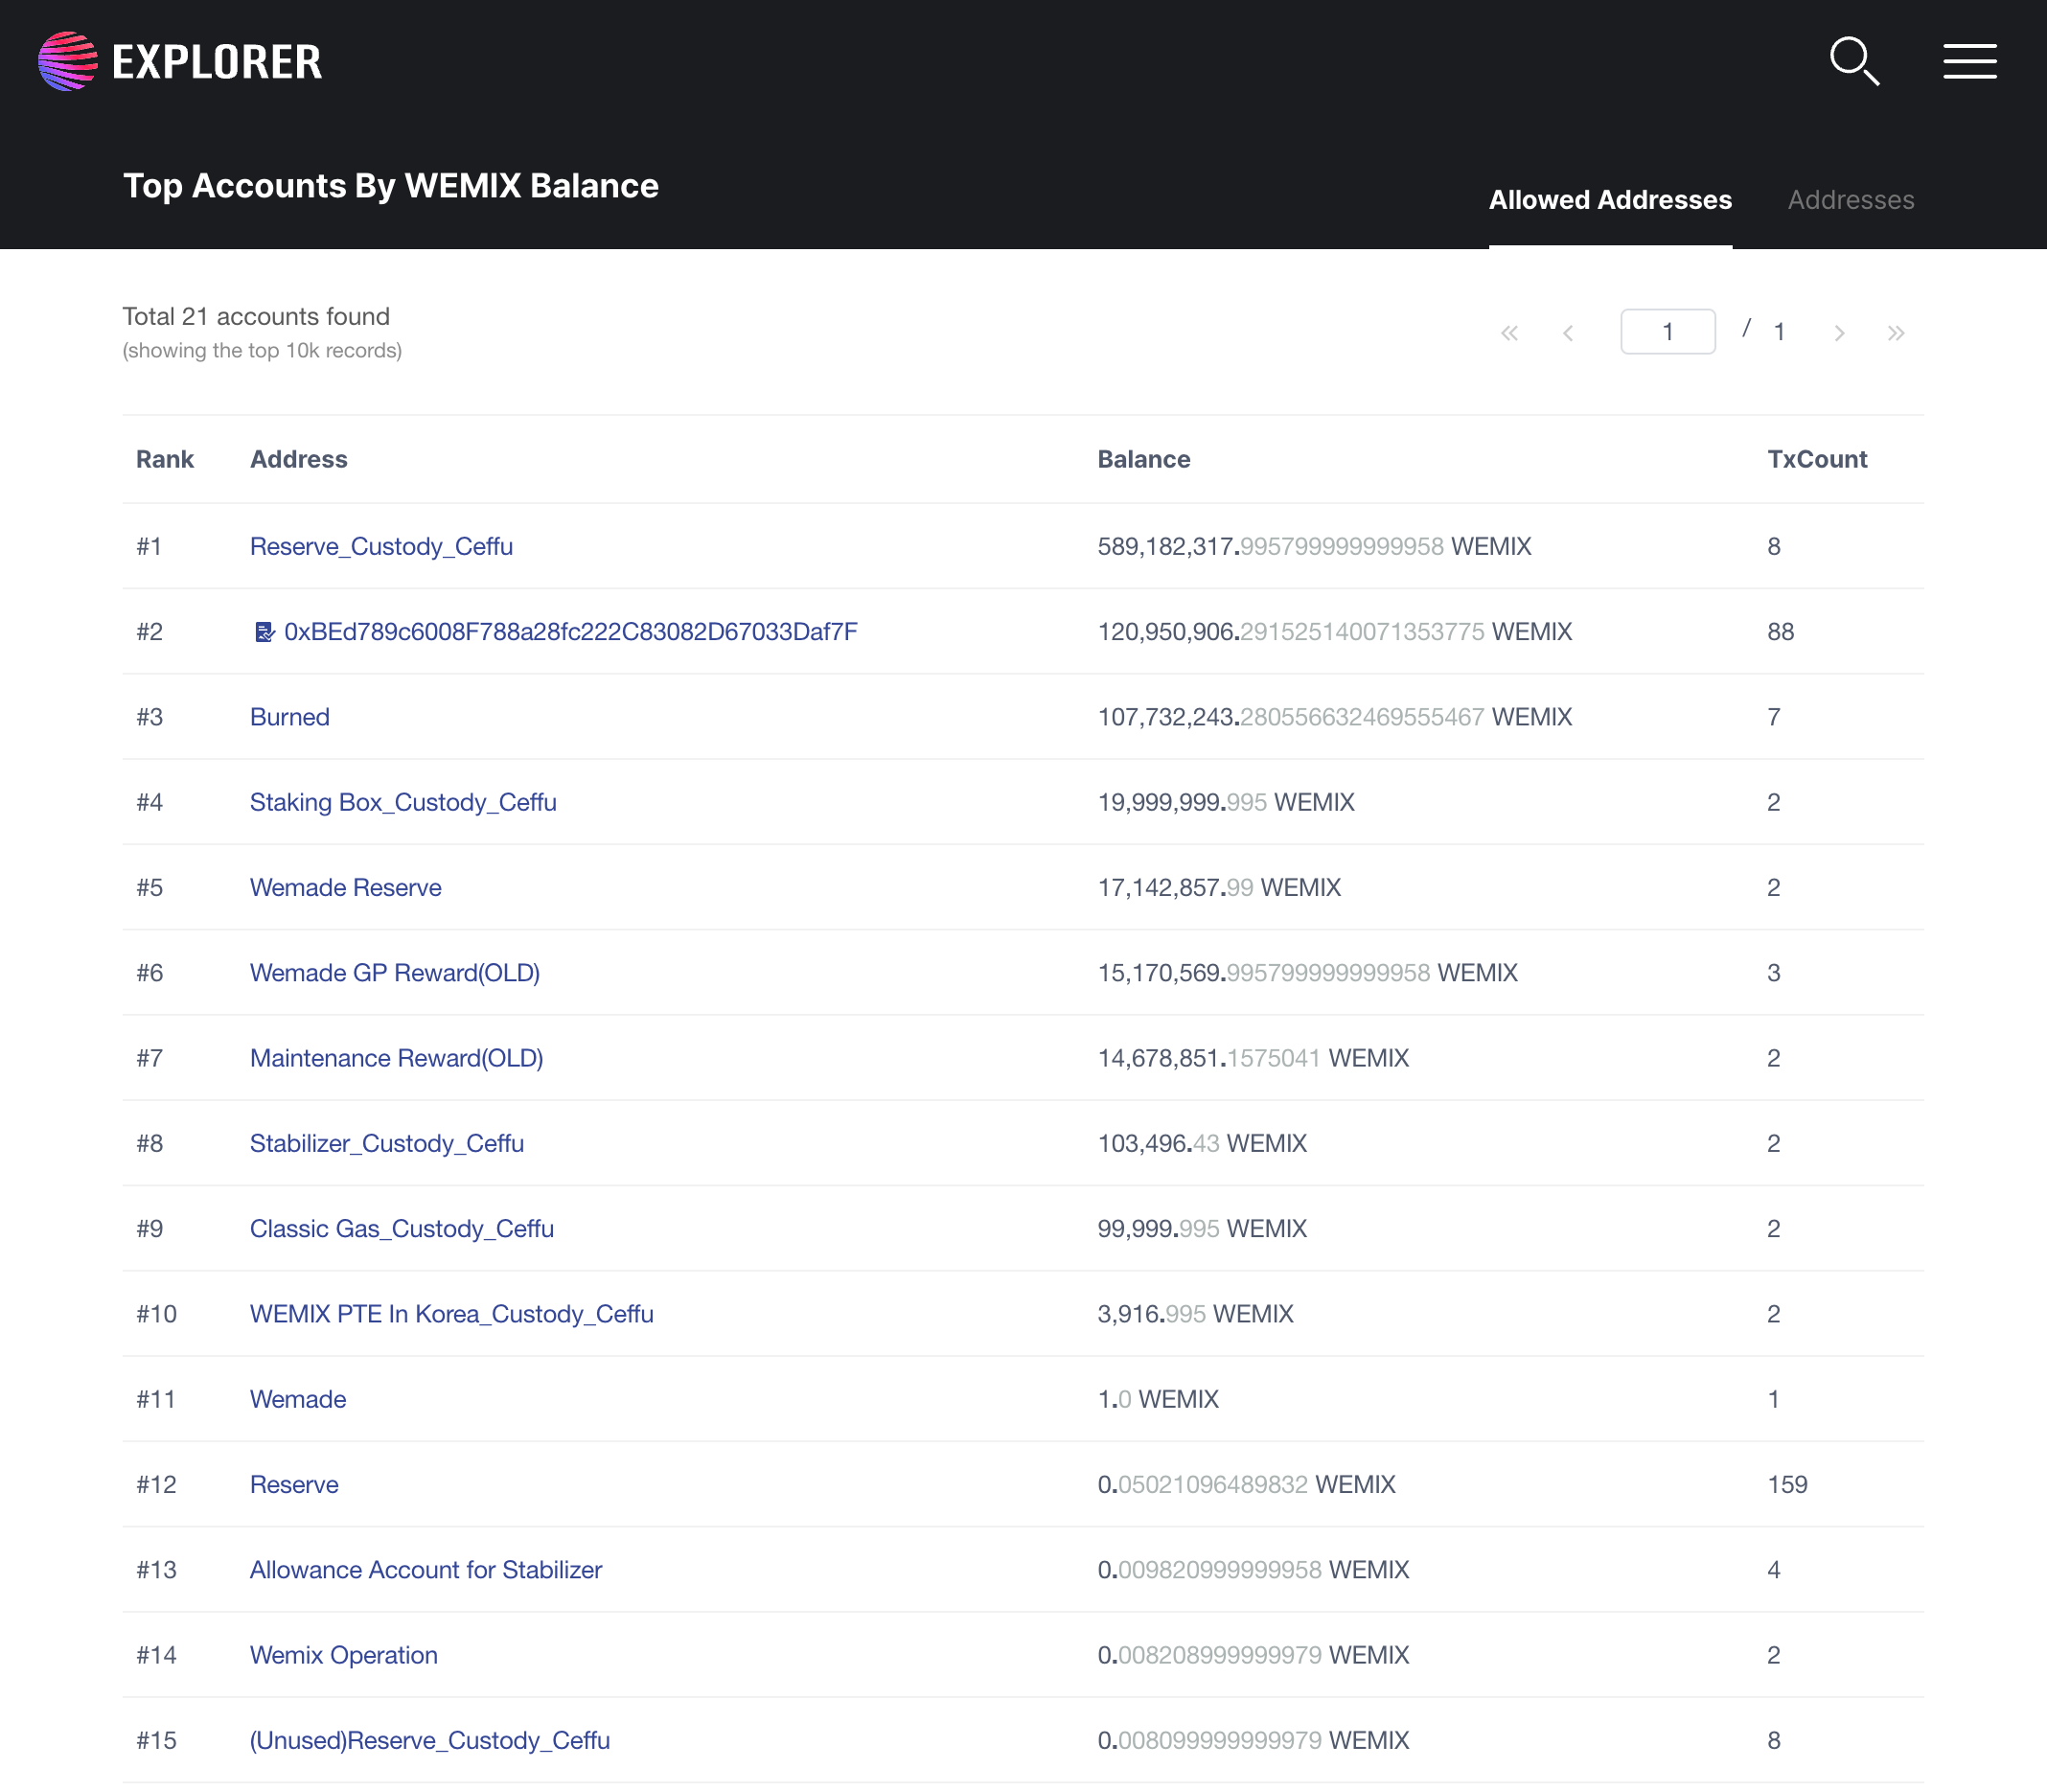
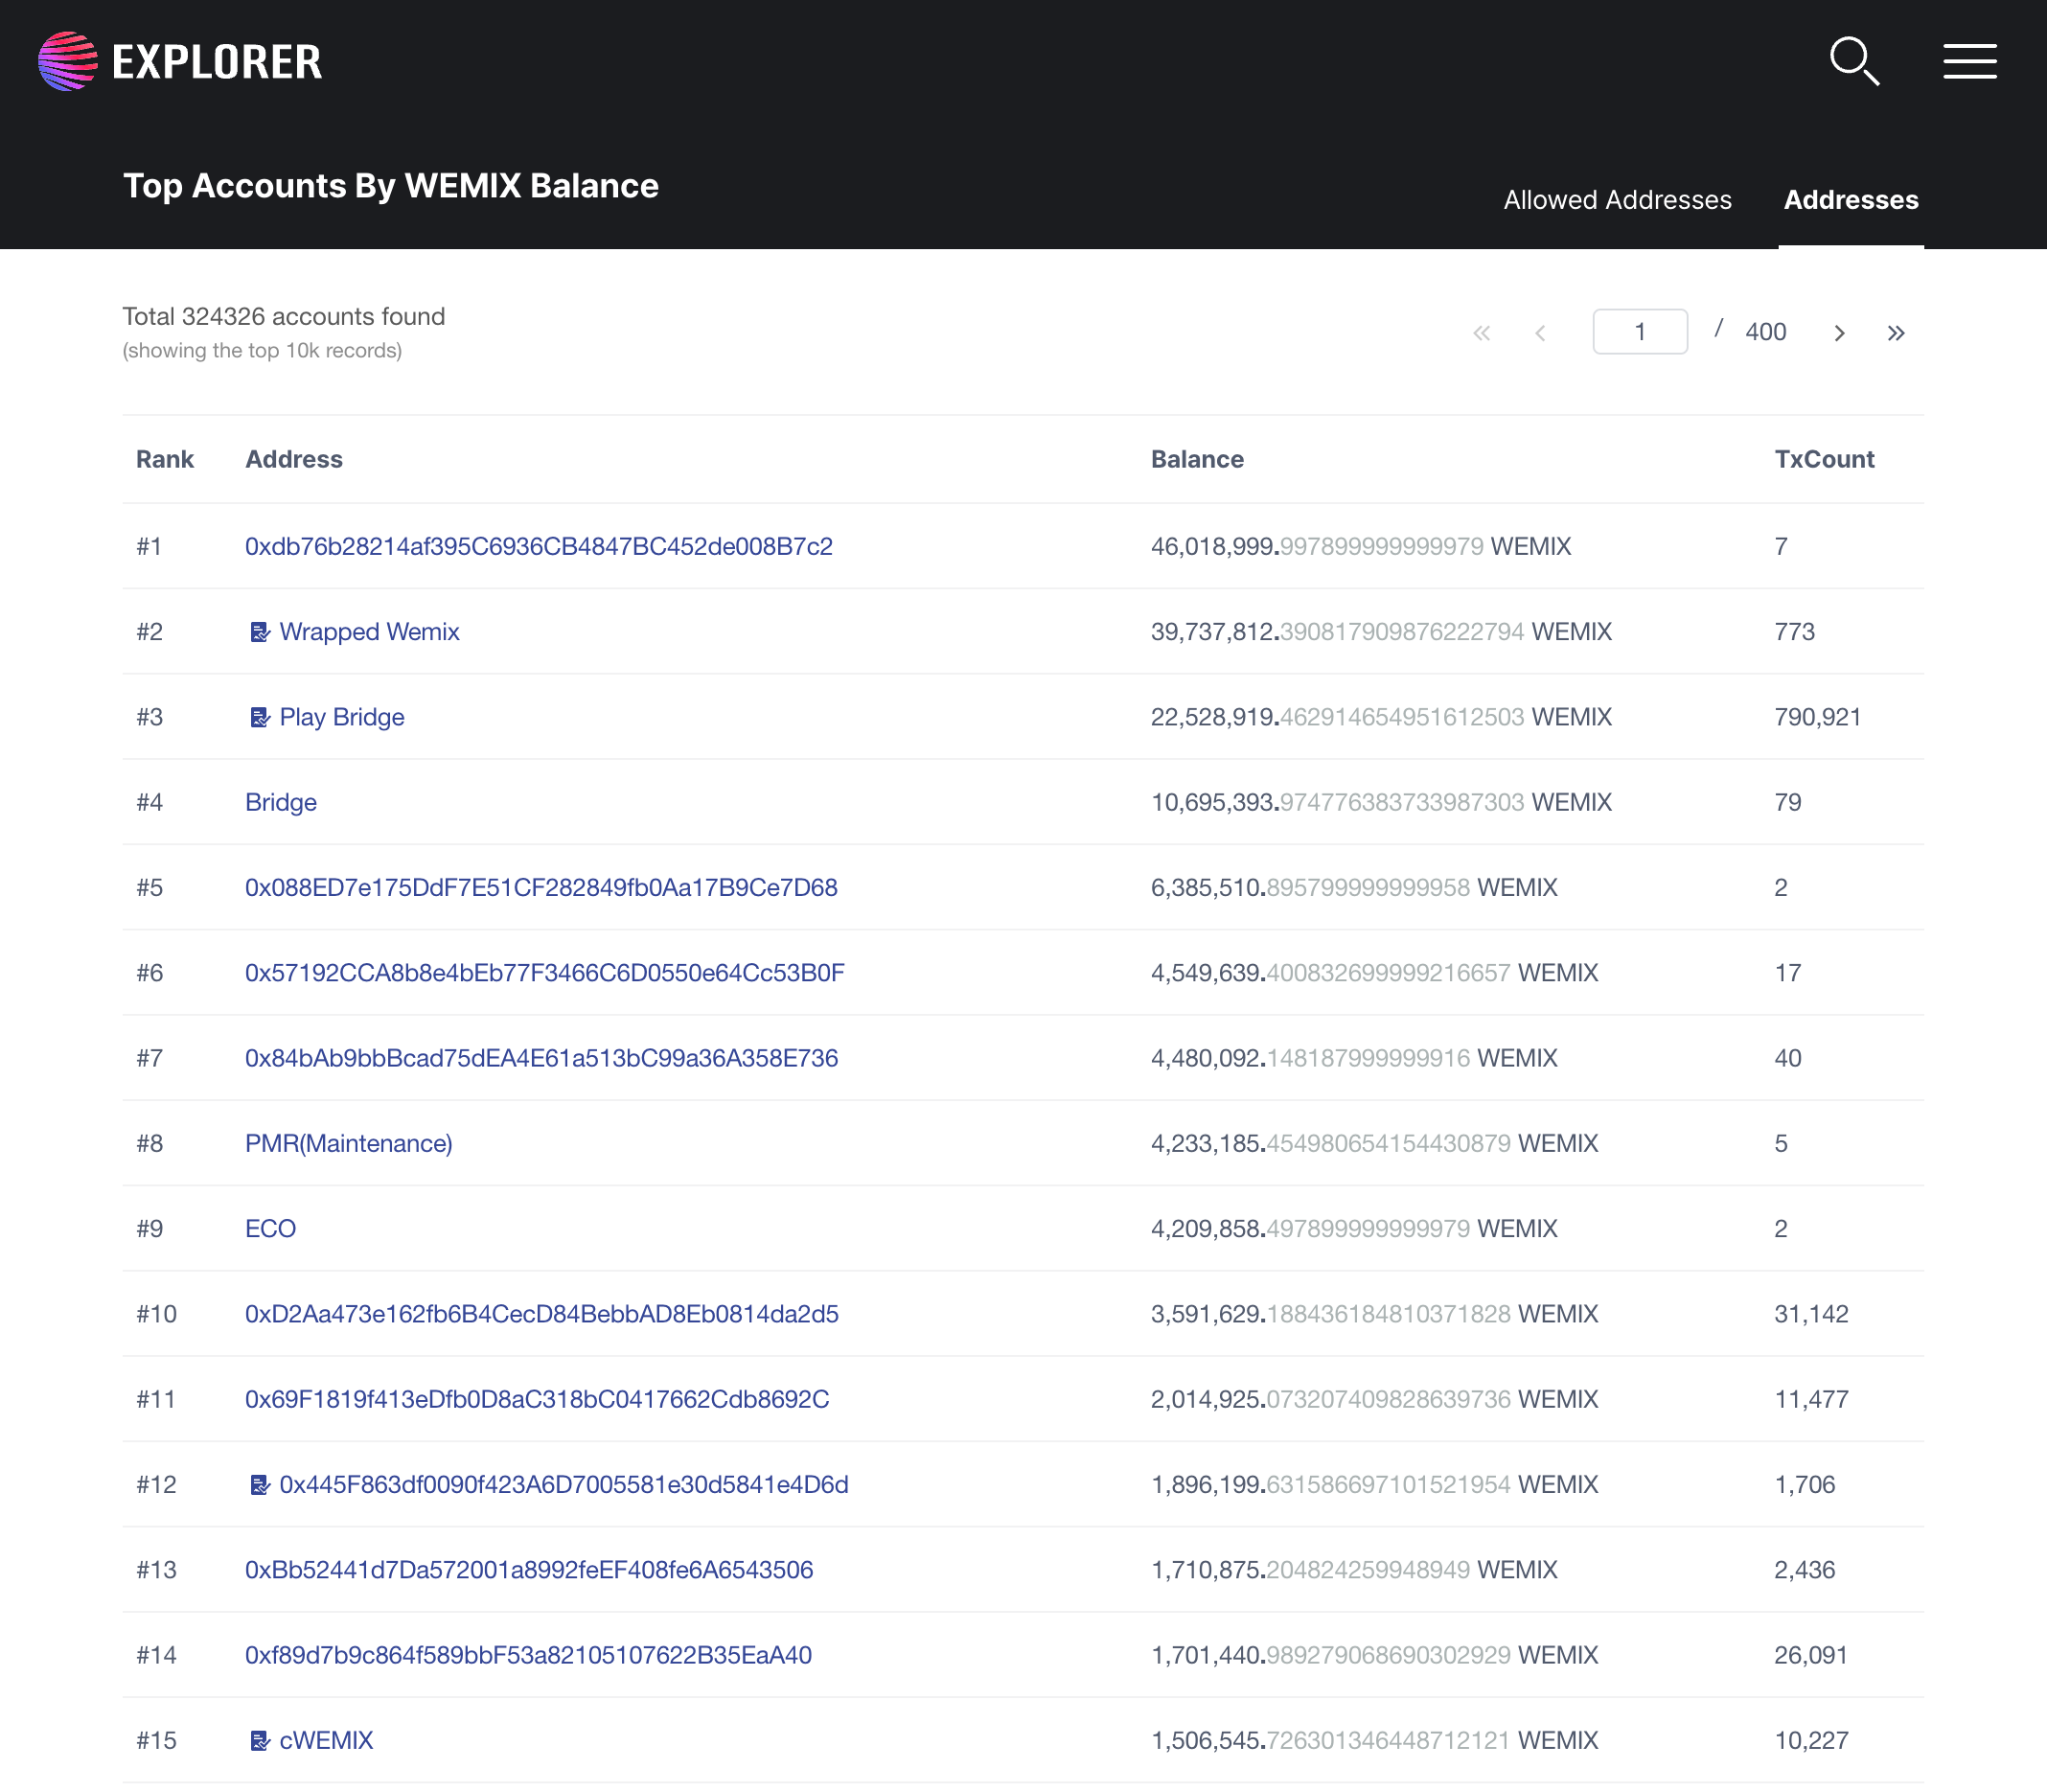
The feature allows user can view all addresses include contract address, external account addresses.
How to access
STEP 1: Open WEMIX Explorer.
STEP 2: Click to Address tab in the navigation of Web UI.
STEP 3: Select Allowed Addresses tab or Addresses tab.
STEP 4: The Web UI will be redirected to the selected page.
How to use
In this Web UI, we provide a table that shows all WEMIX addresses and sort by amount of WEMIX that address holds. In the top of the table, a title will show you how many accounts was found and a total of WEMIX in the WEMIX Blockchain Network. You will see 50 records by default, each record is a WEMIX address. The address can be a contract address with contract icon. Otherwise it's a external account address. This table has 4 columns.
Rank: Rank of this address.
Address: It's this address's hash, you can click to refer to the address details.
Balance: The number represents the amount of this address's WEMIX.
TxCount: The number of transactions that related to this address.
Address details
Description
The feature allows user can see address details.

How to access
STEP 1: Open WEMIX Explorer.
STEP 2: Click to Address tab in the navigation of Web UI.
STEP 3: Web UI will redirect to the Address page.
STEP 4: Click to {address hash}.
STEP 5: Web UI will redirect to the Address details page.
How to use
In this Web UI, we show all information of address that it's hash match with URL id param. Each address contains 6 fields.
Type: The type of this address - Contract or External account.
Name Tag: Address Name.
Balance: The number represents the amount of this address's WEMIX.
Appear date: The first time when this address was appeared on the WEMIX Network.
Transactions: The number of transactions that performed by this address.
Token: All Tokens held by this address
In this Web UI, we also list all Transactions, Internal Transactions and Event Logs that belong to this address.
View contract internal transactions
Description
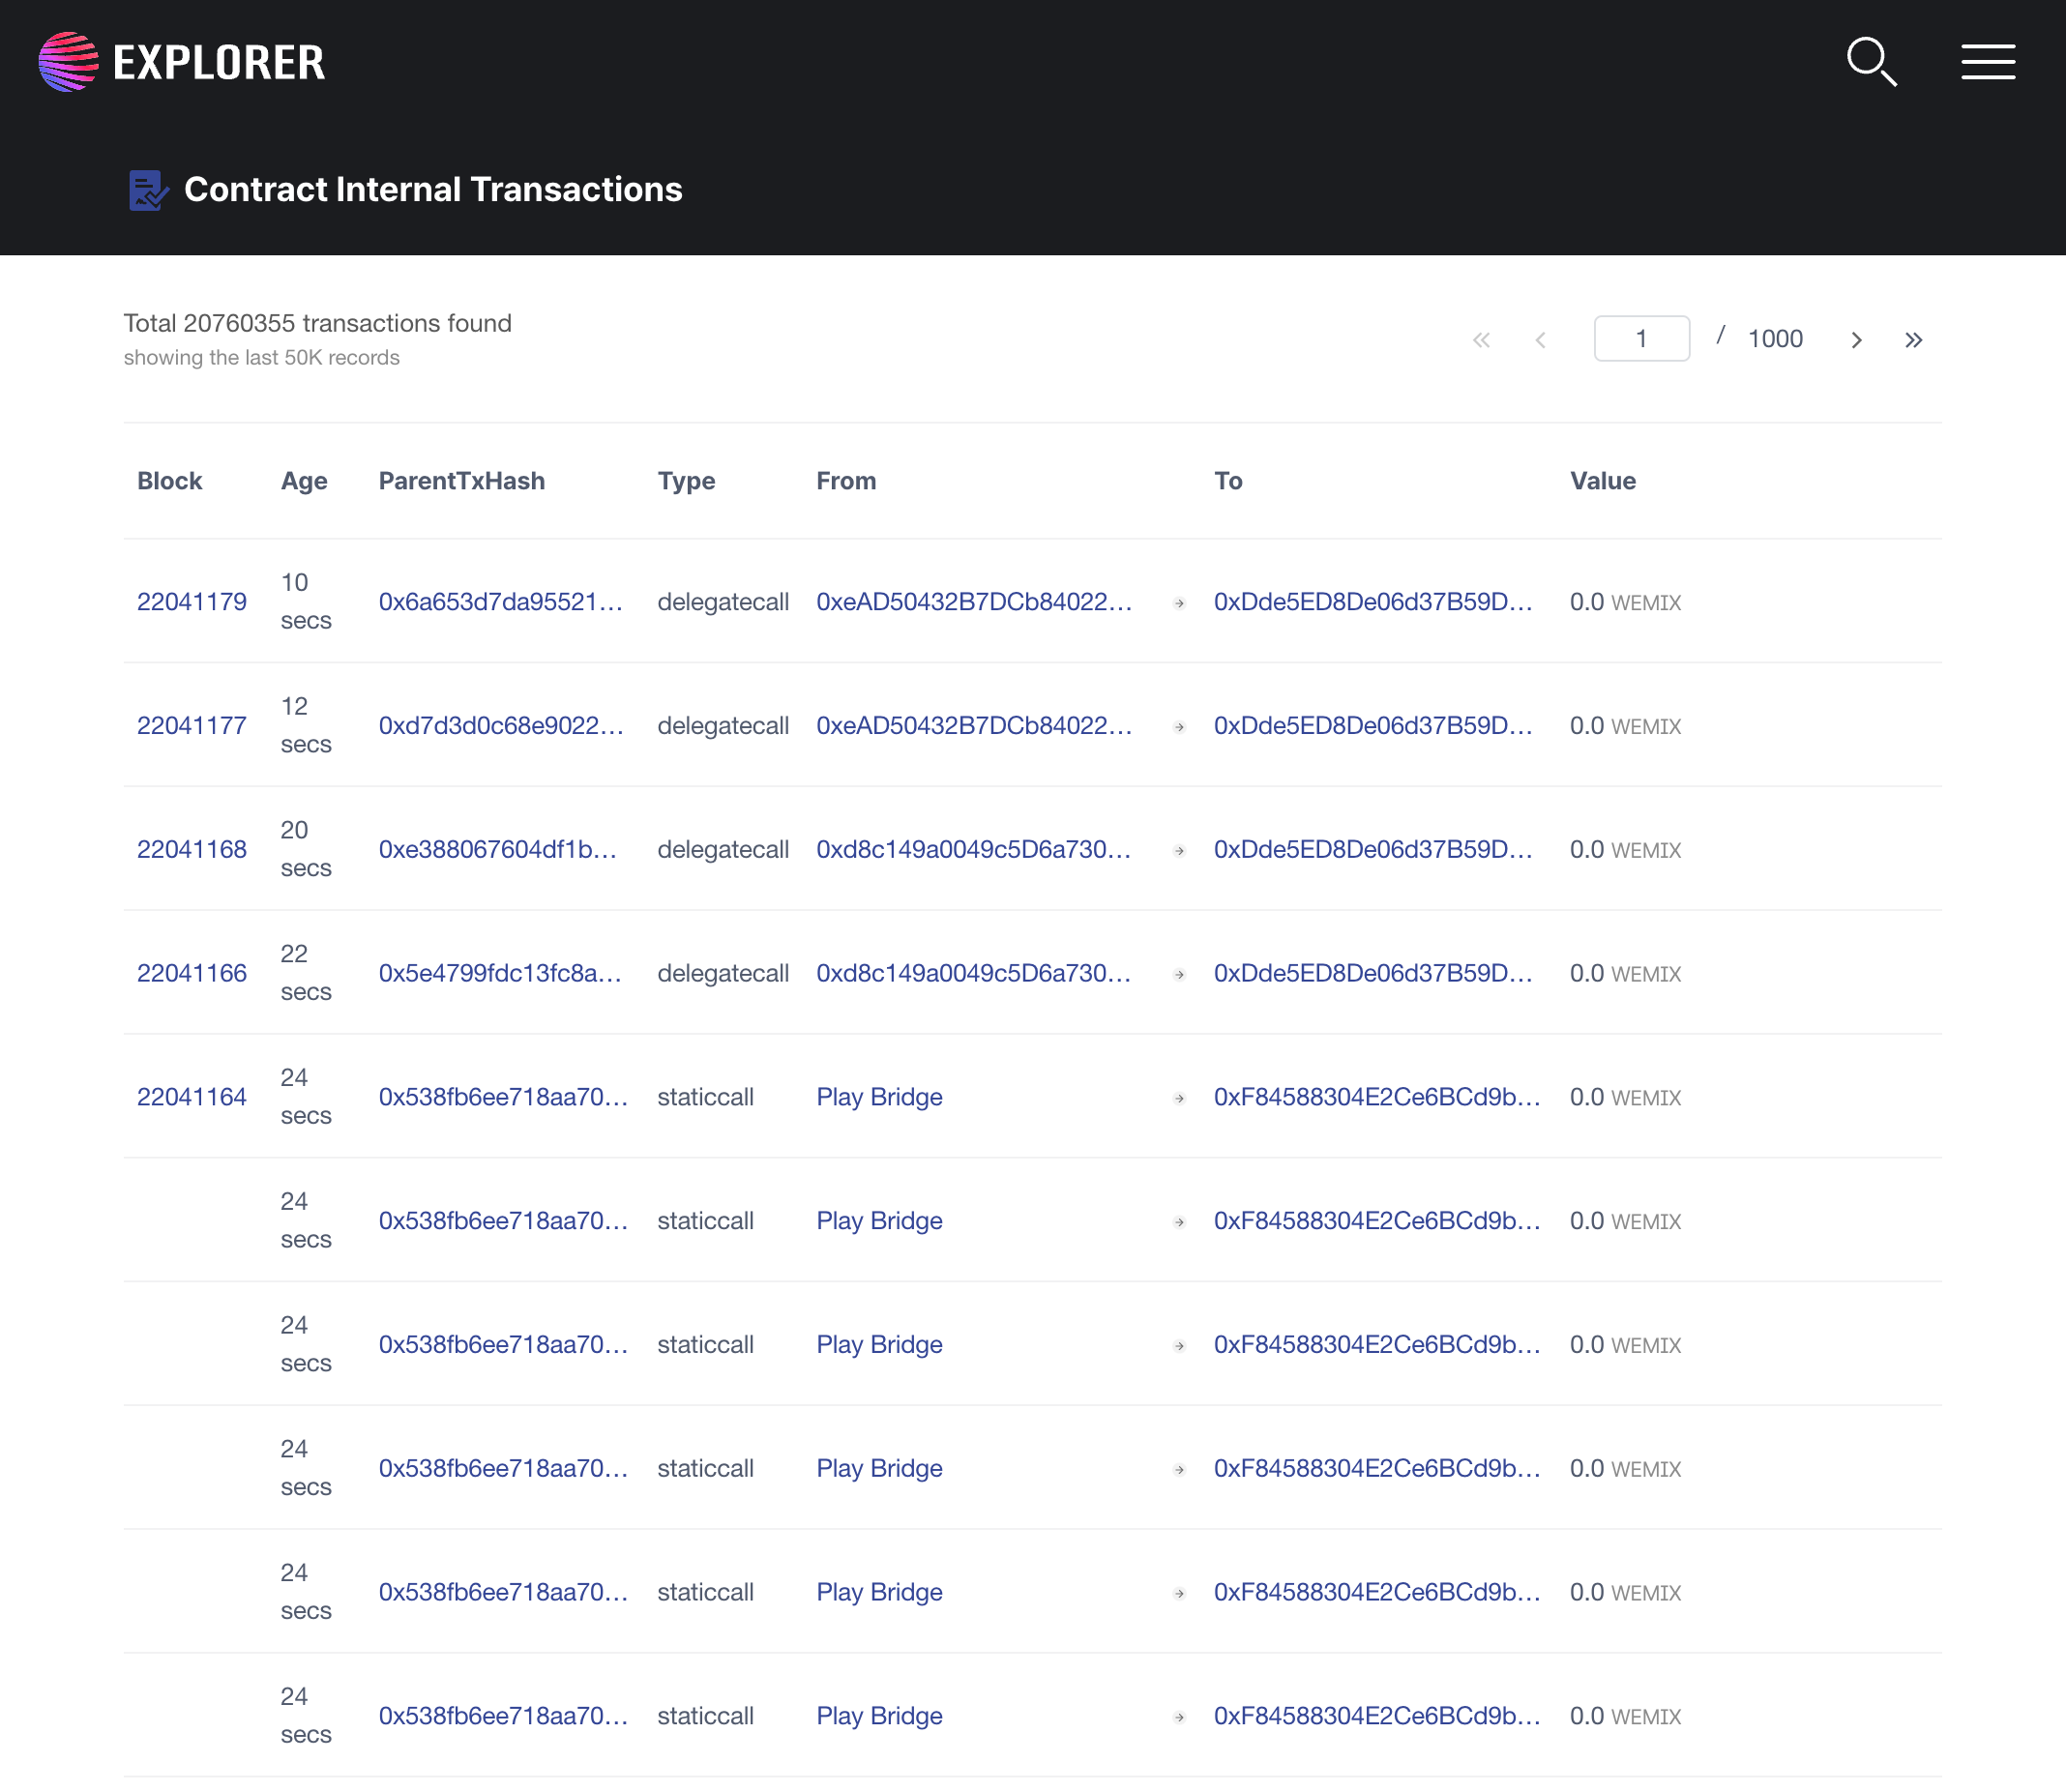
The feature allows user can view all internal transactions of a contract address.
How to access
STEP 1: Open WEMIX Explorer.
STEP 2: Click on Transactions and "View Contract Internal Txns” in the Web UI navigation.
STEP 3: Web UI will redirect to Contract Internal TRANSACTION page.
How to use
In Internal Transactions tab, we provide a table that shows all WEMIX internal transactions that belongs to an address and sort by latest blocks. In the top of the table, a title will show you a total of internal transactions that match URL filter. You will see 50 records by default, each record is a internal transaction. This table has 7 columns.
Block: The height of block which this transaction belongs to.
Age: The time when the block was introduced on the WEMIX Network.
Parent TxHash: The hash of transaction which this internal transaction belongs to.
Type: The trace's type and the order of trace excuting to extract this internal transactions.
From: The address that performed this internal transaction - the sender.
To: The address that received this internal transaction's value.
Value: The value transfer in this internal transaction.
View message signatures
Description
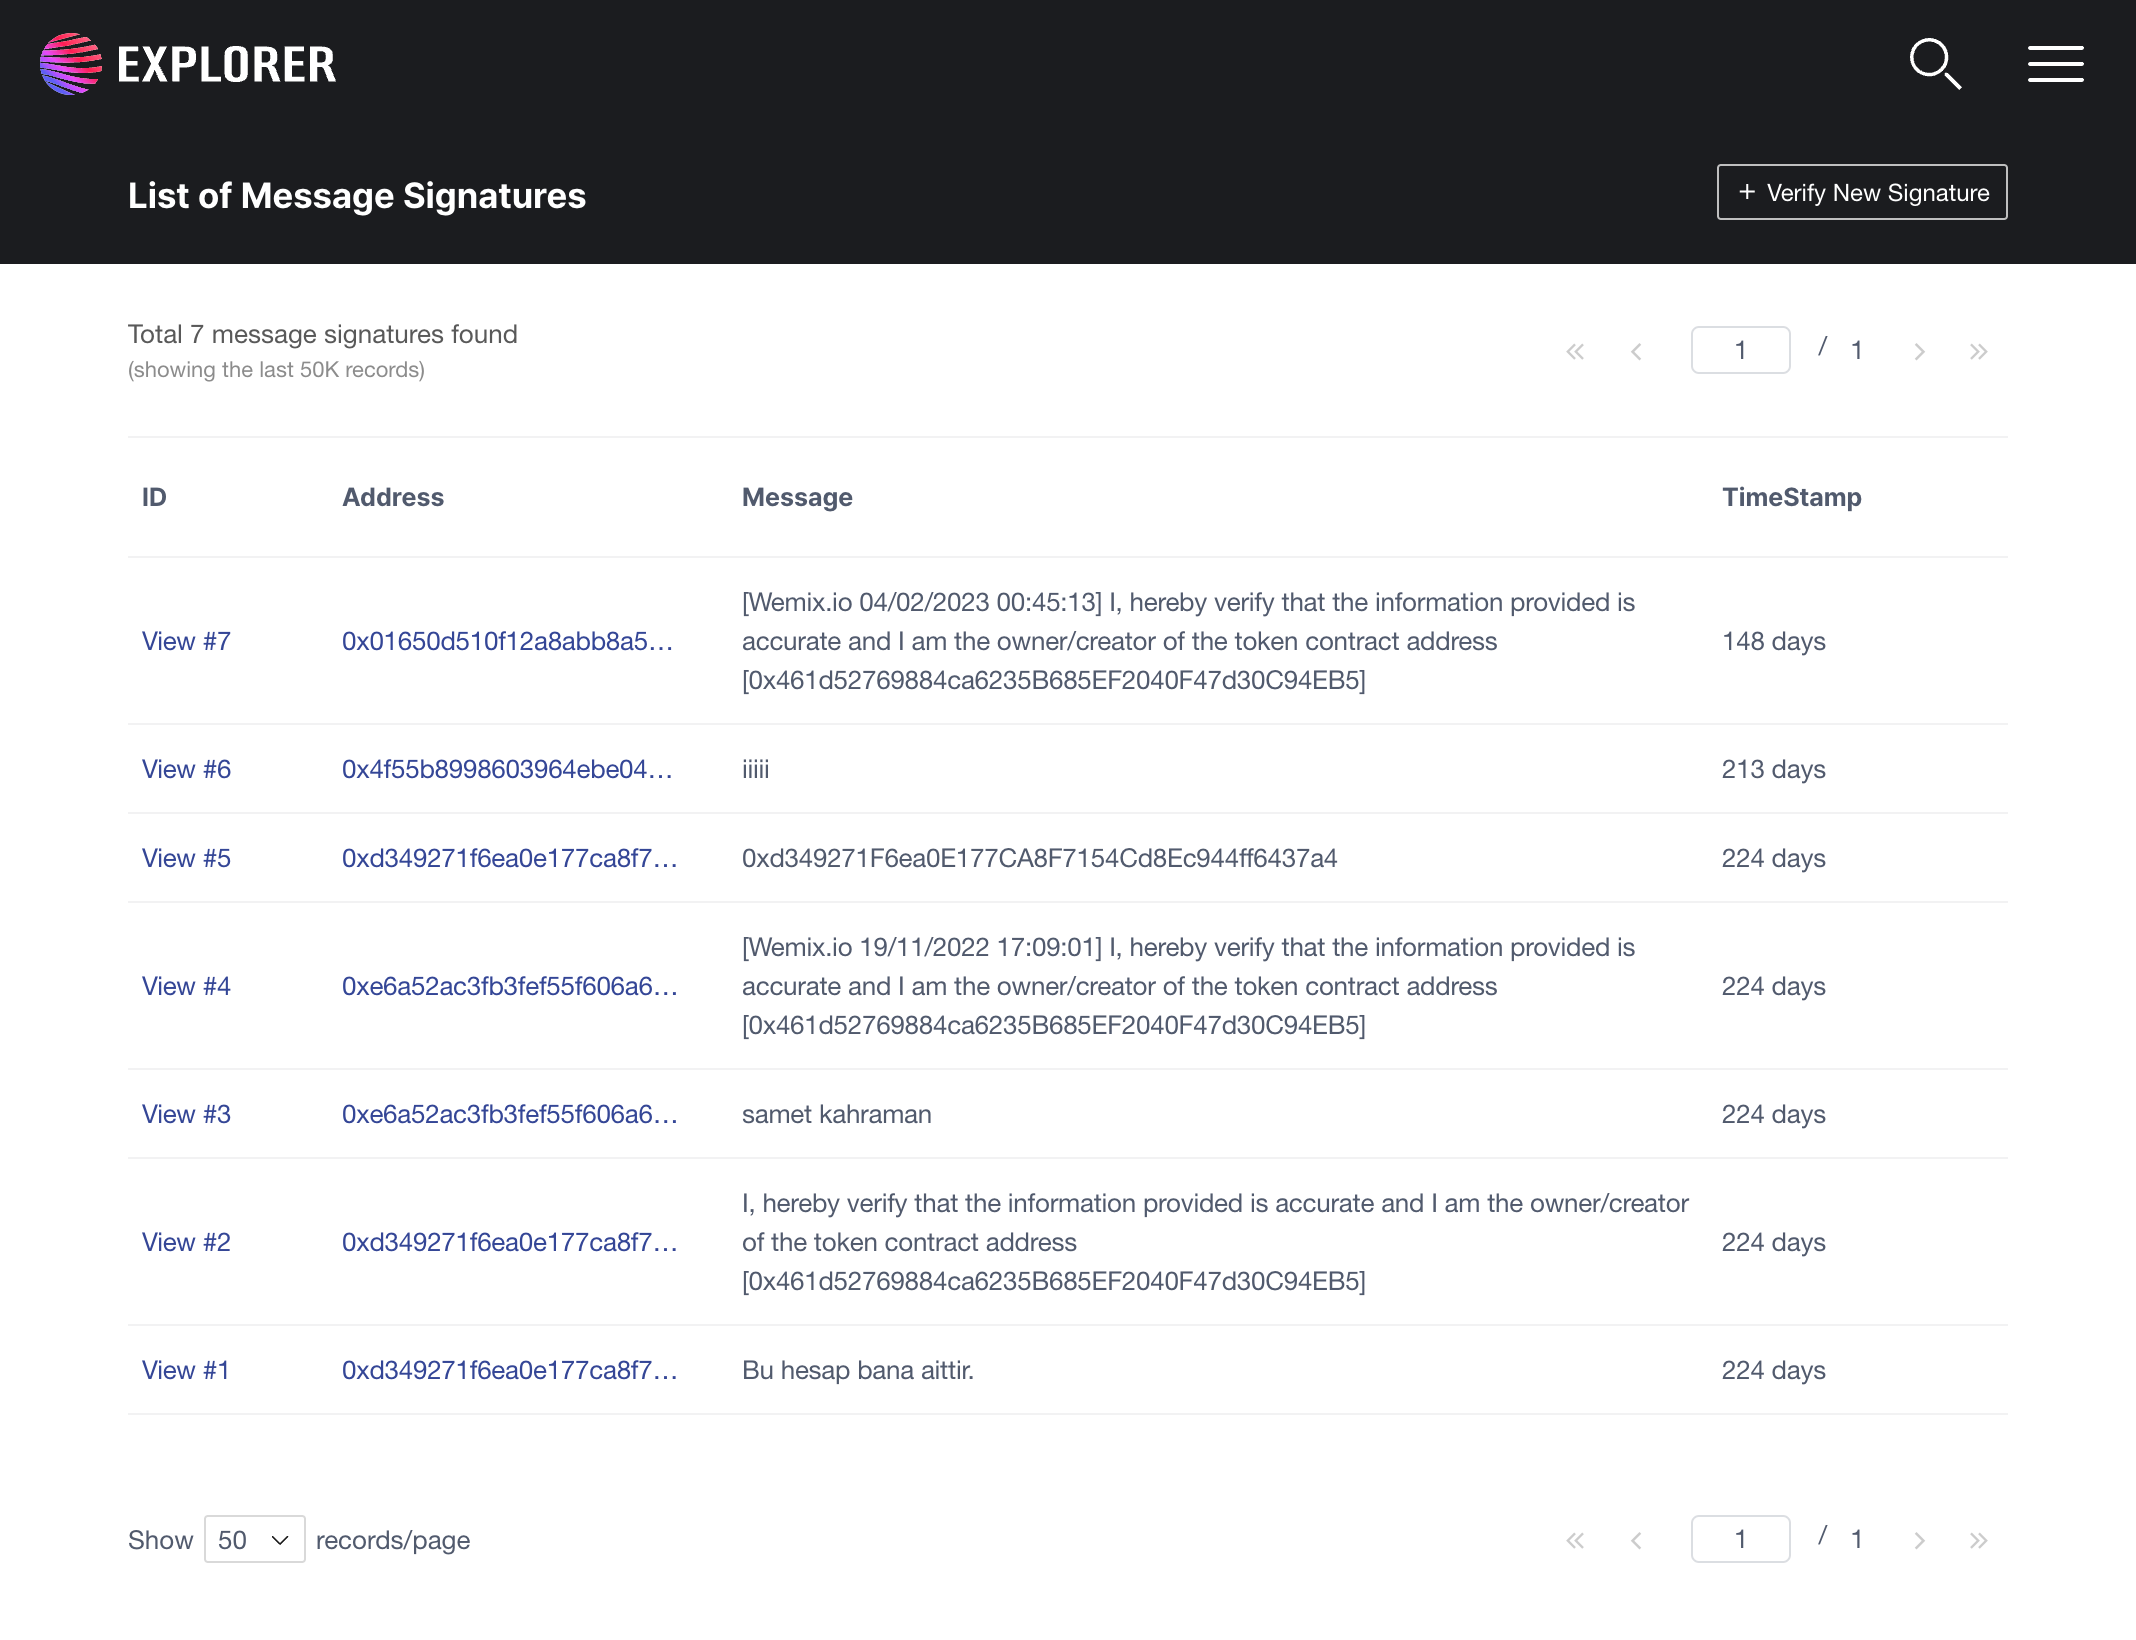
The feature allows user can view all message signatures which saved in the WEMIX block explorer system.
How to access
Step 1: Open WEMIX website.
Step 2: Click to More tab then choose "Verify Message Signature" in the navigation of Web UI.
Step 3: Web UI will redirect to the List of Message Signatures page.
How to use
In this Web UI, we provide a table that shows all WEMIX messages and sort by latest saved time. In the top of the table, a title will show you how many message signatures was found, but we show only the first 500K records. You will see 50 records by default, each record is a WEMIX message signatures that user verified and saved to the system. This table has 4 columns:
ID: Rank of this address. If you click to the View [#ID], you would see the message signature in details.
Address: It's hash of address that signed this message.
Message: The number represents the amount of this address's WEMIX.
TimeStamp: The age of message from the time it was saved.
Verify message signatures
Description
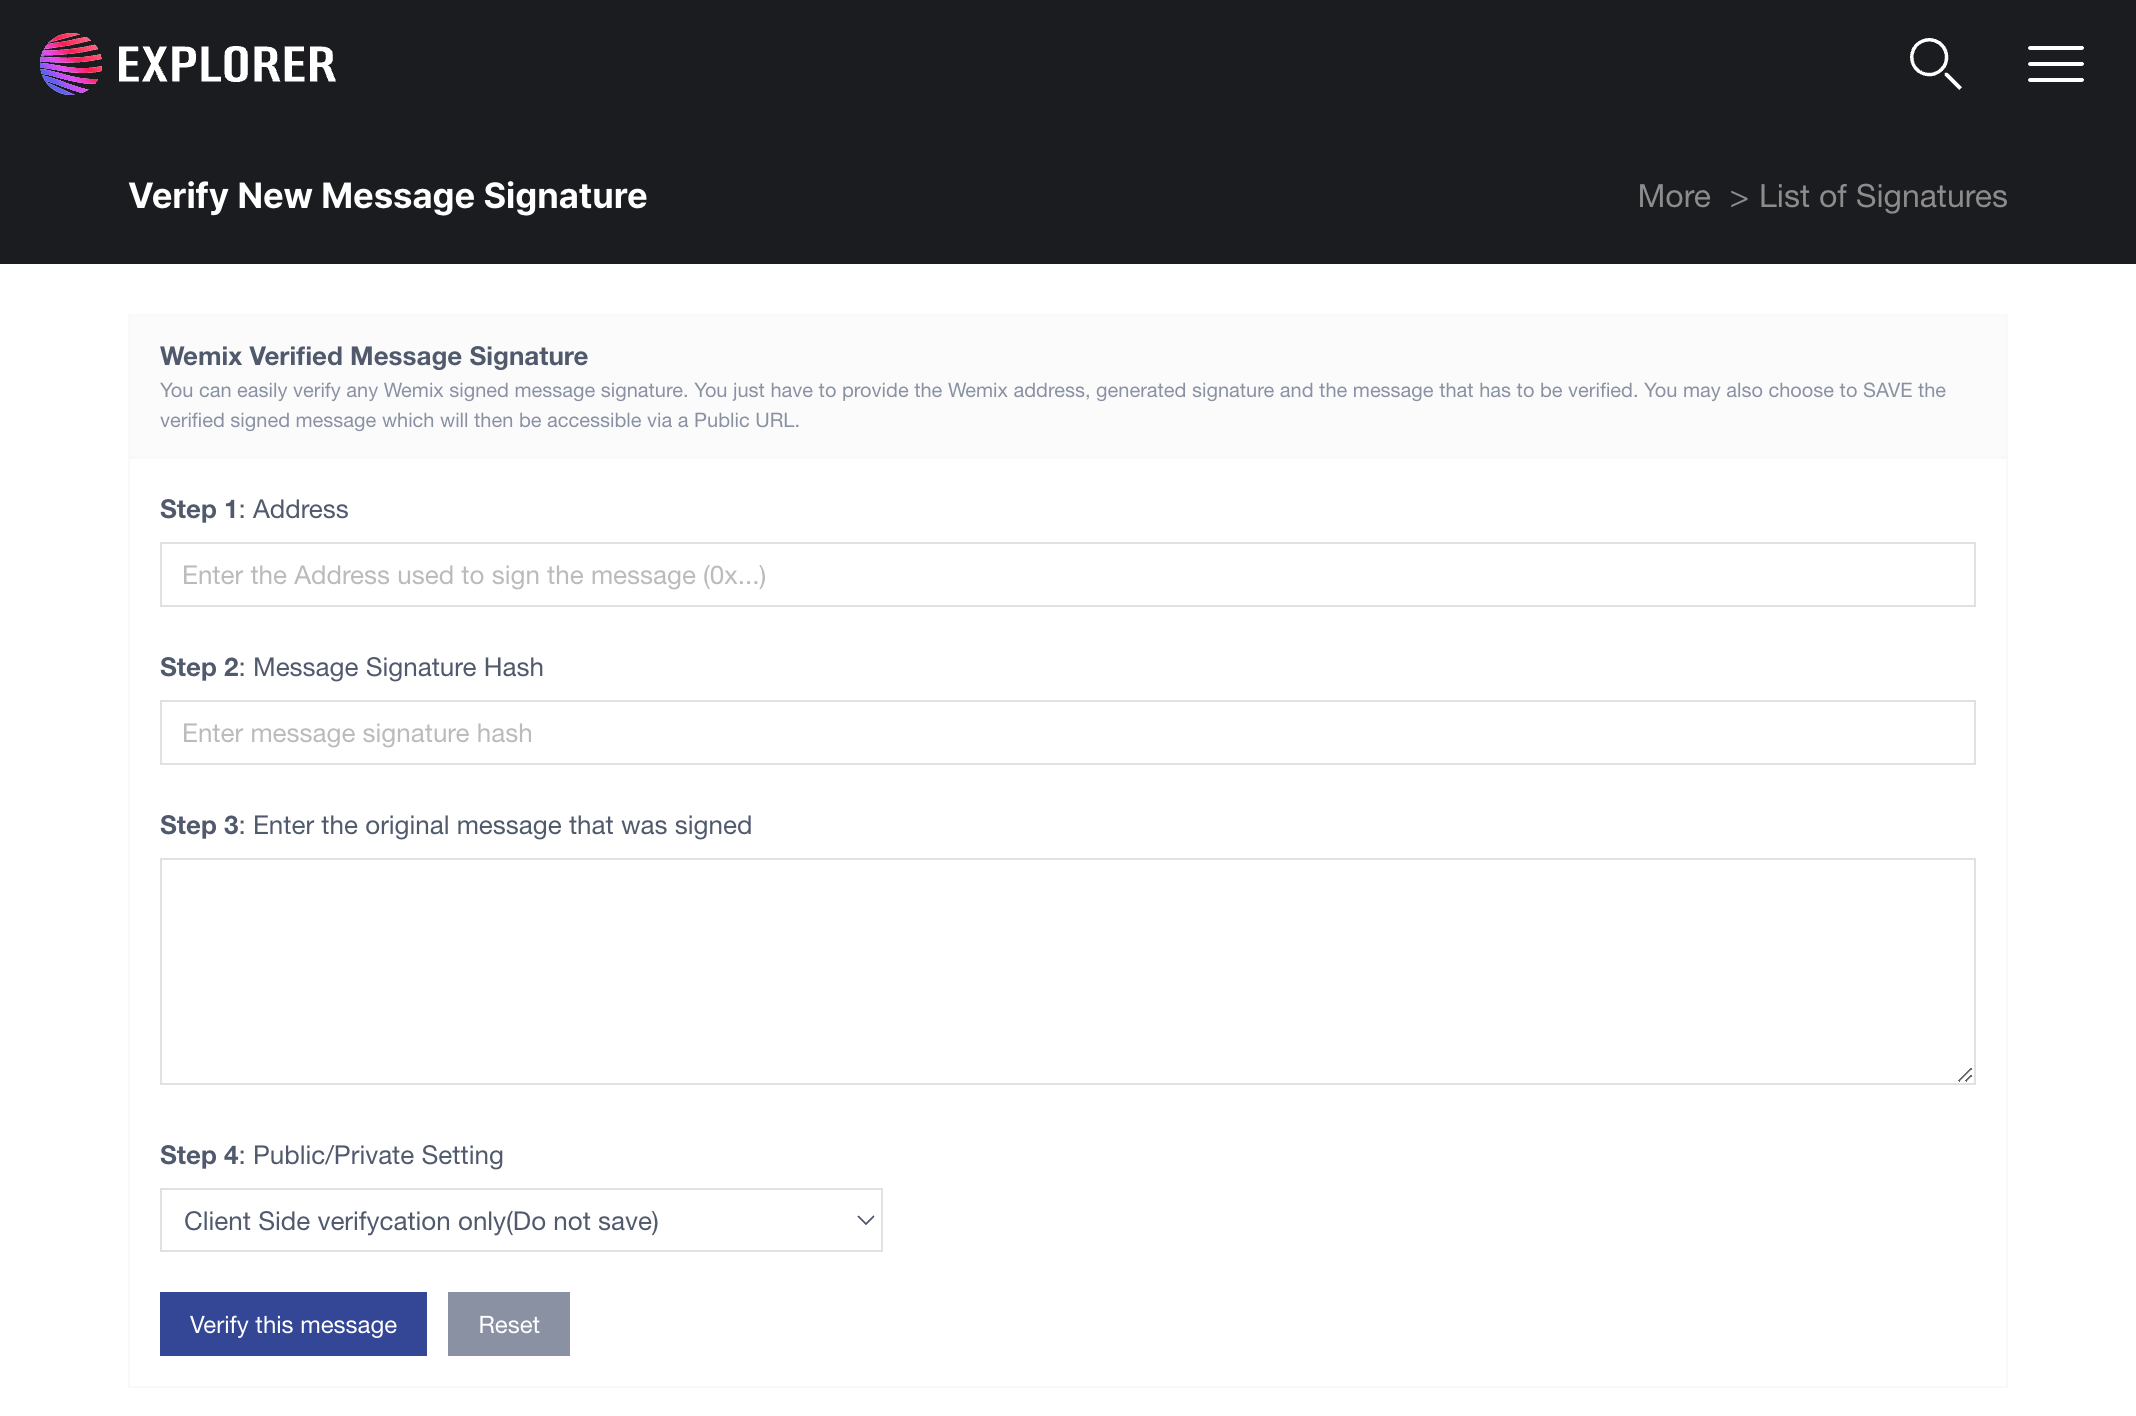
The feature allows user verify their message signature.
How to access
Step 1: Open WEMIX website.
Step 2: Click to More tab then choose "Verify Message Signature" in the navigation of Web UI.
Step 3: Web UI will redirect to the List of Message Signatures page.
Step 4: In List of Message Signatures page, click to Verify New Signature.
Step 5: Web UI will redirect to the Verify New Message Signature page.
How to use
In this Web UI, we provide provides a form for you to enter the values needed to authenticate your message signature.
"Step 1: Address": Paste your address which signed the message.
"Step 2: Message Signature Hash": Paste hash of the message.
"Step 3: Enter the original message that was signed": Paste the original message.
"Step 4: Public/Private Setting": Set up for private or public your message signature.
Then click to Verify this message and wait the response from server. If the response is "Message Signature Verified. Pass (1)!", it's mean you have a right message signature information.
Verify contract code
Description
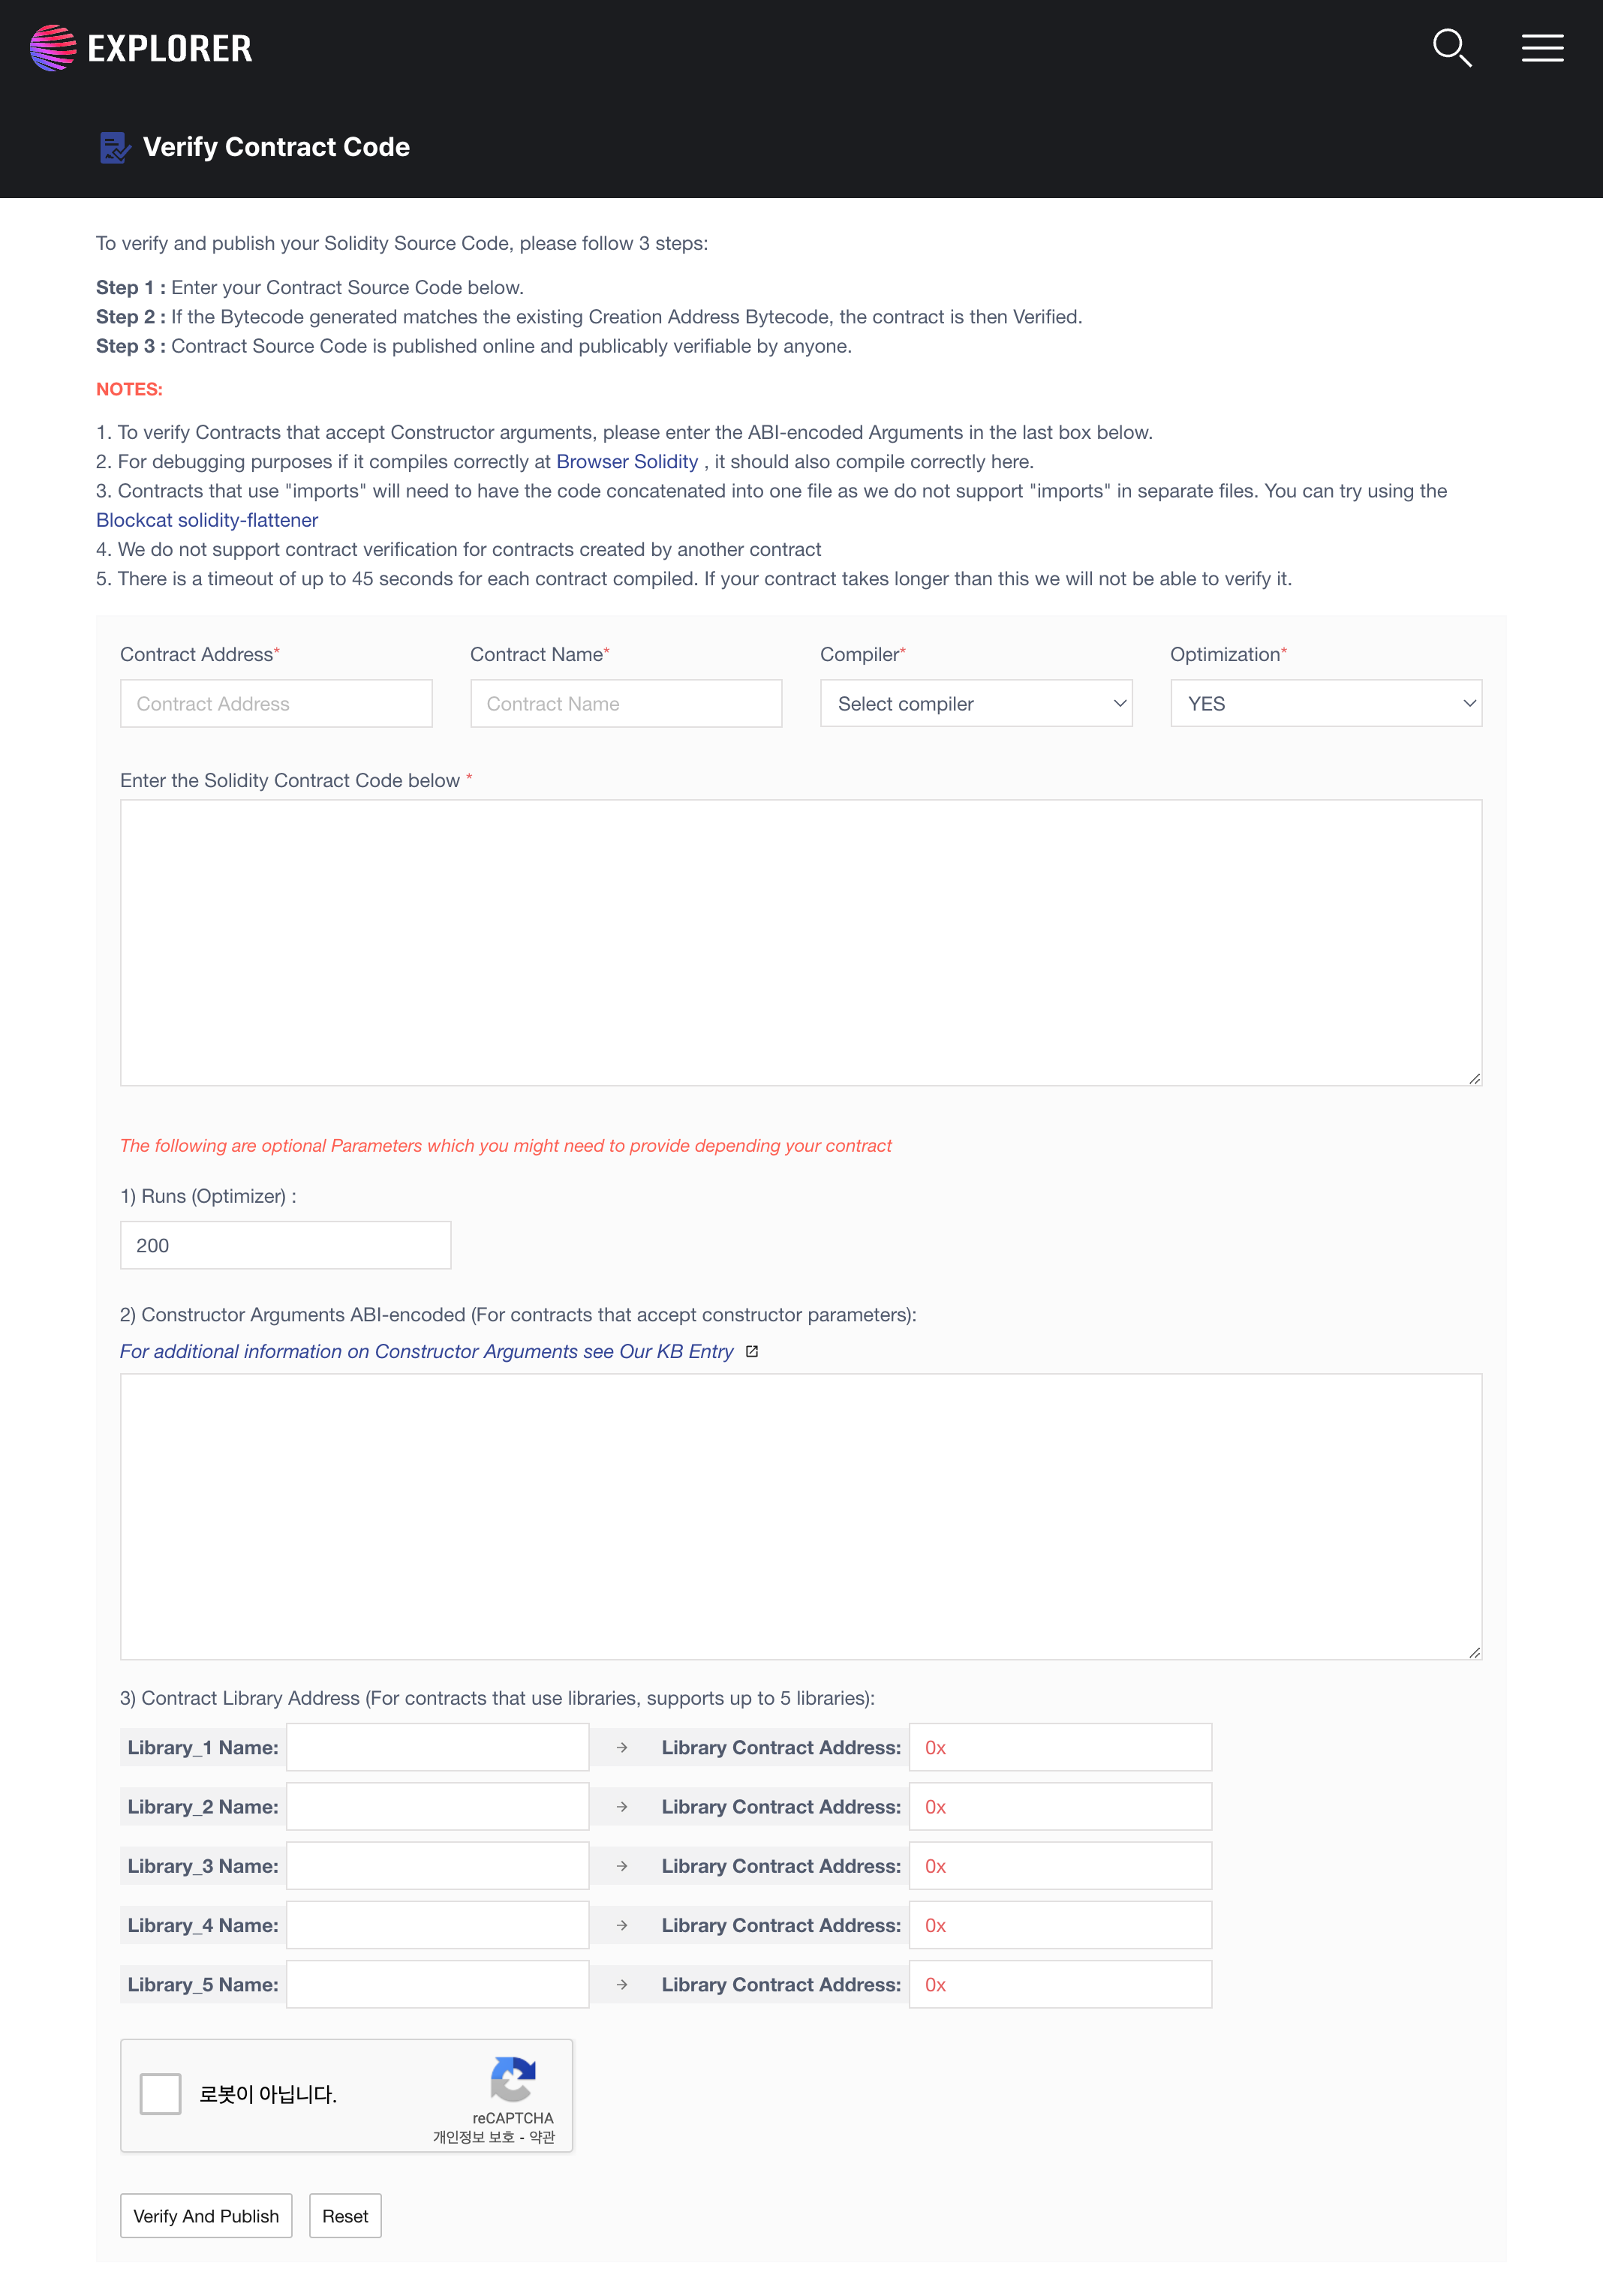
The feature allows contract owner can verify their contract code.
How to access
Step 1: Open WEMIX website.
Step 2: The search box for address searching in top of Web UI.
Step 3: Enter your contract address to the search box.
Step 4: Web UI will redirect to the contract details page.
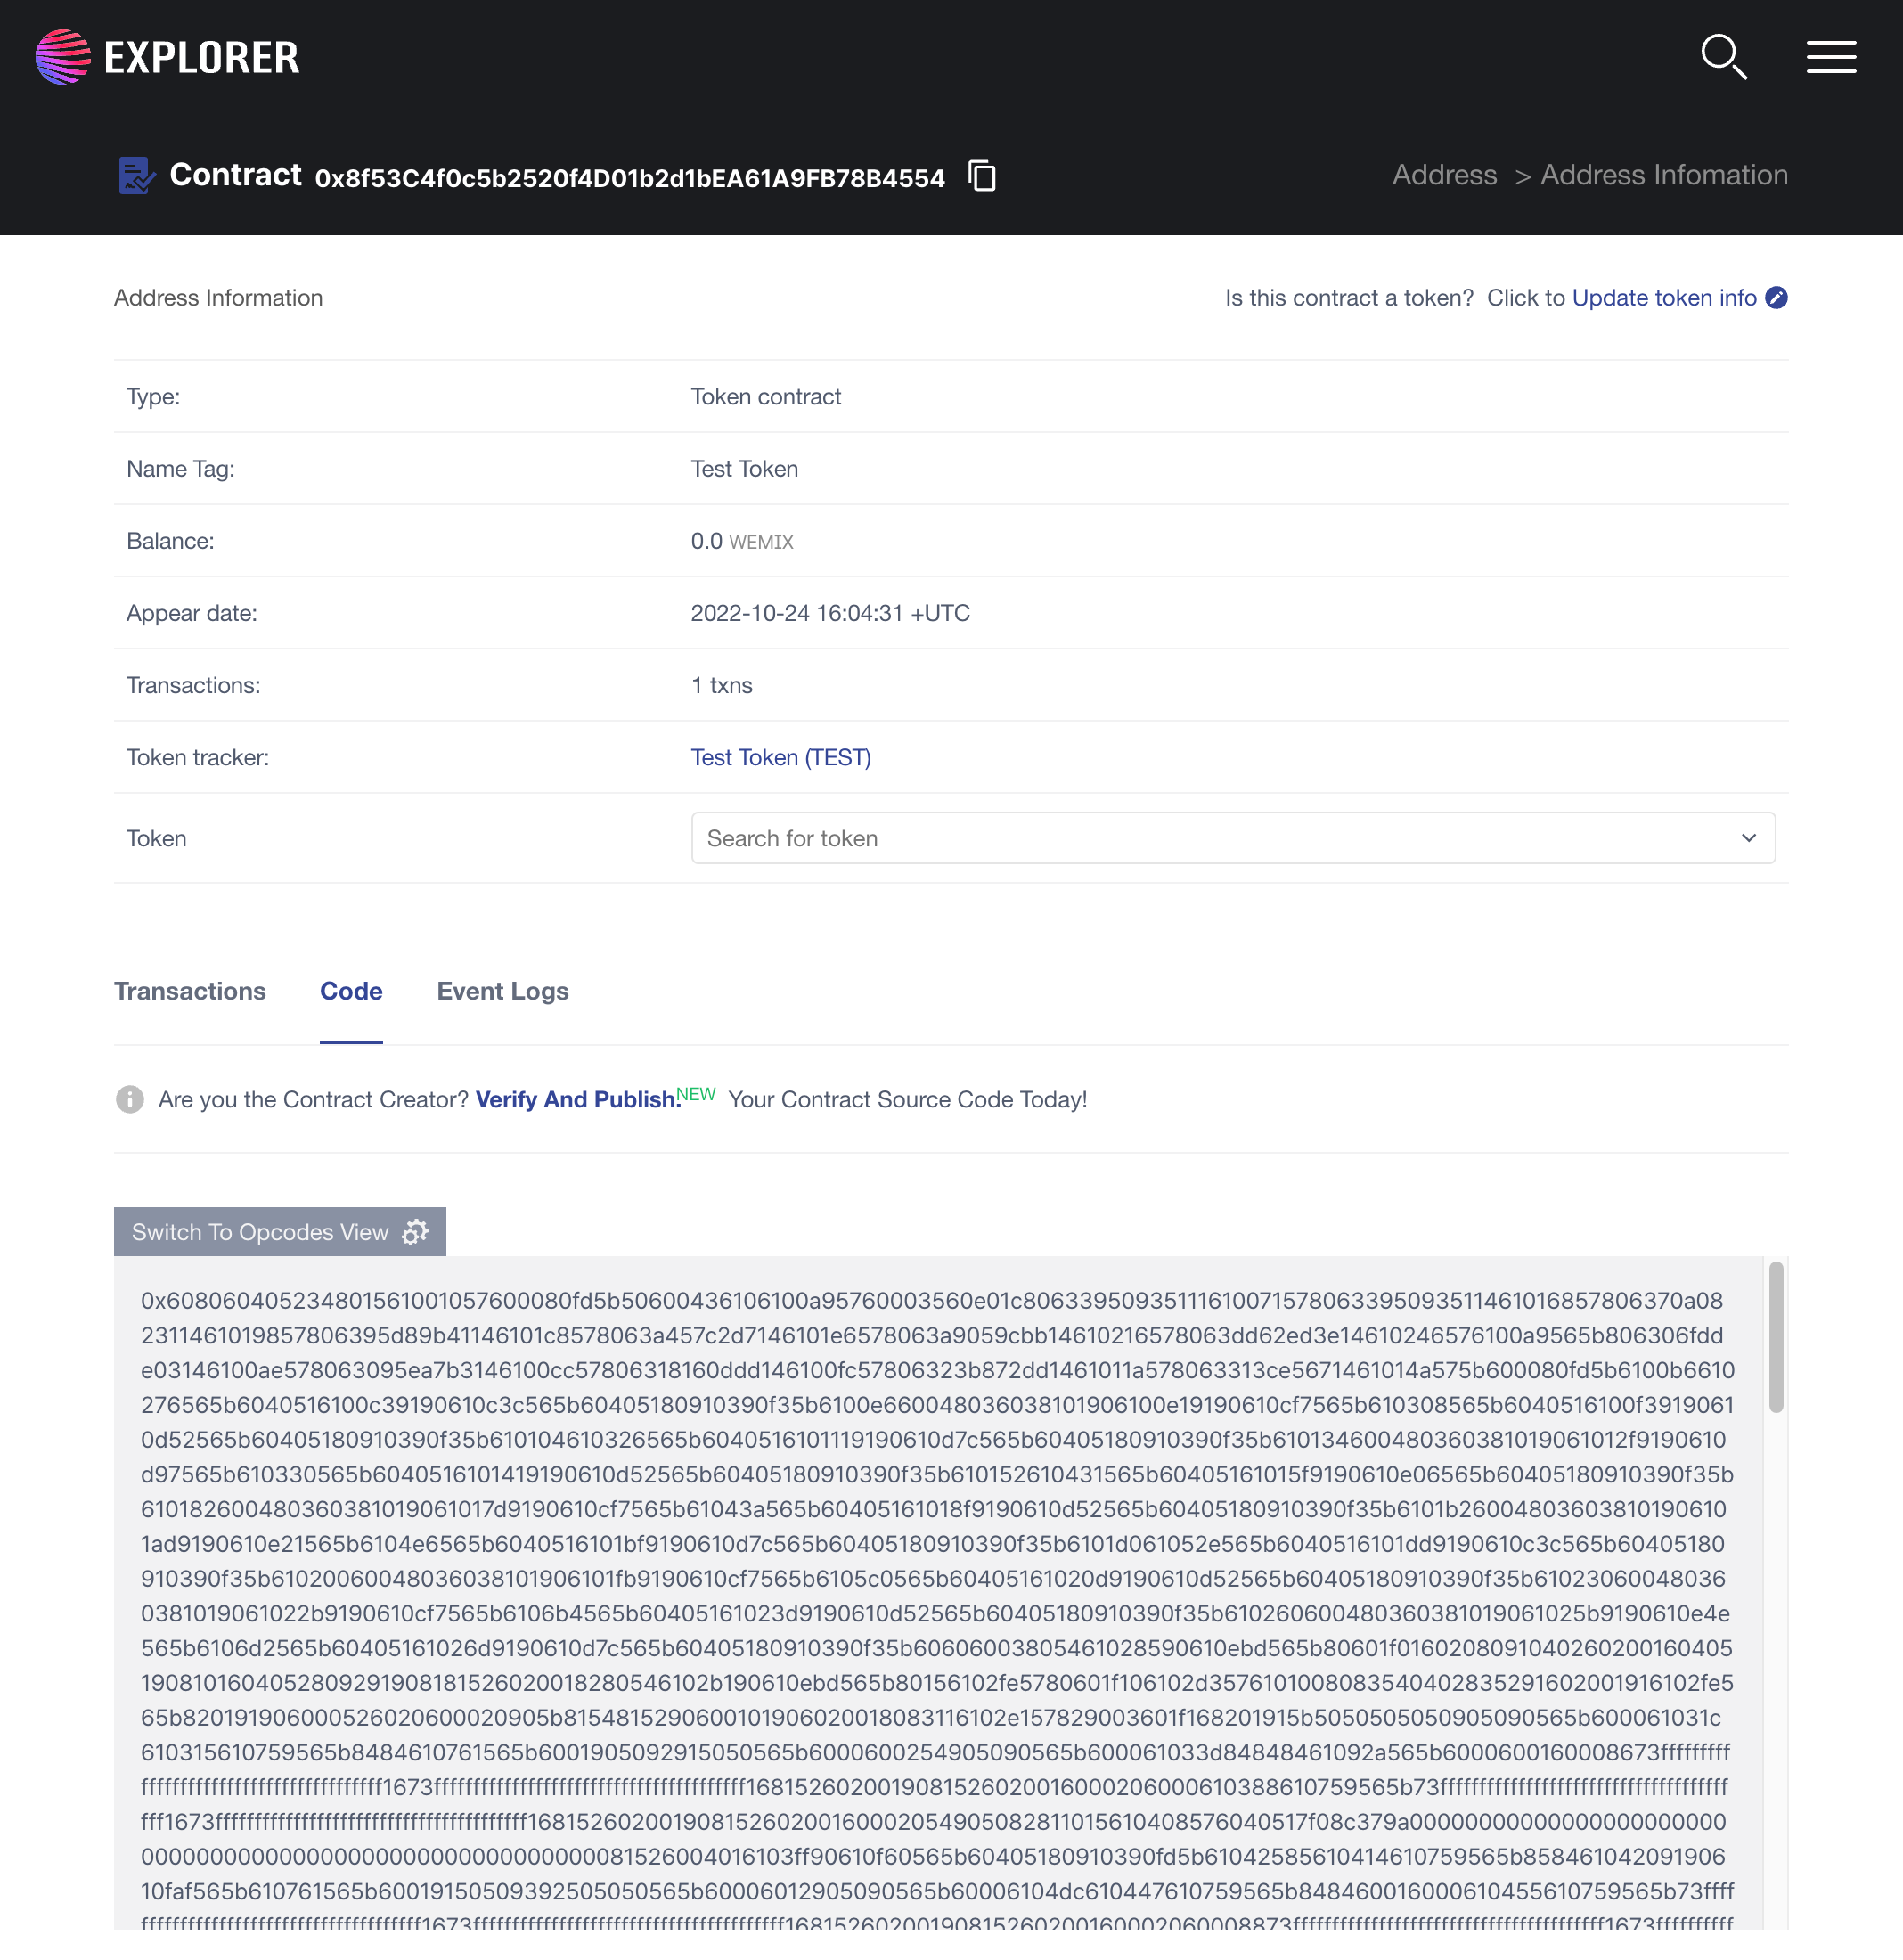
Step 5: Open Code tab, then click to Verify And Publish.
Step 6: Web UI will redirect to the Verify Contract Code page.
How to use
The reason for verifying contracts is to increase transparency and avoid fraud in the blockchain network. Before starting to verify and publish contract source code, please make sure:
If your contract have multi files, you must to have the code concatenated into one file as we do not support "imports" in separate files. You can try using the Blockcat solidity-flattener or SolidityFlattery.
If your contract compiles correctly at Remix Browser Solidity, it should also compile correctly here.
We do not support contract verification for contracts created by another contract.
There is a timeout of up to 45 seconds for each contract compiled. If your contract takes longer than this we will not be able to verify it.
If you make sure that have done everything above, then follow these below steps:
Step 1: If there is no contract address, you must enter your contract address.
Step 2: Set up your contract's name.
Step 3: Select version of solidity compiler.
Step 4: Select "Yes" in Optimization option if when deploy contract you enable Optimization. Otherwise, you must set it's value to "No".
Step 5: Enter your Contract Source Code.
Step 6: See the optional parameters sections, you might need to provide depending your contract.
Provide Runs (Optimizer) if you have Runs configuration in Optimization when setting up for contract deployment.
Provide Constructor Arguments ABI-encoded if your contract accept constructor parameters.
Provide Contract Library Address which includes name of the library & corresponding address of this library in the WEMIX network, if your contract use libraries. Note that we just support up to 5 libraries.
Step 7: Please check to "Not a robot" then click to Verify and Publish.
If your contract source code is match, Web UI would redirect to Contract details page and open Code tab. You can see a small green tick icon on top of Code label.
Verify Address
Description
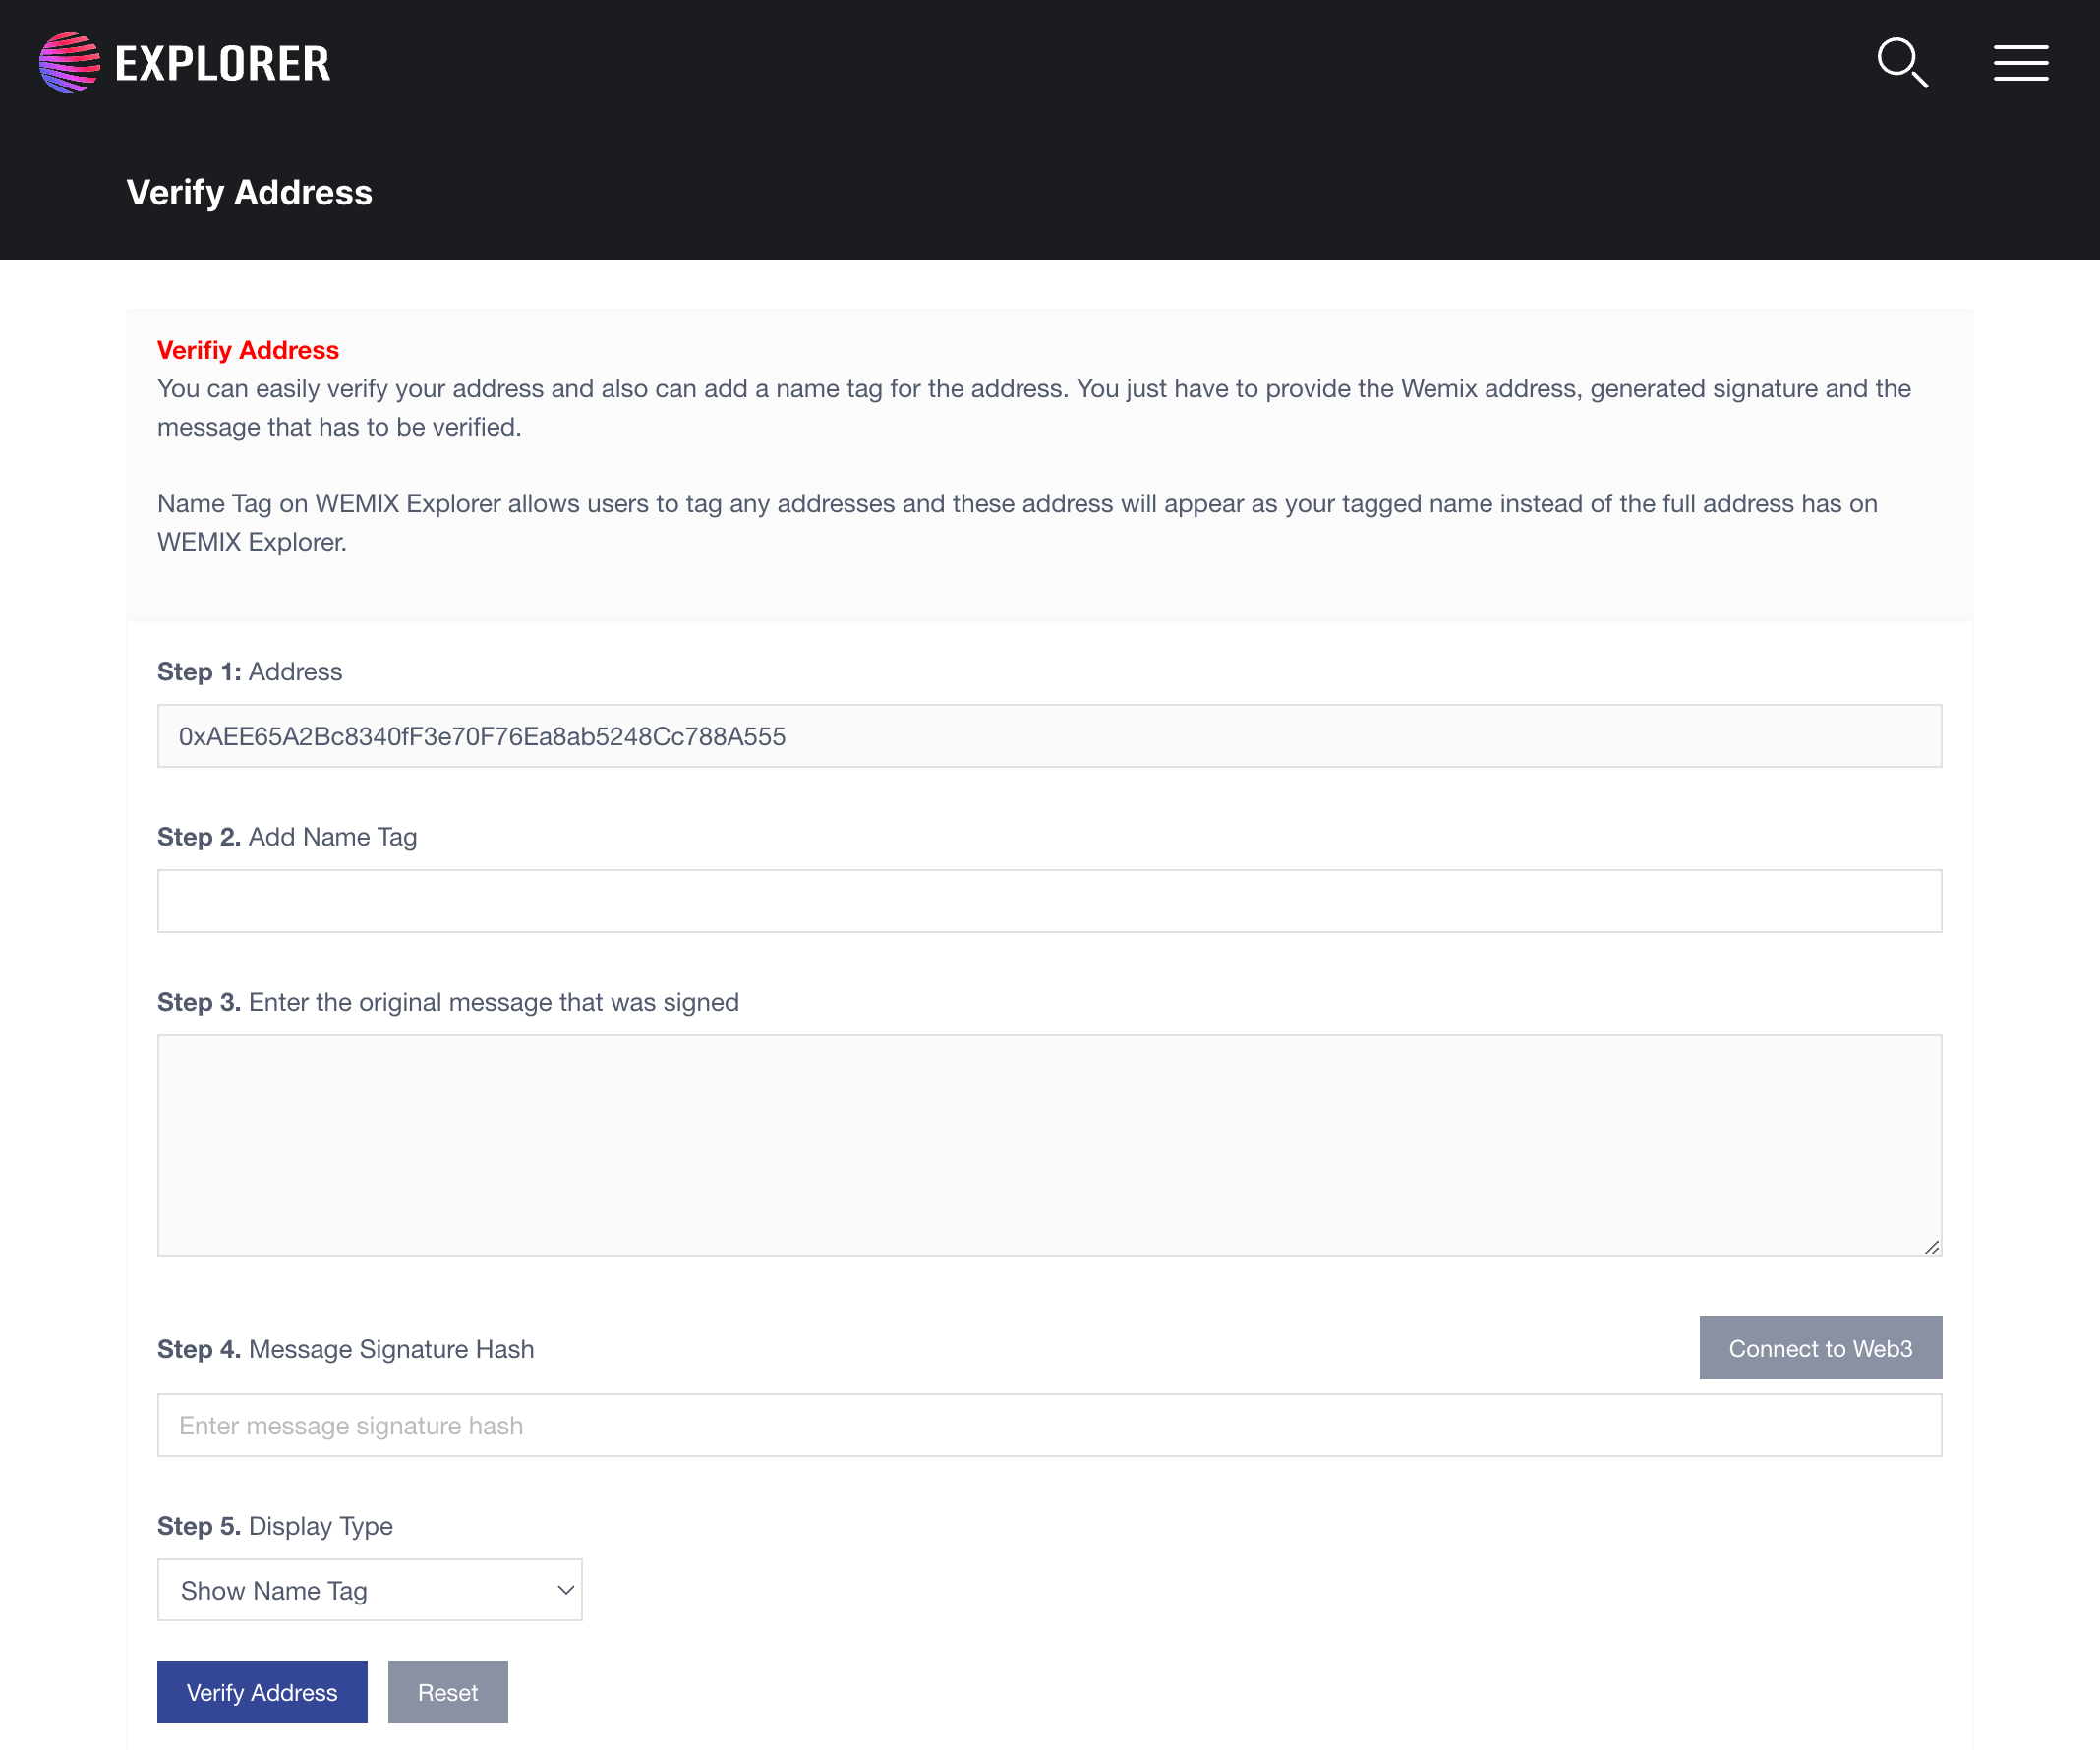
This feature allows user to set the name of the address.
How to access
Step 1: Open WEMIX Explorer.
Step 2: Enter your address to the search box.
Step 3: Web UI will redirect to the address details page.
Step 4: In Address Information section, click to Verify Address.
Step 5: Web UI will redirect to the Verify Address page.
How to use
Before starting to verify address, please make sure you are address owner and installed Metamask.
If you make sure that have done everything above, then follow these below steps:
Step 1: Enter the name of the address.
Step 2: Click to Connect to Web3. You sign the message by using Metamask. We need to make sure you are address owner.
Step 3: Select whether to display the entered name tag.
Click Verify Address to save your information on the server.
Update token information
Description
The feature allows contract owner can update the token information. This information will be saved on the WEMIX block explorer server.
You can update token info only if you are contract owner and your contract code is verified.
How to access
Step 1: Open WEMIX website.
Step 2: The search box for address searching in top of Web UI.
Step 3: Enter your contract address to the search box.
Step 4: Web UI will redirect to the contract details page.
Step 5: In Address Information section, click to Update token info.
Step 6: Web UI will redirect to the Update Token Information page.
How to use
Before starting to 2 steps to update token info, please make sure you are contract owner and installed Metamask.
If you make sure that have done everything above, then follow these below steps:
Step 1: Click to Connect to Web3. We need to make sure you are contract owner. After you have signed message by using Metamask, click to Next to Step 2.
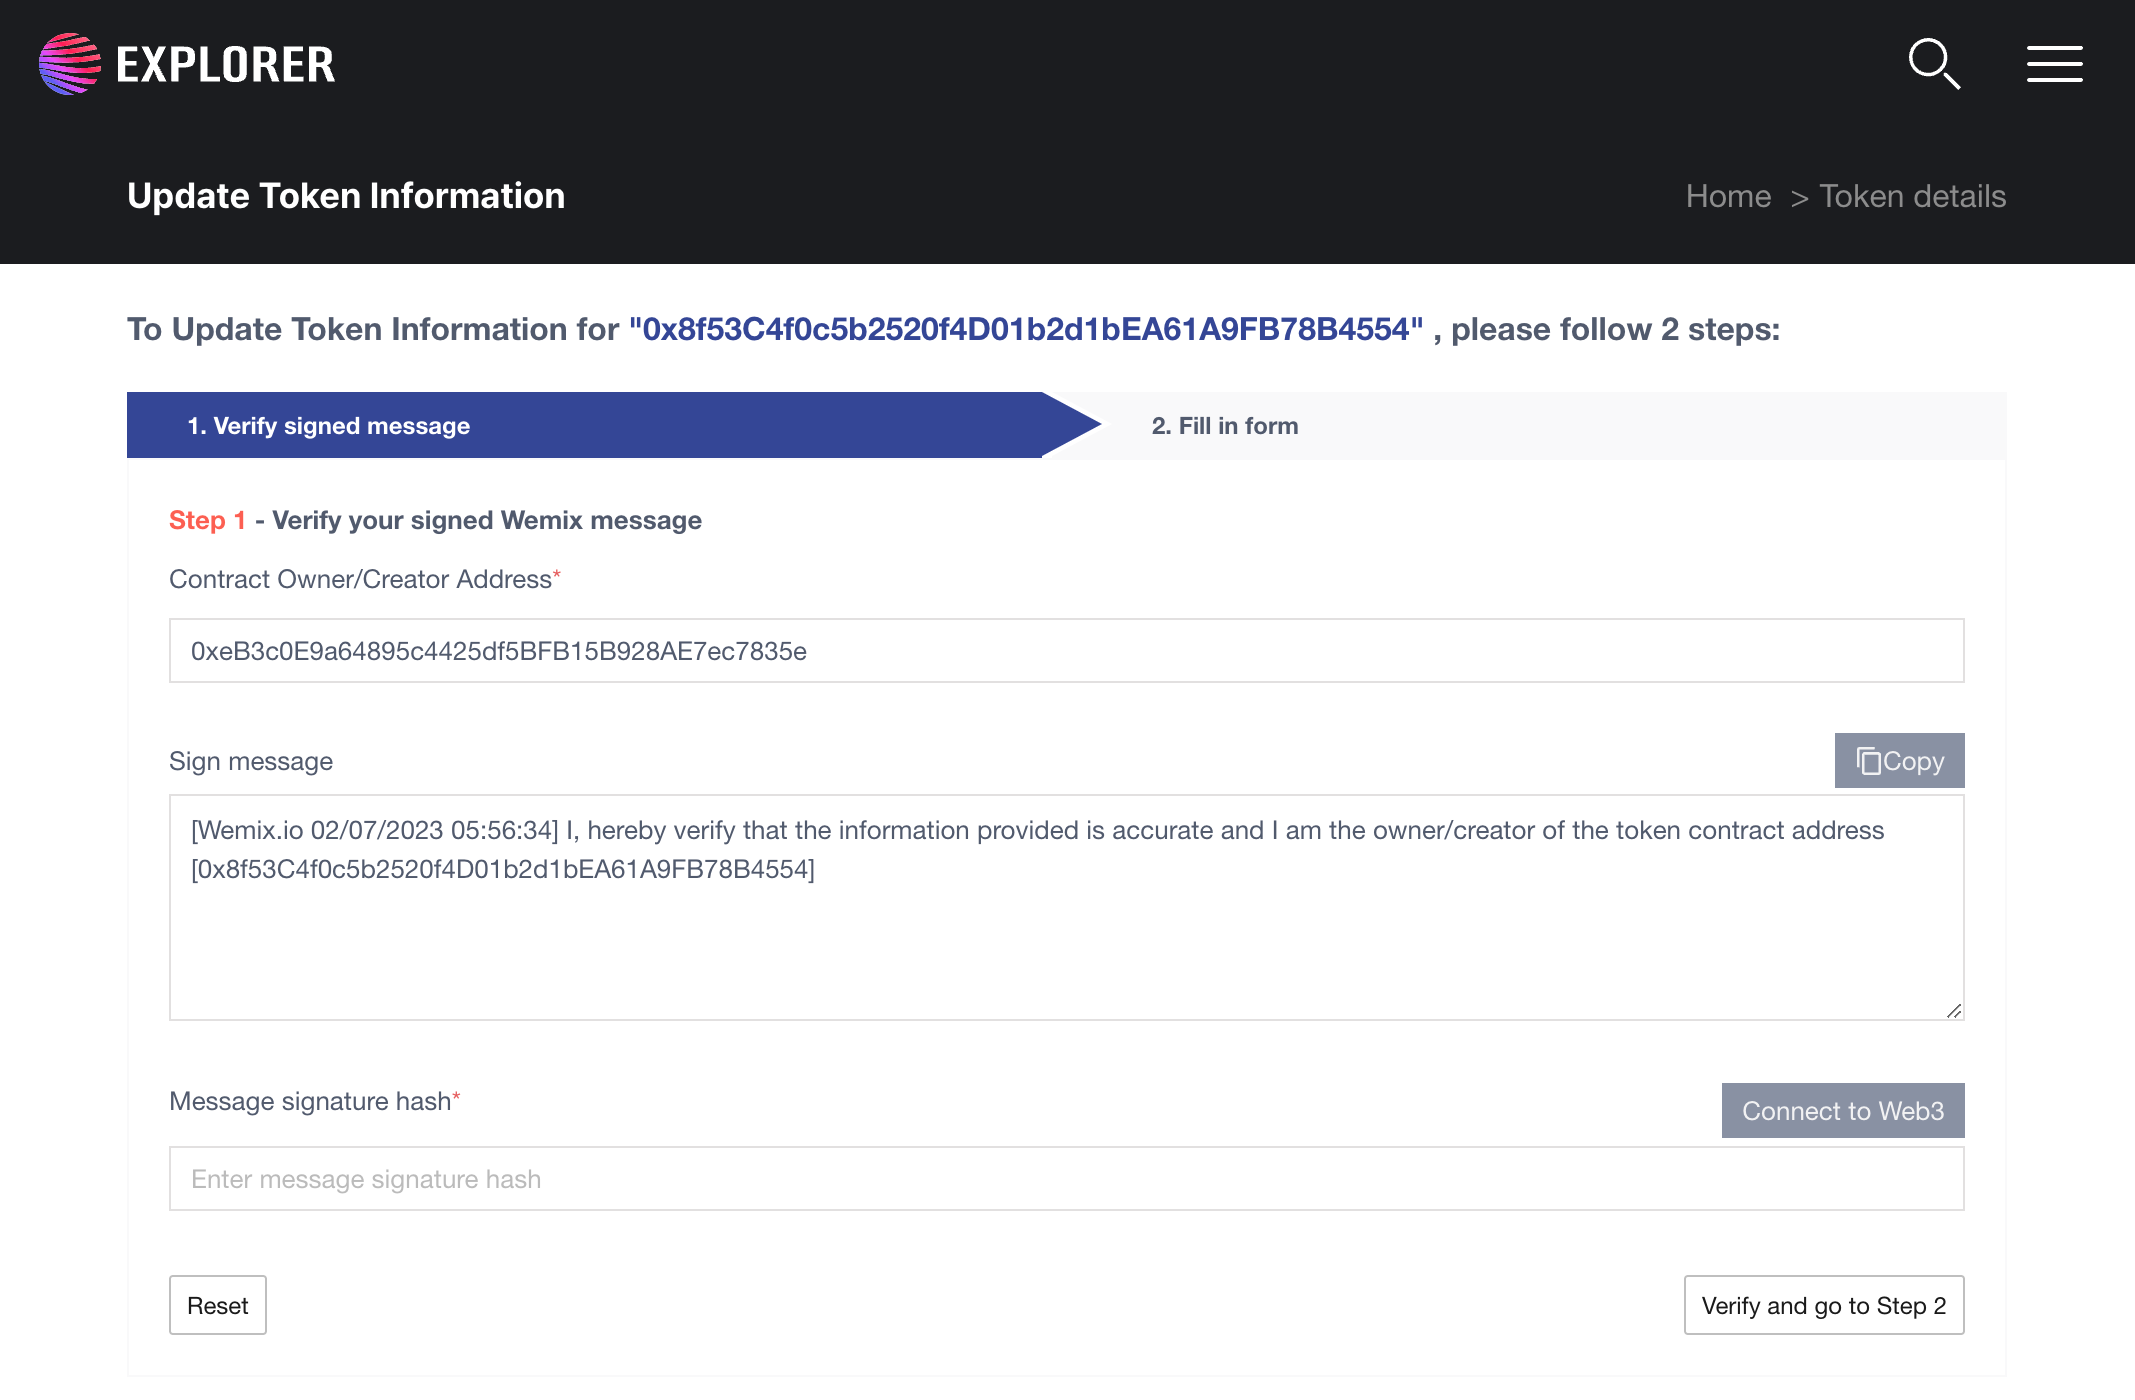
Step 2: If you are contract owner, Web UI will redirect to Step 2 then you must fill your token information in a form. The fields are as follows:
Token's description
Ico Start Date
Ico End Date
Ico USD Price
Official Contact Email
Official Site URL
Link to download a 32x32png icon logo
Link to White paper
Link to CoinMarketCap
Link to Github
Link to Blog
Link to Twitter
Link to Facebook
Link to Reddit
Link to Wechat
Link to Slack
Link to Slack
Link to Telegram
Link to Bitcointalk
Click Submit to save your information on the server.